Dreaming of one mean 4.0: The Build up - Creager's 1992 Sport | Page 10 | Ford Explorer Forums - Serious Explorations

  • Register Today It's free!

Dreaming of one mean 4.0: The Build up - Creager's 1992 Sport

haha, definatly a bit pricey. It was one thing i didnt want to slack on. Simply because of I've gotton used to extremely unreasponsive/kinky steering, which isnt a good thing. With the condition my old one was in, and what happened to a friend of mine recently, yeah... new one please. haha

Rookie rigged up something cutting a bronco shaft to length; that would have been much cheaper, but knowing i got something thats a bit on the overkill side makes me feel better haha.


Join the Elite Explorers for $20 each year.
Elite Explorer members see no advertisements, no banner ads, no double underlined links,.
Add an avatar, upload photo attachments, and more!
.


Update ** May-31

Parts are in! One thing has got me worried, HASTINGS rings? I thought i was getting Sealed Power (federal Mogual), but my machinest said these are a better Moly ring... I did some research and they appear to live up to that. Anyone used HASTINGS before?

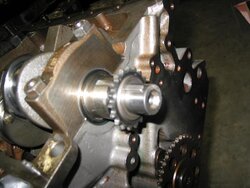
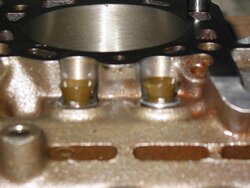
Block is back on the stand, although it appears i might be truckin it back to the machine shop this afternoon. The cam bearings are mis-alighned, partially blocking one of the oil passages, also another bearing is ****ed or something to where the cam cant actually be installed. I can get it in past the first three bearings, but once i get to the forth the cam gets stuck entirly, wont turn or nothing. I had to light pry on it with a crow-bar to pull it out. Cam is fine, bearings are trash now. Obviously there was a mistake made when the bearings were installed so im going to look for some compensation. If its going to take forever, ill buy some new bearings on my own to speed up the process.

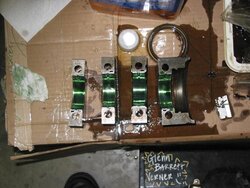
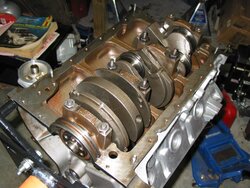
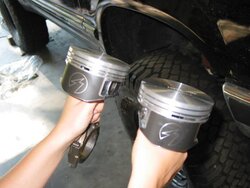
Although, this thing looks badass. I got it painted up and cleaned real nice, i got some pics ill upload later. I got the crank installed, but it looks like thats not going to matter now, hehe i gotta remove it to bring it back to the machine shop. Im probably going to have to buy a new rear-main as i installed mine already, and im going to have to remove it with the crank. Maybe i can reuse it...

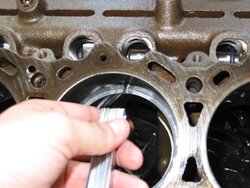
If you are interested, this is how my bearing clearences between the crank and the main bearings look.

Cap 1) <.0015"
Cap 2) <.0015"
Cap 3) <.002"
Cap 4) <.002"

Ford calls for these clearences to be between .0009-.0015" Vanir says .002-.0025," too bad i gotta take it out now haha.


I wouldnt reuse that rear main, they are leak prone enough as it is and its a really cheap part to take a chance on especially with a manual trans.


Hey, thanks for replying man.

Yeah, i'm definatly going to replace it. Infact i forgot i ordered a whole second set of gaskets with my machinest, so i got a spare =)

Here are some pictures of how the block looks. This was last friday when i first got it.
 

Attachments

  • IMG_1297.JPG
    IMG_1297.JPG
    80.3 KB · Views: 1,695
  • IMG_1295.JPG
    IMG_1295.JPG
    75.7 KB · Views: 1,676
  • IMG_1294.JPG
    IMG_1294.JPG
    79.8 KB · Views: 1,681
  • IMG_1293.JPG
    IMG_1293.JPG
    71.1 KB · Views: 1,656


I just dropped it off at the shop. He told me to give him a call around 4 this afternoon, i think he is going to simply try to remove and reinstall the bearing(s).

!!!


Arg, so i picked up the block today. He had me drop the cam off with the block yesterday so he could make sure everything fit right. Well when i went to pick it up he said he put the cam in for me. So i was like ok... he didnt charge me. I took it home and tried turning the cam... crap. Couldnt turn it by hand, so i put the sprocket on there, and it turned a little easier. No binding, so i thought it must be ok...

So i went ahead and cleaned out all the lifter bores and tried out all my lifers... the one i mentioned earlier in the thread, the one where the cap popped off... yeah that one, the insert that seats inside the cap popped out... new lifter. otherwise all the lifters lift and drop in very smooth motion.

After a while i wanted to check the endplay of the cam. So i torqued the trustplate into place and got the dial indicator out. .004", which is right around spec. So i went to go turn the cam again and BIND, tight spot with a jerking noise. asdflksa;jf;alksdj... arg.... The cam bearings are still not right. I tried pulling the cam out a little bit and it was just like before. cam rotates WITH EASE half way in the last bearing, but once you get it in the rest of the way, it doesnt move.

So, im just going to save myself the time and frustration and bring this block somewhere else. Tomorrow im going to make sure the fregging pistons fit right.

...just more wasted time.

But on a happier note, i got a few pics to upload later.


Did the machine shop use a torque plate when they honed the cylinders? I'm really just wondering if most machine shops have those for the 4.0.


I dont know if he did or not, is there a way i could check?

I think those things are more crucial when honing an aluminum block. The 4.0 is cast-iron, but i guess that wouldnt exactly exclude it from cylinders 'twisting' during the honing process. Hrmmm damn rick! got me worried now.


I wouldn't worry about it. The torque plate may help free up a few extra HP, but not using one isn't going to hurt anything. There's really no way to check besides asking him. Actually I guess there is, but it would be a PITA... You would have to either bolt a torque plate or cylinder head to the block and then measure the roundness of the bore. If the bore is straighter with the head or torque plate bolted on then he used it, if it's straighter without the plate he didn't... As I said... PITA! And the variation you would see would be very small numbers.


Wow yah, i guess i might just ask the guy. I dont see it being something that would be too hard to fab up.

Are cams supposed to have some drag on them? or should they bascially free-wheel when installed in the block (with just Wd-40)? The piston-bore clearence checks out, ring-gap is good, and the crank is situated... i just wanna get this cam in and run it! I guess i might haul the block somewhere to get a second opinion, because im not sure. The other day i was dead-set that the guy didnt fix it right. Although today when i went back and cleaned everything up, the jerking noise and the tight spot disappeared. This was immediatly after i removed all the lifters, so maybe its a bad lifer making the noise instead of the cam bearings. The cam still takes a some effort to rotate by hand.


....JUST WD-40?.......

WD-40 is WAY TOO LIGHT of an oil to be assembling a motor with. You MUST use an Assembly Lube. You must coat EVERY FRICTION SURFACE of the Cam and lifters. This means: The lobes, the bearing surfaces, lifter base, and lifter sides.....NEVER, EVER, EVER assemble an engine using JUST WD-40

Ryan


Im only mocking up the peices to check clearnences. Infact, to do this you are supposed to use no oil. WD-40 has worked wonders for keeping the rust away. ATF is awesome for cleaning parts with, aswell as rust prevention.

Bearing guard, Moly Lube, and Lubeplate is what ill be using on various parts when i go for final assembly.

I took the block over to a lil racing engine shop in gastonia NC. I had a guy over there look at the cam, he told me my cam is perfect. He said he puts cams in tighter then that all the time! So i am confident the cam is set. I will be installing the cam with Moly Lube on the lobes, bearing guard on the bearings, and lubeplate on the thrustplate. I will also be reinstalling the crank using bearing guard. If i have time tonight i should beable to start checking the rod-bearing clearnences.


I got your pm and I'll try to send out the files tomorrow if I get a chance.


take your time man, i appreciate it.


attachment.php
]

Here is a pic of one of the mock-ups i did with the crank. As you might be able to see in the pic, the clearence at cap 4 is a little less then .002", which is favorable according to ford. The more the plasti-gauge spreads, the smaller then clearence. I dont have any pics of the rest, but caps 1 & 2 are around .0015".

attachment.php


Cleaning out the block, preparing for the final installation of the crank. I think my flash went out for lunch on this pic, but the red hue looks pretty cool i think. Makes me look like im in a dark room or something.

attachment.php


Nice and clean crank. I made sure to clean all those journals with laqure thinner, and went back and took the blow gun to them.

attachment.php


I submerged all my main bolts, bearings, and caps while i had the block taken apart to get the cam bearings checked out. Keep the rust out! I got my lifters submerged too, hehe.
 

Attachments

  • 060606- 001.jpg
    060606- 001.jpg
    61.5 KB · Views: 2,924
  • 060606- 008.jpg
    060606- 008.jpg
    91.2 KB · Views: 2,909
  • 060606- 011.jpg
    060606- 011.jpg
    48.6 KB · Views: 2,918
  • 060606- 009.jpg
    060606- 009.jpg
    36.3 KB · Views: 2,910


attachment.php


Make sure to clean both sides of this area extra good, as its likely RTV was here from the factory. A bead of RTV is needed to be ran across that crevest, adjacent to the rear main seal. You will notice the 4th main cap has a bevel on that edge, which the RTV is to fill in.

attachment.php


I went and made sure to chase all the main bolts threads to ensure proper torquage.

attachment.php


Here are all the bearings and caps pulled from the deep sea of oil, yummy

attachment.php


And lets get this going! All the main bearings with bearing guard smeared across them.
 

Attachments

  • 060606- 002.jpg
    060606- 002.jpg
    39.2 KB · Views: 2,908
  • 060606- 015.jpg
    060606- 015.jpg
    38.4 KB · Views: 2,898
  • 060606- 016.jpg
    060606- 016.jpg
    43.2 KB · Views: 2,869
  • 060606- 017.jpg
    060606- 017.jpg
    51.6 KB · Views: 2,888


attachment.php


Here is the other half of the main bearings, freshly cleaned with laqure and smeared with bearing guard.

attachment.php


Crank lowered onto the block, finger-placement can be interesting the first couple times you attempt to drop this in.

attachment.php


Aup! im in the dark room again. Here is that bead of RTV i mentioned above, it doesnt need to be super thick, just enough to cover that crevest.

EDIT: I enhanced the picture to where you can see it, i think it came out pretty wicked looking.

attachment.php


Boom, crank torqued down. You want to start from the rear cap, skip cap 3 (for last) and work your way forward; basically you start with cap 4, move to cap 2, then 1, then 3. You want to torque in steps of 10ftlbs all the way up to 70ftlbs.
 

Attachments

  • 060606- 022.jpg
    060606- 022.jpg
    55.8 KB · Views: 2,817
  • 060606- 019.jpg
    060606- 019.jpg
    51.9 KB · Views: 2,847
  • 060606- 018.jpg
    060606- 018.jpg
    54.2 KB · Views: 2,820
  • 060606- 020.jpg
    060606- 020.jpg
    40.8 KB · Views: 2,840


attachment.php


Here is another angle of the crank. As you may notice, my rear-main isnt installed completely yet, i gotta remove the block from the stand if i want to get a even hit with a mallet to drive that sucker in there.


attachment.php


And here is the new problem. Notice how that sprocket has an obstruction in the way, preventing me from removing and replaceing that peice with a new one. Anyone got any ideas on replaceing this?
 

Attachments

  • 060606- 023.jpg
    060606- 023.jpg
    62.5 KB · Views: 2,868
  • 060606- 024.jpg
    060606- 024.jpg
    42.7 KB · Views: 2,842


The lifters!

Here is the mock-up with all the lifters. I wanted to make sure everything moved smoothly with no binding. Its kinda fun to watch these things... ok for like maybe a minute. The one on the very bottom left is the one that needs to be replaced, notice what is different about it, from the others.


I tried to get a series of shots to show the over-lap in the cam. Sorry they are a little blurry, but you should be able to see it. Its not very much, but it definatly does. This leads me to believe the 422 isnt the most wild cam possible for the 4.0, custom cam anyone?

watch when the lifter on the left completely reaches the bottom, and when the lifter on the right starts to raise.
 

Attachments

  • 060606- 005.jpg
    060606- 005.jpg
    49.8 KB · Views: 1,563
  • 060606- 004.jpg
    060606- 004.jpg
    65.7 KB · Views: 1,564
  • 060606- 003.jpg
    060606- 003.jpg
    57.2 KB · Views: 1,551
  • 060606- 006.jpg
    060606- 006.jpg
    118.4 KB · Views: 1,558


Join the Elite Explorers for $20 each year.
Elite Explorer members see no advertisements, no banner ads, no double underlined links,.
Add an avatar, upload photo attachments, and more!
.


1) Ring gap is between .021-.022" for all the cylinders. This particular one was around .021 i believe.

2) Sealed power SOHC pistons

3) ...and uhh, yeah, pistons... hah
 

Attachments

  • 060606- 010.jpg
    060606- 010.jpg
    77.6 KB · Views: 1,547
  • 060606- 012.jpg
    060606- 012.jpg
    114.4 KB · Views: 1,566
  • 060606- 014.jpg
    060606- 014.jpg
    41.6 KB · Views: 1,565


Back
Top