BD's 2000 Explorer Limited | Page 3 | Ford Explorer Forums - Serious Explorations

  • Register Today It's free!

BD's 2000 Explorer Limited

2000 Explorer Limited

-Picked her up (10/13/2010)
-140,093 miles when I test drove it
-5.0 V8, AWD
-Pearl White
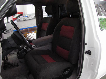
-Dark grey leather interior

My dream explorer basically, no more old ones, no more sports, I finally have an Explorer that I love everything about!

I absolutely love the limited, its got:
-Seats w/ headrests
-Memory power seats
-Heated/Puddle mirrors
-Better mirror without all the buttons, just the slider
-Painted to match bumpers and grille
-Woodgrain radio bezel
-Digital HVAC controls
-And its got the homelink visor with a nifty little voice recorder that I will probably never use LOL

And alot more, but im just in awe over its nice features compared to my previous rides. They even recently (In the past few months) had a brand new hitch installed and the trailer harness all wired up.

I dont have any set plans for this one yet, I do have hopes and dreams though, and im stoked about the V8 that has so many options.

Dream list:
-Torque Monster headers
-Custom Tune
-LED tails (Something custom maybe, I just need to study up on resistors and whatnot)
-BMW projectors in a blacked out housing

It does have a few problems that id like some help with, (Fixed all, besides this one)
1. The blower only works when its on all the way high, (Same thing in my grandam, but it was the blower motor resistor then everything worked great) is that a common problem on the digital HVACs?


"For sure" plans include:
-New rims, id like to get a nice 5-spoke set of 20's with a beefy tire
-Paint job in the spring, black
-Some interior accents (Id like todo another metallic blue color like I did in my grandam)

He was asking 3400$ in the ad, but I talked him and his wife down to 2900$ because I was pointing all the little problems out that I mentioned above.

I didnt get a chance to really take any pictures, as it was raining, and almost dark by the time I got home.

10-13-201011-32-20PM.png


IMG_1254.jpg


IMG_1255.jpg


I was bored on the way home so I took some random "driving" pictures :D

IMG_1252.jpg


My friend was driving my Grand Am in front of me, I have a Avic-F700BT in there that will also be going into the Explorer, he was using the GPS to get us back home

I was extremely happy also, I was averaging 16.2 MPG driving with a decently heavy foot getting the feel for the V8 I was controlling :D

IMG_1251.jpg


Edit- 1/21/11
New parts!

Hubs
Tie rod ends
Lower ball joints
Upper ball joints (Control arms)
Tires: Firestone Destination A/T's 255/70/R16's
Brake Pads

Soon:
Slotted (And drilled maybe) Rotors
Better pads
New shocks
Leafs
Shackles
Amsoil (In everything!)
Rebuilding tranny (And possibly a valve body kit)


Join the Elite Explorers for $20 each year.
Elite Explorer members see no advertisements, no banner ads, no double underlined links,.
Add an avatar, upload photo attachments, and more!
.


The rear wiper gets fluid through a long plastic tube running along the right floor. If you get the pump working for the rear, then it's likely a leak in the tube somewhere. If you replace the rear wiper blade, get the 14" wiper and not the 15" part. The longer blade more often goes off the back and hits the hatch/paint more.


Join the Elite Explorers for $20 each year.
Elite Explorer members see no advertisements, no banner ads, no double underlined links,.
Add an avatar, upload photo attachments, and more!
.


The Autozone book I had said 14 anyways so thats the one I got...thanks for all the help so far! Ive actually been out there this whole time just wiring up my amp/battery/sub/bt mic/gps antenna, and re-VHT'ing my tails.

The night I did them, I got up in the morning and they were completely flat black with like a white haze, they were horrible. I tried polishing them, using rubbing compound, etc nothing worked, so I just spent a good hour wet sanding them and then re-tinted them and theyre smooth as glass and and very glossy:)


Well done, and I should have you work on my stuff. I've been sick most of this week, and the weather has been the best we've had in about a year. Keep going, knock it all out and drive it. Keep that seller(Wade is his name) saved, he turns up new new Ford parts every couple of months. I've run out of room to store so many parts I've bought from him. Regards,


I would love to...I love working on these things (Knock on wood that its voluntary work of course :D)

Yea it seems like EVERYONE has been sick around here, and thank god that I havent gotten anything more than a runny nose for about a week (Knock on wood again!)

Its a little too warm today IMO, but then again, im that person who wears shorts all year round.

IMG_1279.jpg

First fillup :D I was expecting it to be at least 50$ or more

IMG_1276.jpg


IMG_1280.jpg


Final installation (Its a little angled towards the passenger side, which im gonna fix), but I mounted my bass knob on the center console, since I dont have that little pocket under the radio like I used to with my single din.

Theres the BT mic
IMG_1282.jpg


I only have one sub right now, I sold my other one when I got the GrandAm because there was no way in hell it was fitting, I sold it for 300$, (to a close friend) and he's only paid me 100$ so far, so we agreed on 80$ for me to buy it back, I told him he can keep the box, because I found a box at "Tas Electronics" right down in Toledo that has a box probably 3-4 times the size my full box was (When it was 2 15's instead of cut in half for just one)


Simple Green FTW!

I was at work, sitting there bored out of my mind and seen the Simple Green on the rack and decided to buy some and to tackle my engine bay tonight. Well I only had 3 decent sized rags, so I knew I wasnt gonna get much done, but it definitely looks a million times better!

Before:
IMG_1283.jpg

IMG_1284.jpg

IMG_1285.jpg

IMG_1286.jpg

IMG_1288.jpg

IMG_1289.jpg

IMG_1290.jpg


AFTER!
IMG_1291.jpg

IMG_1292.jpg

IMG_1293.jpg

IMG_1295.jpg

IMG_1300.jpg

IMG_1296.jpg

IMG_1297.jpg

IMG_1302.jpg

IMG_1298.jpg


Any ideas what todo with this fella? It just looks pitiful...
IMG_1301.jpg


Browse through Jon's(Turdle's) powder coating thread. He has slicked up many of those intakes, including mine. Pick a color.


Yea but this is my "only" vehicle, I cant take that off and send it out as much as id love to. (I say "only" because the GA is no longer plated, cant afford both :()

Is it possible to remove the "knob" from the shifter? I would love to take that off to put a nice billette handle on there, I know id have to relocate the OD button, but thats no biggie since I never use it.


That shifter is one piece, but likely you could find one from some other Ford that would swap.

Jon may have a spare intake, you should ask him.


Thanks a million Joe Dirt! I got the centercaps today, and she is almost complete (-a new rear bumper :p:)

Looks a million times better man!


Rusty rear bumper... Come on... :p:


Shutup Joe don't remind me :( I was out last night checking out the underbody and pretty much knew there's no reviving that bumper. It's weird there's "normal Michigan" rust on the undercarriage, but then random spots like the bumper and hood rotted through. I'd like to have a rollpan made for it but I have no clue who even sells them.


So last night I spent a good hour at the carwash, the roof on this thing was so neglected, I swear I have reason to believe it has NEVER been washed, it almost looked like a bad gray paint job up there, but it was just all dirt and grime built up, so I scrubbed that, paint looks brand new now, and then I noticed the gas door was filthy so I took my chances and squirted the piss out of that and scrubbed it, thank god she ran fine last night and this morning.

On the way home from school today I had a complete loss of power, luckily I was on the back roads because at stop signs the idle was sporratic (going from normal, dropping to almost stalling) then I went to give it some gas (I was doing about 35 and the engine just completely didnt respond) (Basically died out, but didnt stall) and I let off and kept going the 35 or so. As I went on (3 miles from my house) it got worse and worse, I had a line of cars behind me because I had to basically idle through intersections giving it literally about a centimeters worth of throttle and it was even hesistating at that, so I figured for sure that some water had gotten into the tank, which tells me that I should replace my fuel cap, and probably the filler neck since there was a little rust on that too.

Anywho, Im on the last final stretch before I turn into my neighborhood, and got complete power back, stuttered a little at high RPMs (5+) but had full power back thank god!

I hope thats the last time that ever happens :(


Keep an eye on it, and check the fuel pressure if you can. That is how a pump going out acts sometimes.


Damnit now you got me nervous....How do I check the fuel pressure?


*Edit* Nvm I searched, and found a tutorial but it was a 4.0 Ranger...think it will be simaler?

Thats a good thing to check anywho, seems easy as cake, ill have to give AutoZone a call and see if they rent the gauges


Im heading into work now, I cant find any 5.0 tuts on how to check it but im gonna stop and rent the gauge on the way to work.

What exactly should I be doing with it?

(What should I be checking, and what PSI should I be reading...)


For 99+ Fords, the pressure should be 55-62psi all of the time. There is no vacuum line to disconnect like 98 and older Fords, which are 32-35psi, and 42psi with the vacuum line pulled and plugged.

I've only checked my 99 twice, I had a lean condition with an occasional CEL code for three months before I checked it. The shrader valve in these 99+ Fords is sometimes hard to trigger. The gauge kit needs to have a good deep adapter to reach down into the valve. So select the adapter to use carefully. If you don't get a reading at all, then the adapter isn't the right one.

I had 50-55psi in mine, dropping with the throttle, that was enough to make it lay down at WOT at higher speeds. A new(used) pump solved it, I had a slight leak at the pump rubber hoses. The higher pressure is more likely to find a crack in the hoses. If you ever go into the tank, try not to loosen the hoses if you don't have to. I saw the cracks in the rubber and decided my problem wasn't the pump or the regulator, which is there with it. I swapped the whole pump assembly, and sold the old pump to friend later.


Thanks once again man! I didnt end up getting the test kit, because AutoZone wants 150$ +tax as the deposit to rent it, and I only have about 100$ on me right now. Shes running perfectly again though, I might just hold off until I get my next big check, and drop the 40$ or so to BUY a pressure tester kit. Couldnt hurt to have that in the toolbox :)

How hard was it to replace your pump? If I do have to, ill probably replace as many lines as I can while im down that way lol


The in tank pump is typical for a Ford, don't do it unless you know that's where the problem is. There are two very short rubber high pressure hoses in the tank, from the pump to the outlets nipple. Usually those look great and you would just loosen the one end at the pump etc.

For some odd reason mine had several cracks in the hose surfaces. I'd guess the tank was empty or open for a long long time. I bought my truck wrecked as a rollover in 2005, and finished it in 2007. Bad things happen to an undriven vehicle. Night,


Oh I know about letting vehicles sit haha, but youve been a great help man!


Now...let the train horn installation begin!


Join the Elite Explorers for $20 each year.
Elite Explorer members see no advertisements, no banner ads, no double underlined links,.
Add an avatar, upload photo attachments, and more!
.


Regarding the fuel pump, I have done it twice, I'd consider myself a pro except for the second time was because I forgot to put the strainer on the new pump that went in *facepalm*

I have one suggestion if you discover you HAVE to do it

1. After you disconnect the two large fuel filler lines, lower the rear of the tank just enough to where you can get all the bolts off the 'cap', for lack of better terms, that the fuel pump assembly is attached to, THEN lower the tank the rest of the way and pulling out the fuel pump assembly at the same time. All the while leaving all the fuel delivery/return lines and harness' connected to the top of the cap. They were a PITA to get off/on and the electrical connectors all broke on mine.

I realized I could have just left them all attached and replaced the fuel pump without even disconnecting the 'cap'/fuel pump assembly off the top of the tank.

That job took me 7 hours, 2 bloody knuckles and one ginormous headache start to finish. I really hope you don't have to do it!


Back
Top