-
Performance Upgrades - Maintenance - Modifications - Problem Solving - Off-Road - Street Trucks.
Covering the Explorer, ST, Sport, Lincoln Aviator, Sport Trac,
Mercury Mountaineer, Mazda Navajo, Ford Ranger, Mazda Pickups, and the Aerostar.
Featuring H.I. - Human Intelligence.
Register Today It's free!
- Forums
- Ford Ranger - Mazda B-Series Forum
- Ford Ranger - Mazda B-Series Forum
- Ranger / Mazda Registry
You are using an out of date browser. It may not display this or other websites correctly.
You should upgrade or use an alternative browser.
You should upgrade or use an alternative browser.
Scott B's 93 Ranger XLT V8
- Thread starter Scott B.
- Start date
Elite Explorer members see no advertisements, no banner ads, no double underlined links,.
Add an avatar, upload photo attachments, and more!.
Scott B.
Explorer Addict
- Joined
- February 15, 1999
- Messages
- 2,822
- Reaction score
- 28
- City, State
- GA
- Year, Model & Trim Level
- '93 Ranger XLT
Scott B.
Explorer Addict
- Joined
- February 15, 1999
- Messages
- 2,822
- Reaction score
- 28
- City, State
- GA
- Year, Model & Trim Level
- '93 Ranger XLT
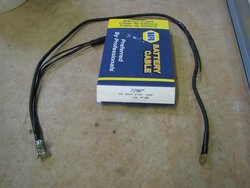
Battery Cables
I've had new battery cables on the shelf, waiting for an opportune moment to install them. I was also planning on replacing the battery connectors with military style ones.
The starter on a 4.0L is on the driver's side - on a 302, it is on the passenger's side. This means the 2 leads need to be lengthened to cross over the engine.
Changing the battery connector ends actually made lengthening the cables a fairly easy task.
Pictures:
- Factory cables
- New factory positive cable assembly
- New aftermarket negative cable assembly
- Modified cables
Attachments


Scott B.
Explorer Addict
- Joined
- February 15, 1999
- Messages
- 2,822
- Reaction score
- 28
- City, State
- GA
- Year, Model & Trim Level
- '93 Ranger XLT
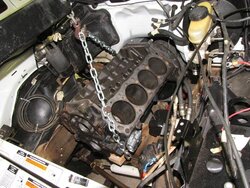
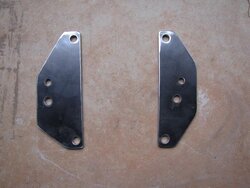
Engine Mounts
Instead of paying $200 for a set of aftermarket engine mounts, I decided to build mounting plates and use factory 4.0L engine mounts. Others have done it in the past, so I figure it will work just fine.
I found one detailed drawing (specifying hole location, etc.) - only one. I thought it best to make my own.
I have a "spare" small block borrowed from the machine shop - that is the one you see in the pictures. I dropped the block into the truck, attached it to the transmission, checked for clearances.
Attachments


Scott B.
Explorer Addict
- Joined
- February 15, 1999
- Messages
- 2,822
- Reaction score
- 28
- City, State
- GA
- Year, Model & Trim Level
- '93 Ranger XLT


mjmcdowell
Active Member
- Joined
- January 18, 2009
- Messages
- 83
- Reaction score
- 0
- City, State
- nys
- Year, Model & Trim Level
- 2009ranger4x4 sport
Scots "new truck"
Scott, lookin good can't wait to see the "transformation" nice fab work. Soooooo when you get a little spare time hows about some sliders for my truck? Michael
Scott, lookin good can't wait to see the "transformation" nice fab work. Soooooo when you get a little spare time hows about some sliders for my truck?
Michaelmjmcdowell
Active Member
- Joined
- January 18, 2009
- Messages
- 83
- Reaction score
- 0
- City, State
- nys
- Year, Model & Trim Level
- 2009ranger4x4 sport
Sliders????
Hmmmm..... Scott, we will have to talk, would rather pay you than someone else... Michael
Hmmmm..... Scott, we will have to talk, would rather pay you than someone else... Michael
Scott B.
Explorer Addict
- Joined
- February 15, 1999
- Messages
- 2,822
- Reaction score
- 28
- City, State
- GA
- Year, Model & Trim Level
- '93 Ranger XLT
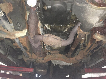
Pulled the Trans again...
I pulled the transmission out again today.
I sprayed undercoating on the top of the transmission tunnel (along the flange that was bent out of the way.) I really don't want that area to rust.
Also, I trimmed the breather tube. As it sat, the breather tube was less than 1/2" from the underside of the body. There was not enough room for a hose. I trimmed about 1/2" off the tube - now, a hose should fit easily. (And, the body will keep it from slipping off!)
Attachments
Scott B.
Explorer Addict
- Joined
- February 15, 1999
- Messages
- 2,822
- Reaction score
- 28
- City, State
- GA
- Year, Model & Trim Level
- '93 Ranger XLT
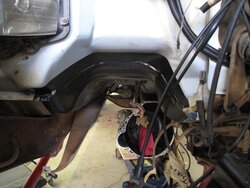
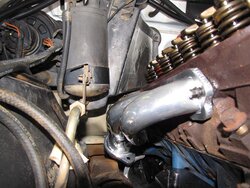
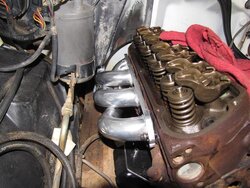
I have decided to raise the engine 1/2".
The oil pan sump interferes with the Rancho TTB pivot bracket. One option is to cut the corner out of the pan - but, the pickup is there as well as a drain plug. Not cutting the oil pan is a good idea.
The EGR fitting on the header is not in a good place. (Mustangs have a different under-hood layout.) I'm not sure if a tight 90 degree fitting will fit under the heater box - I'm sure it won't when I raise the engine.
This particular header has a manufacturing flaw - because of the way the EGR fitting was welded, (sloppily) there are only 3 threads available on the fitting. Not enough for a successful connection. So, I am returning these.
I've been looking at BBK headers - I believe the EGR fitting is in a different place. I should find out tomorrow. If this is the case, I will probably get a set. If not, I am considering getting a set of headers without the EGR fitting, adding my own, then coating them. We shall see.
Attachments
mjmcdowell
Active Member
- Joined
- January 18, 2009
- Messages
- 83
- Reaction score
- 0
- City, State
- nys
- Year, Model & Trim Level
- 2009ranger4x4 sport
Scott's truck transformation...........
YEAH BABY.............!!!!!!!!
YEAH BABY.............!!!!!!!!
Scott B.
Explorer Addict
- Joined
- February 15, 1999
- Messages
- 2,822
- Reaction score
- 28
- City, State
- GA
- Year, Model & Trim Level
- '93 Ranger XLT
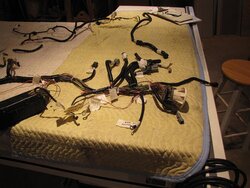
Time for some updates...
I finished separating the engine and chassis wiring harnesses, and reinstalled the chassis harness.
The tagged wires will attach to the new engine harness.
I finished separating the engine and chassis wiring harnesses, and reinstalled the chassis harness.
The tagged wires will attach to the new engine harness.
Attachments


Scott B.
Explorer Addict
- Joined
- February 15, 1999
- Messages
- 2,822
- Reaction score
- 28
- City, State
- GA
- Year, Model & Trim Level
- '93 Ranger XLT

Scott B.
Explorer Addict
- Joined
- February 15, 1999
- Messages
- 2,822
- Reaction score
- 28
- City, State
- GA
- Year, Model & Trim Level
- '93 Ranger XLT

Scott B.
Explorer Addict
- Joined
- February 15, 1999
- Messages
- 2,822
- Reaction score
- 28
- City, State
- GA
- Year, Model & Trim Level
- '93 Ranger XLT

Scott B.
Explorer Addict
- Joined
- February 15, 1999
- Messages
- 2,822
- Reaction score
- 28
- City, State
- GA
- Year, Model & Trim Level
- '93 Ranger XLT
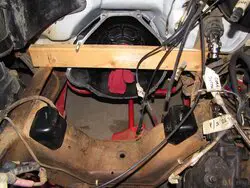
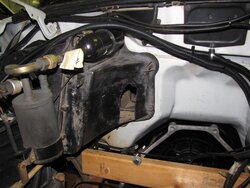
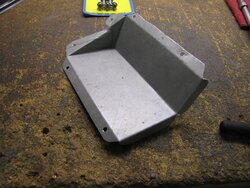
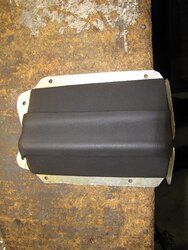
New A/C Relief Plate
As I mentioned earlier, I had to re-do the A/C relief plate.
The pictures show the first part of the process.
First, the new, larger hole I cut around the engine. It was a PITA to get to.
The new plate I built/bent.
At the last minute, I decided to apply some pipe insulation tape to the backside of the aluminum. Hopefully, that will limit the aluminum from drawing cold air out of the box.
The new plate installed. There is a bead of sealer behind the plate. Once that dries, I am going to add a bead on the outside, filling the gaps. Once that dries, I will apply 2 layers of foil tape.
Attachments


Elite Explorer members see no advertisements, no banner ads, no double underlined links,.
Add an avatar, upload photo attachments, and more!.
1 of the last
New Member
- Joined
- February 19, 2012
- Messages
- 3
- Reaction score
- 0
- Year, Model & Trim Level
- 2011 Ranger Sport 4X4
This build is looking great. Thanks for sharing, Scott!
Featured images


Featured images
Similar Threads
- Replies
- 12
- Views
- 9,143
- Replies
- 137
- Views
- 87,613