- Joined
- August 3, 2000
- Messages
- 31,706
- Reaction score
- 8,367
- City, State
- NORTH IDAHO, 7B
- Year, Model & Trim Level
- B2 "Slightly" Modified
- Callsign
- FOURTEN
We are happy you did! Great work!
So it was you. Good man, as always.take note on where some of the shinny spots are for the passengers side. thats where they may have come into contact due to bad motor mounts, or major engine torque.
So it was you. Good man, as always.
“May have” hahahahahahahaha “major engine torque” I love it you had me laughing this am
Pipe Diameter (inches) | Pipe Area (in2) | Total CFM (est.) | Max HP Per Pipe | Max HP For A Dual Pipe System |
1 1/2 | 1.48 | 171 | 78 | 155 |
1 5/8 | 1.77 | 203 | 92 | 185 |
1 3/4 | 2.07 | 239 | 108 | 217 |
2 | 2.76 | 318 | 144 | 289 |
2 1/4 | 3.55 | 408 | 185 | 371 |
2 1/2 | 4.43 | 509 | 232 | 463 |
2 3/4 | 5.41 | 622 | 283 | 566 |
3 | 6.49 | 747 | 339 | 679 |
3 1/4 | 7.67 | 882 | 401 | 802 |
3 1/2 | 8.95 | 1029 | 468 | 935 |
thats exactly how i took that one out. never done it that way, and figured i would try it. couldnt believe how easy it was. also, does your header that you have made come close to the plastics splash shield? you might also want to get as much room as you can between the heater box, and the header. i melted 2 boxes a few years back while tuning the truck (had the timing waaaaaaay out and the heat the headers pumped out was unreal.)Finally had an opportunity to get out in daylight and play around with the headers and do more comparisons.
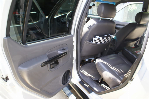
With the heater box out, passenger side TMH installs with minimal issues.
View attachment 447744
View attachment 447745
View attachment 447746
View attachment 447747View attachment 447748
View attachment 447749
Clearance is pretty good all around and spark plug access is fine. With the heater box in, the #4 primary is right along the side of the heat shield.
View attachment 447750
View attachment 447751
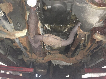
With my passenger header, it's generally a similar story, just tighter everywhere due to the larger tubing.
View attachment 447752
View attachment 447753
View attachment 447754
View attachment 447755
My cylinder #4 primary touches the underside of the heater box heat shield. This was the plan.
View attachment 447756
One thing I decided after this trial fit is that I want to cut off the locking nuts I welded on the exit flange and replace them with normal nuts. It seemed like a good idea, but it's hard enough to get access to the inner bolt, I don't want them to be harder to turn than they need to be.
Thanks! It's definitely a lot of time and effort, but if you want headers and don't want to wait for TMH, it's what must be done. I know I've said it already, but when you consider the labor that goes into these, TMH look like an absolute bargain.Great job! you jumped-in acknowledging a lack of experience and did it! I wouldn't have tried. I may now after your example but probably wont realizing how much time and effort you have put in. I think I will work on better downpipes.
It will come somewhat close but not touch the splash shield. Thankfully the primary sits lower than the plastic part, and the fiber part of the shield bows out in that area for the shock tower.does your header that you have made come close to the plastics splash shield? you might also want to get as much room as you can between the heater box, and the header. i melted 2 boxes a few years back while tuning the truck (had the timing waaaaaaay out and the heat the headers pumped out was unreal.)
This is all great to know! I'm hoping the ceramic coating, wrap, and retaining factory heat shields will be sufficient for thermal management, but we'll see. Adding something to protect the passenger's foot well (at least more wrap around the collector) is a good idea that I would have missed.With the heater box lid off you can simply heat it with a heat gun and re shape it to clear your header
Or hack that part of the box out and replace it with tin/rivets/ fiberglass
You will want some serious heat shielding there either way so your cold air stays cool in summer. Maybe even wrap the header tube where it comes close? A simple tin heat guard with some air gaps can also work wonders.
I have v8 stuffed into bronco ii with a small body drop… I know all about how much heat headers can put off, enough to melt your shoes on the passenger side before I did a bunch of heat shielding inside and out
The forum member that burned holes in his trying to repair a crack needs to talk to you.I'm a pipe welder by trade... If I had a set of TMH on hand, I'd be happy to build headers for the group.