How to: - 5R55E Valve Body Rebuild Diary | Page 3 | Ford Explorer Forums - Serious Explorations

  • Register Today It's free!

How to: 5R55E Valve Body Rebuild Diary

Prefix for threads which are instructional.
Thank you guys for sharing what your experiences have been. Mind you I have *never* rebuilt a 5R55E trannie (though it is very close, VERY close to the A4LD - more bearings and some other upgrades mainly) and I have *never* before rebuilt a 5R55E valve body...though numerous A4LD's... so I am just doing my homework and sharing what I find here. Others who have experiences are invited to join in, a good collaborative thread is valuable. We can share and learn from one another.

I'm with ROE in being a little surprised that FORD didn't use bonded gaskets on all of the upgraded separator plates, but as I think about it I am thinking it was the 98's or newer that were exhibiting the majority of the gasket blowout problems (don't ask me why, it just sticks from somewhere...) so maybe they only did it for the later years - I dunno. I have wondered about the prospect of using spray contact cement on a gasket... aligning it carefully on the VB, pulling it off to allow it to cure then putting in some guide screws (yeah I will be making some of those and show it in the thread) and cementing your own.... seems like overkill... but if it helps.... Just a random thought. Comments ?

Anyway 'Greg S' and 'Runnin on Empty', and Don thanks for your input, keep jumping in if you have anything to add or see something I miss or should cover more thoroughly or clearly. 'Greg S' - PM me on the manual please.

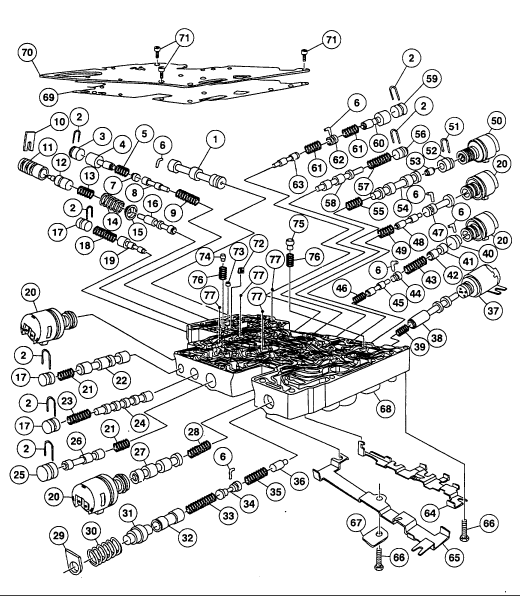
btw. I am going to sell the old Sep plate, modified with the Transgo rivet in hole 50 and with the transgo popoff valve if anyone is interested and just wants to do THAT mod only. PM me.


Join the Elite Explorers for $20 each year.
Elite Explorer members see no advertisements, no banner ads, no double underlined links,.
Add an avatar, upload photo attachments, and more!
.


Chris, have you noticed that most valve body kit instructions make mention of two guide holes for the plate, gaskets, and valve body. Usually there are two holes which should have bolts used with shanks(no threads) to best align the gaskets. That has almost always been the case with the kits that I have installed. I have only helped with one Superior AODE kit, I cannot remember if it mentioned special guide holes.

Those guide holes(when referred to) help greatly to assure that the gaskets are properly aligned. Regards,


Some helpful Diagrams and parts lists

Don I notice the factory manuals prefer the use of guide pins in every case, Can't say the same has been true for correction kits. When you have a valve body right side up on a bench it's pretty easy to be careful and line things up to put the sep plate on the valve body, and even on a bench the valve body on the transmission main body. But, if you were on your back under the vehicle, or the vehicle was on a hoist, it might be more difficult to line up the 2nd gasket between the VB and the main body, making pins more than helpful. Given the problems with the 5R55 gaskets, I think making some and using them (on a non-bonded sep plate) is good insurance. Bonded sep plate.... no biggie.

[Edit] Member Donnie Arbogast was kind enough to upload some diagrams of the VB with parts lists... I'm posting these here as a result of his courtesy, and we owe him a big thanks!

FIRST, THE VB Diagram for the 5R55E

5r55VB.gif


Next the listings for the diagram parts numbering system

5r55partslist.gif

5r55partslist2.gif


The superior kit mentioned using a little vaseline on the gaskest and plates to keep them from moving around which I did. I worked well, and and nothing shifted.


Ford TSB Modification

Vaseline is used all throughout a transmission to hold parts in place. I bought a BIG jar!

Ok, let's look at the FORD TSB Overpressure fix next. I've shown pictures of the little valve they supply. Here's generally what this is all about: You remove what now is a plug in the end of a bore, and replace it with that valve. You remove the EPC relief valve and spring, and the EPC limit filter (the little square thing I showed you in the VB in an early post in this thread). You changeover to a NEW separator plate, and where there USED to be a EPC limit valve hole, it's gone, now solid. (The same thing Transgo accomplishes with a rivet).

So first off, we locate the correct bore, on the end between the manual valve and the Boost Valve...the left most silver plug you see here. (notice that the retainer for the Boost Valve is one of the "H" variety... I wonder why... those are generally used when there is a spring behind them....) anyway, I digress....left most in this pic is our bore

15286DSCN5985-med.JPG


There is one of the new style clip retainers behind it. I use forceps to remove it, most anything will do...

15286DSCN5986-med.JPG


and here it is out

15286DSCN5987-med.JPG


Now the trick is to remove the plug. I used a small screw driver and gently pushed the innards behind the plug in an outward direction until I ran out of an ability to find a place to push (you'll understand what I mean when you do this).. but by then the end was sitting proud of the Valve body...

15286DSCN5988-med.JPG


Here is a better picture of the plug "sitting proud" of the body

15286DSCN5989-med.JPG


I was able to grasp it in the forceps and move it out more, and then once again a chance to use the screwdriver to pry opened up... soon I was able to grasp it with my fingers to remove it

15286DSCN5990-med.JPG


(I know, most photographed fingers on the net.... eat yer hearts out)

[I am going to stop a minute and explain that I am trying to do overlapping mods in the VB. Rather than mix em up, I will do each one as it was intended, alone. What this means, is that I may be back into the same bore to add something from another kit later. You may ask why not do it all while you are there, and the answer is, so that people only wanting to do one, do not get confused.]

Here is the FORD replacement valve, and retainer sitting next to the plug we just removed and it's retainer clip

15286DSCN5991-med.JPG


and another view

15286DSCN5992.JPG


The first step is to replace the plug with this valve. Some time ago I bought some teflon based aerosol "Valve Body Lubricant" at the Aceomatic (Now Axiom) store here in Sacramento (great folks)... and I lube anything and everything I put into a VB, so I lubed it and installed it...first gently into the bore rotating it as I go... this is a CLOSE fit, so be gentle and use your time so you do not **** it in the bore and have to wrestle with it..

15286DSCN5994-med.JPG


Once you have it aligned nicely with the bore, longitudinally, so it slides in more easily and is not ****ed and moving in, slide it all the way in, flush

15286DSCN5996-med.JPG


clip in the new retainer and push it down all the way

15286DSCN59951.JPG


Ok the hardest part is done. Next remove the spring and EPC relief valve nearest the end of the VB you are working on... you know the silver one I dropped when I took the separator plate off. Here is the hole left when you remove them..

15286DSCN5997-med.JPG


and then may as well remove the screen... here is where IT was..

15286DSCN5998-med.JPG


With the addition of the proper separator plate for your application, you are done with the FORD mod. Not too bad.


Sonnax Boost Valve Mod

Lets go ahead as long as we are here and put in the SONNAX boost valve. While I was a big proponent of the Sonnax Boost valve in the A4LD, whether or not it's as big an improvement here is questionable in my mind. No O-rings for one thing. But in the interest of science I bought it and here it is...

15286DSCN5981-med.JPG


Here it is beside the old stock boost valve (removal is this one is quite easy)

15286DSCN5983-med.JPG


Notice the extra ring and hole... anyway, lubricate the new one, put it togther, relube the outside and slide it into the bore against the springs inside, and add the H retainer, and this Mod is done!


Superior Kit Installation

Now I am going to install the Superior kit. Both Superior and Transgo are excellent companies and put out great kits... I flipped a coin and decided to do the Superior first, and for no other reason. I didn't think they overlapped that much ...but I may have been wrong on that... but anyway, let's start with the Superior kit.

I previously showed you the contents.... let's do the VB portion..what I mentioned earlier about being back in the same bore again after doing one MOD will become apparent...ok... where do we start ? Yep, (lol) right back where we just did the FORD EPC limit mod! Superior has a new spool, and they give you a replacement spring, but in their instructions they say that for HD use they recommend you reinstall the FORD factory spring (much heftier spring I might mention) so... with that in mind, I removed the JUST installed FORD blowoff valve, and removed the old spool.... here are the bore contents and the 2 spools side by side:

15286DSCN6002-med.JPG


This one was really easy. I'll skip the reassembly, it is pretty rote.

Next up? Uh huh... the Boost Valve Bore. (yeah I know, we were JUST there too!) Sonnax gives us a different spring to use. They color it green. Here are the appropriate contents. I did not take this completely apart, but if you do, go back and read the A4LD VB Diary about the proper position for the retainer under these springs. it is the same design!

15286DSCN6001-med.JPG


The inner spring is reused. Reassemble, and another easy one is done.

The next one is also very easy, it is the bore right next to the Boost valve on the other side.... the "forward engagement control valve". It gets a new (white) spring... here is the old versus the new side by side...

15286DSCN6003-med.JPG


replace, reassemble and reinstall. easy.

The next MOD in the Superior series I have not done yet, and will save and let whoever wants to buy this VB decide if they want it or not. Ya see, FORD in the 5R55 has a thermostatic control that doesn't let the transmission oil cooler start doing it's job until the fluid has warmed up.

Interesting concept. Might be great in Fairbanks.... maybe unnecessary in Miami. Superior has a piece you add to defeat this. I am skipping it for now.

The last in body MOD from Superior has us replace an mid bore plug

Superior says:

STEP 4 Replace the coast clutch retaining plug with the one supplied.

Note: The OE. Plug may be very hard to remove. [no shjt Sherlock]. We are replacing this plug because it makes a lot of metal [aha!] The best procedure for removing the plug is to use a stiff piece of wire through the slot on the pan side of the valve body. Go through the spring end and push the valve outward. If you are unable to get the plug out, at least clean this area of the valve body very thoroughly.


They are right about the solution being in the back (pan) side... but my little screwdrivers did the trick.... no wire needed...

Here it is apart

15286DSCN6005-med.JPG


The outer spool has nested springs... like so

15286DSCN6006-med.JPG


I should reverse that so as to not confuse anyone.... left to right.

This little plug is a bear to get back in..... because it fits so tightly and has to align just so... be careful, take your time, it will go... do not force it and get it stuck in a ****ed position. Oh and, it goes in small end first. Be careful to capture it with the L retainer at the correct point.

Of the Superior mods, this was the most difficult.

Superior also has you drill the separator plate, and add their electronic "pressure riser", but for "in the guts" this is it.

[LATE BREAKING NEWS - 9/23/05] Sonnax has come out with 2 more mods for the 5R55E Valve body. I'll research them and if able purchase them and show their installation here.


Let's take a break, and for fun check the resistance of the solenoids...

First off the 2 shift solenoids from the bank of 4 solenoids...first one

15286DSCN6009-med.JPG


27 ohms

then the other

15286DSCN6008-med.JPG


also 27 ohms...

Now the EPC

15286DSCN6010-med.JPG


Hmmm 5 ohms... and lastly, the TCC (note the tab on it)

15286DSCN6012-med.JPG


11 ohms.

here are two more shift solenoids left to test, but I think you get idea. (actually the two left are the same solenoid, but one is used as the coast clutch solenoid (CCS).

From the manual:

resistance: SSA,SSB,SSC,CSS 22-48 ohms
EPC 3.1-5.7 ohms
TCC 8.9-16 ohms

So we are in spec. However, all the best advice says if there are significant miles on your EPC, REPLACE IT. I'll price this option out for you.

We are also going to replace the bracket, even though I found no incipient cracks.


The EPC solenoid is high dollar, I paid just over $100 for mine from Ford. The trans shop price was not really any better, so I chose the Ford part. I like to use Ford parts if possible. Regards,


TRANSGO a NO-GO

Thanks Don, I expected something like that.

[Edit: I found that Torrie's price at Ford Parts Network was less than my price from the trans specialty shop, so like DON, bought mine there - OEM.]

Now for the interesting news. Other than the metal extension housing puck, having done what we did with the Superior kit more or less makes the Transgo kit duplicative, or unuseable/unnecessary!

Let me try and explain. Remember the white spring in the Forward Engagement Control Valve bore next to the Boost valve Superior gave us? Transgo gives us the same thing. So duplicative. Remember the bore we put the FORD popoff valve in? and then the Superior Spool? Transgo gives us new springs for the stock valve (won't work with the Superior spool) and a new end plug ...we need to use the FORD popoff there, So that one isn't useable.

Lastly they give us their own version of the popoff valve, but theirs goes into a different bore. Not a lot of sense having two of them, it would seem to me. I'm having kind of the same thoughts about the Superior "Pressure riser".

Now mind you this is not a slam on Transgo at all. You COULD just buy their kit and save the trouble of going the FORD route at all.

So, all I am going to use from the Transgo kit is the aluminum puck for the extension housing lubrication circuit. I need to investigate why they want me to drill the VB, is it to energize their overpressure relief circuit? In which case I do not need to.

So, with all that said... anyone want to get a great deal on a NEW Transgo kit? I have a gasket set to go along with it.


Conclusion

Well, with the exception of making decisions regarding a) drilling my as yet not purchased Sep plate according to Superior's suggestions, and b)drilling the vb according to Transgo's and then letting someone decide if they want a cooler thermostat, I am finished.

CONCERNS and some thoughts (more to be added I am sure)


I have noticed something that is bothering me. As you recall there were 3 check balls? Well all my info suggests that if one of the checkball locaions (which was vacant in our VB) has 2 holes in the separator plate over it, then it needed a checkball. Our sep plate has two (2) holes over a location that was empty. Hmmm.

I'll wait til I see what the new FORD separator plate has, and act accordingly. I bet it also has 2.

Odds and Ends: Valve body to case torque spec is 72-92 INCH pounds. Do it evenly and in maybe 3 or 4 passes. It is important for ALL VB's but especially so for these. No fudging with a foot lb torque wrench!

Invite comments, ideas suggestions and questions.


Take your time with the comparisons. I would like to know what the best route is. I will definately work on more 5R's in the future. I obviously went with what I am familier with, a known quantity. What is the best, is my goal of course.

There was a member here who wanted to sell a 5R55E recently, but it was too much. Hopefully you will come across one sometime soon. Also let me know if you discover any 5R55E specialists, who might know the details that I will need to make my AWD project happen. Regards,


EXCELLENT pics and writeup, Mr Glacier. The mods you've documented should eliminate the infamous 'shifting flare' that these trans are plagued with.

I installed the Ford kit along with the Superior kit several months ago with excellent results; no more 1-2 shift flare, slightly firmer shifts, and an improved rpm spread between gears (This was my first impression on the test drive, that the spacing between shifts was more uniform than before).

I too thought the Superior "Pressure Riser" wasn't necessary with the Ford revised blow-off valve, so I omitted it.

I did use the thermostat bypass spool, and haven't noticed any ill effects from doing so. The trans shifts as well when cool as when warm, although the coldest weather it's been driven in so far was about 30*F.

Sorry I can't add anything as to the check balls, Glacier. I was in a hurry to get it back together, and didn't pay attention to the matching holes in the separator plate.

One suggestion I might add for anyone doing this work, is to trace out the separator plate on a cardboard box, and punch holes for the bolt locations. Then during disassembly, place the bolts in the appropriate holes (just like we used to do with pushrods). Since the bolts are of different lengths, this will make reassembly much quicker.

Also confirm that the gear selector spool is in place when mating the VB back up to the trans. I slipped up on this, and had to remove the VB again to fix it. Luckily I caught it before the pan was on and fluid was added......

This is not a hard project at all, you simply have to pay attention and work as cleanly as possible. So far, my trans has shifted perfectly with absolutely no flares, and I'm happy with the Ford/Superior kit combo. Oh yes, I did add a bottle of Lubegard Red as insurance......

Once again, we should all thank Chris for going to all this time and trouble to document these mods (with excellent pictures) :thumbsup: .


thank you Glacier once again thank you. This now is something i can do instead of paying for. Couple quick questions if you dont mind:

did you pick up the ford kit at a ford dealership or got a part number on it?

do you recommend the ATSG manual as a helper for this or another book (online guides like yours are awsome for the unanswered questons) ?

any special tools required? i have dental picks and small piers i know i need to grab an inch pound torque wrench for this

also you want to decode this from me? i emailed Sonnax about upgrades to make it bulletproof and this was the response:

Hello John
Sorry for the delay in responding, I have been out of the office.
Valve bodies for that unit are prone to quite a few problesm.
Most common would be soft shifts:
37947-01K oem ratio boost valve or 37947-03K increased ratio boost vavle
There also a long list of new items soon to be released.
All of these will require tooling which would be suitable for a shop to purchase for repeat use but no for a one-off job 37947-05K Pressure regulator sleeve kit 37947-07K TCC Modulator valve sleeve kit 37947-09K TCC Regulator Sleeve kit 37947-11K Engagement control kit 37947-33K Coast clutch valve kit.

I am asssuming you are not in the tranny business so I don't think these parts would be the way for you to go. I point them out just so you realize the many problems areas within this valve body. If you have high milage or multiple complaints with your unit, you might want to consider buying a remanufactured valve body from one of the companies who specialize in rebuilding them.
Valve Body Xpress
Ream Man Valve Bodies
Hard Parts for Transmissions.

Information on current parts and soon on the new parts mentioned can be found on our web, if you have not already been ther. www.sonnax.com

Frank Biolsi
Sonnax
Technical Support

with this i assume there is more room for upgrades oh and it only took 2 days for a response back which is good once again very very nice write up i look forward to more thaat you do.


Zhanx - my update kit was in a rebuild kit I purchased - FORD factory kit. But the part number is listed in the TSB I set out in the thread. I suggest you contact Torrie at Ford Parts Network (a site sponsor with links) for pricing and availability on the upgrade and the required separator plate to go along with it, YOU NEED BOTH !!!!! READ the TSB carefully.

(Ought to be about $30 the pair. Make sure you get the right gaskets, if your plate is not a bonded plate.)


one more for the road

ok questions on the part numbers. i delete the parts of the TSB thhat were not need for this :

Glacier991 said:
FORD: 1995-2001 EXPLORER

CAUTION: A NEW SEPARATOR 7Z490 MUST BE USED WHEN INSTALLING THE SPECIAL SERVICE KIT 7M203 OR ADDITIONAL TRANSMISSION DAMAGE MAY OCCUR. REFER TO THE PARTS APPLICATION CHART IN THIS ARTICLE FOR CORRECT SEPARATOR PLATE PART LISTING.

Part Application Chart
Vehicle Application Engineering Description Qty. New Service Part Use on Transmission Application 7000 -Reference Only-

98/00 4.0L - EI Explorer Plate - Valve Body Separator 1 1L5Z-7Z490-GA 98GT-CB/DB; XL2P- EA/FA
ALL MODELS
1995-2002 ALL as Listed Above Valve Body Service Kit 1 3L5Z-7M203-JA ALL

PART NUMBER PART NAME
3L5Z-7M203-JA Valve Body Service Kit

i know i need the following :
3L5Z-7M203-JA Valve Body Service Kit
1L5Z-7Z490-GA Valve Body Separator
which from following along all i should need to fix unless i go wth upgrades. now the question what does the last part 98GT-CB/DB; XL2P- EA/FA stand for or is it just extra ford stuff no need to worry, just order the rebuild kit and the separator plat and call it good

edit: fyi on the ford part network you can search by the oem part numbers and the kits come right up at a price cheaper than the local dealer


[The FORD Parts Network is OEM parts at better than dealer prices. I keep telling everyone to check there! Thanks for the heads up.]

Now as for the rest of your Q, dang, I'm not sure. Wish Eneurb was around to decipher.

Or, you can just buy the transgo kit from me "with gaskets" <g>


pm me a price shipped and wether or not you do pay pal. its the same as the ford kit but i just need the separator plate right? plus a shift too right?


The Transgo IS the shift kit, just also happens to take care of the TSB. And it modifies the VB. So all you need in addition is gaskets. It's what Don used and he was satisfied with it. If you are interrested PM me... might wanna re-read his thoughts on his installation in this thread near the beginning.


Join the Elite Explorers for $20 each year.
Elite Explorer members see no advertisements, no banner ads, no double underlined links,.
Add an avatar, upload photo attachments, and more!
.


ok i am sending you the pm sorry it took so long been busy, btw i installed my transmission remote filter today.. i know i know just because i got it in the mail today doesnt mean i had to put it on. i didn't even use the filter that came with it..but a Fram on it.. i know how much you like fram Glacier991. Anyways.. i installed the filter with a cast on my left hand that sucks and i am left handed.. so for the newbies you know its easy to do.. now just need to get my fan power remot cooler and one of the oil filter cooler fin thingys for the filter and i should never have hight trany temps.. and after this kit is install i should be good for my s/c


Back
Top