-
Ford Explorer Community - Maintenance - Modifications - Performance Upgrades - Problem Solving - Off-Road - Street
Explorer Forum Covers the Explorer ST, Explorer Sport, Explorer Sport Trac, Lincoln Aviator,
Mercury Mountaineer, Mazda Navajo, Ford Ranger, Mazda Pickups, and the Ford Aerostar
Register Today It's free!
You are using an out of date browser. It may not display this or other websites correctly.
You should upgrade or use an alternative browser.
You should upgrade or use an alternative browser.
Fat Cat's 99 SAS
- Thread starter FAT CAT
- Start date
Elite Explorer members see no advertisements, no banner ads, no double underlined links,.
Add an avatar, upload photo attachments, and more!.

- Joined
- January 28, 2000
- Messages
- 19,706
- Reaction score
- 249
- City, State
- Huntington Beach, CA
- Year, Model & Trim Level
- 1991 Eddie
I'm guessing this is why...
This set up is working good for about 30 jeeps done by Willys shop. I didn't trust it at first, but I've seen them take huge abuse & not break.
- Joined
- August 3, 2000
- Messages
- 35,227
- Reaction score
- 12,217
- City, State
- NORTH IDAHO, 7B
- Year, Model & Trim Level
- B2 "Slightly" Modified
- Callsign
- FOURTEN
dude whoa nice friggin build
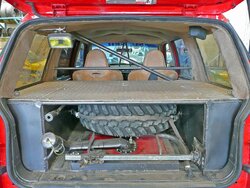
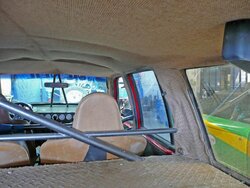
I especially like the cage inside the factory pillars, something I must keep in mind when I do my BII.....
Why dont you have an extra brace on the B pillar for the drivers side?
An X instead of a diagnal only for the passenger?
Just curious
How do you like the Ected front?
Do you still have side curtain airbags in the seats? hehehehe
SkanlaxJMO
Explorer Addict
- Joined
- September 30, 2005
- Messages
- 3,074
- Reaction score
- 4
- City, State
- Syracuse, New York
- Year, Model & Trim Level
- 96 XLT
awesome build
FAT CAT
meaty beaty big & bouncy
- Joined
- July 19, 2004
- Messages
- 686
- Reaction score
- 1
- City, State
- Baja California
- Year, Model & Trim Level
- 99 XLT
dude whoa nice friggin build
I especially like the cage inside the factory pillars, something I must keep in mind when I do my BII.....
Why dont you have an extra brace on the B pillar for the drivers side?
An X instead of a diagnal only for the passenger?
How do you like the Ected front?
Do you still have side curtain airbags in the seats? hehehehe
Most of the cage was modeled after the cage in the McNeils new Explorer prerunner. They have the diagonal support at the C pillar, but I wanted it at the B and flipped it to give myself more seat room.
The Ected in the 44 works great! I really like this locker/limited slip. I had one in the rear, but the new 37's were a bit too much for it. I don't think the front see's the same stress as the back, so I think it will hold up...
I do still have the airbags in the seats, but the airbag lights were flashing so I don't think the system works any more. We removed the passenger airbag all together and now I get a loud 5 tone warning every 30 minutes that repeats 5 times... Anyone know how to kill that bell?
Thanks!
Chris
Attachments
- Joined
- August 3, 2000
- Messages
- 35,227
- Reaction score
- 12,217
- City, State
- NORTH IDAHO, 7B
- Year, Model & Trim Level
- B2 "Slightly" Modified
- Callsign
- FOURTEN
truck is sick as hell, thanks for sharing!!
drool drool
drool drool
- Joined
- August 3, 2000
- Messages
- 35,227
- Reaction score
- 12,217
- City, State
- NORTH IDAHO, 7B
- Year, Model & Trim Level
- B2 "Slightly" Modified
- Callsign
- FOURTEN
I have those headlights on my 96 too, try a seach for black headlights
FAT CAT
meaty beaty big & bouncy
- Joined
- July 19, 2004
- Messages
- 686
- Reaction score
- 1
- City, State
- Baja California
- Year, Model & Trim Level
- 99 XLT
amazing build I love it
where did you pick up those head lights? those are bad ass
Thanks!
I'm pretty sure these are the ones I got...
http://cgi.ebay.com/ebaymotors/95-9...006QQitemZ160146566481QQrdZ1QQsspagenameZWDVW
FAT CAT
meaty beaty big & bouncy
- Joined
- July 19, 2004
- Messages
- 686
- Reaction score
- 1
- City, State
- Baja California
- Year, Model & Trim Level
- 99 XLT
verry cool. hey i like those rear tail light protectors. where can i find??
I got them here;
http://www.aztrucks.com/
They are the Tuffy plastic ones...
Lefy
Well-Known Member
- Joined
- December 13, 2002
- Messages
- 734
- Reaction score
- 2
- City, State
- Westchester, NY
- Year, Model & Trim Level
- 98 Sport 4x4 4.0 SOHC
after alil more oggling over your build
I was wondering if you had a shot of how you set up your rear shocks outside the frame. If you have a few pictures that would help me see whats going on. I've been really thinking about how I could do a different shock set up in the rear. also are you still using the stock ford explorer 8.8 or are you running a full width axle.
thanks for your help
FAT CAT
meaty beaty big & bouncy
- Joined
- July 19, 2004
- Messages
- 686
- Reaction score
- 1
- City, State
- Baja California
- Year, Model & Trim Level
- 99 XLT
after alil more oggling over your build
I was wondering if you had a shot of how you set up your rear shocks outside the frame. If you have a few pictures that would help me see whats going on. I've been really thinking about how I could do a different shock set up in the rear. also are you still using the stock ford explorer 8.8 or are you running a full width axle.
thanks for your help
Hello!
Its still the stock width rear axle.
Here is the thread where I got the outboard shock hoops etc...
http://www.explorerforum.com/forums/showthread.php?t=138090
Thanks!
Chris
- Joined
- January 28, 2000
- Messages
- 19,706
- Reaction score
- 249
- City, State
- Huntington Beach, CA
- Year, Model & Trim Level
- 1991 Eddie
BTW CG -- I didn't notice it but I see you were running Maxxis CCI have yet to try mine out on the rocks but were they are good as people say?
I'm curious too.
")
FAT CAT
meaty beaty big & bouncy
- Joined
- July 19, 2004
- Messages
- 686
- Reaction score
- 1
- City, State
- Baja California
- Year, Model & Trim Level
- 99 XLT
I'm curious too.
Hello!
Man, I loved those tires! They are as great as everyone says, If I had the money I would have bought a set of the 37's.
I found some MT/R's for $800 like new, but I already put a stick through the side wall of one; something I never worried about with the CC's
The guy I sold them to loves them as well, he is running open diff's and people are amazed at the stuff he can climb with them.
The only thing I didn't like about them, was how heavy they were. With steel rims, they were massive. They tore up my ifs front end almost every trip out.
Thanks!
Chris
FAT CAT
meaty beaty big & bouncy
- Joined
- July 19, 2004
- Messages
- 686
- Reaction score
- 1
- City, State
- Baja California
- Year, Model & Trim Level
- 99 XLT
Looks incredible. Far cry from when I first saw it at Truckhaven and you had to take the "easy" way around everything.
Yeah, I remember that was quite the learning experience for me. All the trucks with lockers would just slowly climb around everywhere & I just sat there & dug holes

nice truck! mr fatty fat cat.
Thank you, thank you very much
Did you ever contact McNeils for your front end stuff???
Attachments

Elite Explorer members see no advertisements, no banner ads, no double underlined links,.
Add an avatar, upload photo attachments, and more!.
R.J.
Elite In Memoriam
- Joined
- November 16, 2006
- Messages
- 2,237
- Reaction score
- 214
- City, State
- La Habra Hts, CA
- Year, Model & Trim Level
- 90 Bronco II
yeah i did! made me some radius arms adn now im saving up to get the whole front end done (which is gonna take forever being that i just started college and have three cars in the backyard im trying to fix)
Explorer Features


Explorer Features
Similar threads
- Replies
- 50
- Views
- 13,661
- Replies
- 3
- Views
- 1,449
- Replies
- 28
- Views
- 33,456