Big Red
Well-Known Member
- Joined
- November 4, 2006
- Messages
- 159
- Reaction score
- 0
- City, State
- Richmond, VA
- Year, Model & Trim Level
- '96 XLT 4WD
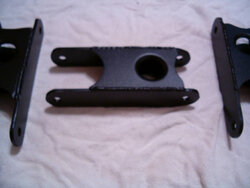
Don't sweat the center brace. It isn't needed if the shackle material is stout enough, and it will actually flex better...
Here's mine...

What did you use that is 'stout enough'? And this might be a stupid question but how tight do you tighten the bolts that go through the leaf spring and the shackle holes? I mean do you let the two sides of the shackle tighten all the way up against the leaf spring? And lastly what kind of bolts did you use because I don't want to use something that won't make it on the trail!