MarineSNiper217
Active Member
- Joined
- February 18, 2007
- Messages
- 96
- Reaction score
- 0
Have you ever seen those cars and trucks at shows with their hoods up and tilted back across the front, so it looks like the hood is actually floating above the engine bay? Well here's how to do it quite simply and VERY cheap, without going to a seller and buying a kit for probably around $100. You can do it yourself, (cost me about $18). You may want some  if you can't lift the hood yourself... Took me about 2 and 1/2 hours for doing it the first time - no help.
I AM NOT LIABLE FOR DAMAGES ASSOCIATED WITH YOUR NOT DOING IT RIGHT, I AM STATING HOW *I* DID IT.
(I did drivers side first, so that's how I'm going to talk in this one)
(Make sure you have two supports holding the front of the hood up)
Materials Needed (what I used)
1. A Ford Explorer
2. 2 strap hinges (8 inches)
3. 9 screws
4. 4 bolts
5. 4 nuts
6. Several wrenches
7. A permanent Marker
8. Tape
9. 4 Sheets of 4x6" metal (I used the stuff more for lumber, has lots of pre-drilled holes! Double them up when I refer to one, it means both)
How To do it (how I did it)
MAKE SURE YOU PROP BOTH SIDES AFTER OPENING, IT *WILL* FALL! lol
1. Open your hood, obviously
2. Pop out those little black clip things holding on the hood liner
3. Remove the hood liner
4. Place a small cloth behind your hood, in between the windshield
5. Grab the bottom of the hood, and keep your hand firmly there
6. Take your wrench with the correct head, and unbolt the hood, top bolt first
7. Slowly let the hood side down on the cloth
8. Place the strap hinge behind the factory hinge
9. Use a permanent marker to mark the OEM bolt holes
10. Use a drill, (preferably a drill press) and drill out the factory size bolt holes.
11. Mount the hood back with the hinge sandwiched between the hood hinge and the hood.
12. Tape the top of the hinge to the hood
13. Lay the metal sheets behind the hinge and across the hood supports (the parts that stick out)
14. Use the permanent marker to outline the hinge location, and screw locations
15. Drill out those spots
16. Drill small, pilot holes in the same locations in your hood supports
17. Screw the strap hinge to the metal sheets
18. Screw the top of the hinge to your hood support
19. Unbolt your OEM bolts on the hood hinge now
20. Using separate, shorter bolts, connect the hood hinge, to the strap hinge, NOT THE HOOD.
21. Bolt those bad boys down tight, and in the factory locations (for proper fit)
22. Remove the clips located in the hood (part the bolt screwed into)
23. Saw off the remainder of the bolt behind it
24. Do the same to the other side of your hood
25. Place hood liner back
26. Put those little black clips back in
27. Remove the hood supports, and slowly let the hood fold down.
28. Check locations of everything and make sure its all nice and good
The only way to have the Explorer hood close normal again, because of those danged hydraulic arms, is to either pull the hood towards you as you close it, or place your hand in the center of the hood and press it down. If you lined the bolts back up to factory spots, the hood should close and look like a stock hood. When you open it, make sure you do from the CENTER, or it will go up off sides and look weird until its up and even. Again, because of the hydraulics. This process took me about 2-3 hours no help.
I am in no way responsible for any damages or ANYTHING associated with this page, so don't blame me if the hood closes and smacks you on the head. If you have any ideas to make this better, let me know!
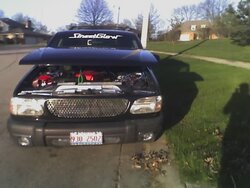
RESULT: When you open your hood, it opens normally, BUT, you can then grab the top, and fold it down (It wants to fall on its own because its so heavy, get a support). Your hood liner actually hides the hinges about 98%, when its up normal you wouldn't even see them. When it folds down, it slightly bends the hood liner, but only a little-no creases) Perfect for car shows, or just someone who wants to show off. This is the first day I have had it, and already I have received comments from just about everyone in my school! The stock hood latch on the hood, actually rests on your radiator cover thing, so it is already supported.
if you can't lift the hood yourself... Took me about 2 and 1/2 hours for doing it the first time - no help.I AM NOT LIABLE FOR DAMAGES ASSOCIATED WITH YOUR NOT DOING IT RIGHT, I AM STATING HOW *I* DID IT.
(I did drivers side first, so that's how I'm going to talk in this one)
(Make sure you have two supports holding the front of the hood up)
Materials Needed (what I used)
1. A Ford Explorer
2. 2 strap hinges (8 inches)
3. 9 screws
4. 4 bolts
5. 4 nuts
6. Several wrenches
7. A permanent Marker
8. Tape
9. 4 Sheets of 4x6" metal (I used the stuff more for lumber, has lots of pre-drilled holes! Double them up when I refer to one, it means both)
How To do it (how I did it)
MAKE SURE YOU PROP BOTH SIDES AFTER OPENING, IT *WILL* FALL! lol
1. Open your hood, obviously
2. Pop out those little black clip things holding on the hood liner
3. Remove the hood liner
4. Place a small cloth behind your hood, in between the windshield
5. Grab the bottom of the hood, and keep your hand firmly there
6. Take your wrench with the correct head, and unbolt the hood, top bolt first
7. Slowly let the hood side down on the cloth
8. Place the strap hinge behind the factory hinge
9. Use a permanent marker to mark the OEM bolt holes
10. Use a drill, (preferably a drill press) and drill out the factory size bolt holes.
11. Mount the hood back with the hinge sandwiched between the hood hinge and the hood.
12. Tape the top of the hinge to the hood
13. Lay the metal sheets behind the hinge and across the hood supports (the parts that stick out)
14. Use the permanent marker to outline the hinge location, and screw locations
15. Drill out those spots
16. Drill small, pilot holes in the same locations in your hood supports
17. Screw the strap hinge to the metal sheets
18. Screw the top of the hinge to your hood support
19. Unbolt your OEM bolts on the hood hinge now
20. Using separate, shorter bolts, connect the hood hinge, to the strap hinge, NOT THE HOOD.
21. Bolt those bad boys down tight, and in the factory locations (for proper fit)
22. Remove the clips located in the hood (part the bolt screwed into)
23. Saw off the remainder of the bolt behind it
24. Do the same to the other side of your hood
25. Place hood liner back
26. Put those little black clips back in
27. Remove the hood supports, and slowly let the hood fold down.
28. Check locations of everything and make sure its all nice and good
The only way to have the Explorer hood close normal again, because of those danged hydraulic arms, is to either pull the hood towards you as you close it, or place your hand in the center of the hood and press it down. If you lined the bolts back up to factory spots, the hood should close and look like a stock hood. When you open it, make sure you do from the CENTER, or it will go up off sides and look weird until its up and even. Again, because of the hydraulics. This process took me about 2-3 hours no help.
I am in no way responsible for any damages or ANYTHING associated with this page, so don't blame me if the hood closes and smacks you on the head. If you have any ideas to make this better, let me know!
RESULT: When you open your hood, it opens normally, BUT, you can then grab the top, and fold it down (It wants to fall on its own because its so heavy, get a support). Your hood liner actually hides the hinges about 98%, when its up normal you wouldn't even see them. When it folds down, it slightly bends the hood liner, but only a little-no creases) Perfect for car shows, or just someone who wants to show off. This is the first day I have had it, and already I have received comments from just about everyone in my school! The stock hood latch on the hood, actually rests on your radiator cover thing, so it is already supported.