Completed Project - Kirby's 1991 Ranger Build Up | Page 40 | Ford Explorer Forums - Serious Explorations

  • Register Today It's free!

Completed Project Kirby's 1991 Ranger Build Up

Use this prefix for completed projects that are not "How to" articles or threads asking for help.
I haven't posted much here since I sold my 1993 Mazda Navajo around 2010 or 2011. It was 10 years in the making and finally to a solid, reliable state. I had some other priorities and decided to sell it and get something more versatile. I will include some pictures below of its developing states and final state when I sold it below. In the end, it had 37" MTRs, Arb front, detroit rear, 4.56 gears, D and D doubler and I built all the armor and the Dana 44 front Solid Axle Swap.

James duff 3.5" VR coil lift, 235" defender tires and a home made heavy ugly bumper (around 2000 when I bought it) :
Before.jpg


2001 with 33x10.50s and James duff 4.5" lift with extended radius arms, manual hubs and new auto tranny:
33sand4inch.jpg

Here it is just after the SAS with 34s and a swapped in manual tcase and tranny:

864825-R1-044-20A.jpg


Winching out of Mikeys hot tub circa 2002 or so

Tub.jpg


Stuck on a tree just after 37s
DCFC0209.jpg


37s, winch bumper rebuild etc
IMG_0388.jpg


Final State Explorerforum moab trip 2010

IMG_2875.jpg


IMG_2930.jpg


MoabMay2010217.jpg


Last Poser Shots
IMG_3625.jpg


IMG_3617.jpg


I hear it still gets around Colorado and Utah and I have had buddies call me with airings from time to time.

I have had a few rangers and one explorer since I sold my explorer.
Here are some pics of those:

Beat up 1994 Ranger 2.4l ($250)
IMG_1339.jpg


Traded 1993 Ranger 4.0l and an abused auto tranny

IMG_1594.jpg


1991 Manual Tcase and Tranny Explorer Sport

IMG_4973.jpg


We have also had a ton of cool Jeeps. Here are a couple of pics, along with our current Jeep which we are hanging on to:

2005 unlimited Rubicon Sahara 5.7 L Hemi
IMG_3981.jpg

IMG_3980.jpg


2005 unlimited Rubicon 35s and 4" lift
IMG_1196.jpg


Our Current 2005 Unlimited Rubicon 4" Lift 315 Kevlars
IMG_1369.jpg


It does great grocery getter, family truckster, and occasional wekend wheeler, but I need a truck and I miss my exploder, so I decided to build a Ranger. However, I want to build it a little different this time.

I have always wanted to build a 1989-1992 ranger, so I spent a considerable amount of time looking for a low mile one with the right engine, tranny and tcase in good shape. 4.0l, m5od and 1354M stock. My explorer ended up with this combo, but started out as an auto tranny and tcase. This made for a ton of modifications and headaches with my explorer. Rangers can be had in many other undesirable configurations because they were available with 3 different v6s in 1989-92 and a 4cylinder. It proved to be a difficult task. Finally in the fall of 2012 I picked this one up. A 1991 4.0l manual tranny and transfer case 4x4 extended cab "mountain States Edition. It had 130k on it and ran great. The paint was toast, it had a rusty bed and (my biggest complaint) it had no factory air.

IMG_2624.jpg


I drove it for a year until I was ready to have it painted. I fixed a bunch on it- thermostat, muffler, wheel bearings, brakes, had a new headliner installed, etc. When I got a quote for the paint (one solid color and fix the dings) it was 2k. So then I started thinking I better look for a different ranger to build! I settled on this one. It too is a 1991, it has air (huge plus after not having it in my other truck all summer), manual case and tranny and everything else and a 4.0. The body is really straight no rust and the interior is super nice. The odo read 83k and I believed it.
IMG_2956.jpg


Since then I tracked down the original and only owner to find it has 183 k on it and they were all hwy miles. The only complaints I have is I wish it had the other mirrors and pop out extended cab windows. I can deal with those, though. This truck has been taken care of.

First order of business was a tune up, brakes and leaky valve cover gaskets.

The build plan is pretty simple: build it similar to how my explorer ended up, with out all the half builds in between. It took me a lot of work and money to get my explorer to preform well off-road and on the street and be reliable. On this one I want to skip all the poor performing, cheapskate half steps I took with the explorer.

My goal is to end up with a reliable, daily drive able, off-road capable ranger that will make a great driver, great work truck and great expo vehicle. I like the idea of a truck over a explorer sport because I need to haul dirt bikes and Sheetrock and plywood and all kinds of stuff all the time so I always needed a pickup when I had the explorer even though I wanted to drive the explorer all the time. Hopefully this will do both functions well.

So far, I have installed:

A blue tooth pioneer stereo (replacing the stock tape deck)
IMG_2957.jpg


A optima yellow top
IMG_2958.jpg


A Black grill and headlight bezels along with new headlights:
IMG_2961.jpg


The only body work it needs is the topper it had on it was put on with a loose and poorly placed clamp that rubbed a hole in the bed cap. I will weld it up and hopefully add a LineX bedliner over the top
IMG_2962.jpg


I purchased a Dana 44 out of a 76 f150 with no guts or outers for a $50 bill. I still have my spare warn premium hubs off my ex, and I plan to build this one stout before I put it in and leave it full width but move the c bushings in about 2" per side. I will likely then run stock style f150 wheels with stock backspacing and 35s or 37s as skinny as I can find. It will get a full rebuild and at least 4.88s, maybe 5.13s. I am not decided on radius arms yet. I suppose extended ones are on the bill instead of the stock wristed ones I had before, but I haven't sorted that out yet. The wrist traveled fine but it clunked and made a racket and it was also a pain to get out and pull the pin when it was time to wheel. Extended arms won't perform quite as well on the street as the stock length ones did with the pin in, but longer arms should stream line things.

For the rear I will rebuild a full width late model 31 spline 8.8 put of a bronco or f150 and install explorer disk brakes. I will likely need to have the axle flanges turned down and drill the rotors for the new bolt pattern.

I will extend the wheel base around 3" by moving the front axle forward and leave the rear axle centered in the wheel well. I plan to leave the bed size stock as I need the truck to haul stuff all the time. I will build bumpers and sliders before I beat it up this time.

Stay Tuned, I am picking up the front axle tomorrow.


Join the Elite Explorers for $20 each year.
Elite Explorer members see no advertisements, no banner ads, no double underlined links,.
Add an avatar, upload photo attachments, and more!
.


I've bought cylinder heads that had the valve spring retainer installed incorrectly. That is easy to overlook and would keep a valve from fully closing.
That may have been the thing. IDK. Looked fine to me before and looked the same after the machine shop messed with them

The ranger came home tonight. Still have a couple things to do that I will work on next week. Needs the AC charged. Was going to do that but I was short an adapter. Also needs the brake lines fixed. On the front- the two rubber lines are cracked. Figure I better address it before it becomes a big problem. Also needs an alignment.


Thanks @BKennedy and @Paul. After all the money and time I have in it, I could have a pretty decent used raptor or power wagon. But I like my ranger more so its all good. Hoping for another 300k miles.

On monday I have an appointment with Rhino liner. I am going to have them coat the roof and fix some warranty issues in the bed. I was never able to sort the roof leak with my body guy and I got the privilege of doing his funeral last spring. Covid got him. He was a really great dude and a talented craftsman. MY only option left is to rhino the roof. Then I can put back in my head liner and interior trim. My kid is going to park in the garage this winter so I need my ranger sealed up tight.

Lastly, Autozone refunded my lifter purchase. all $437 of it in cash. Thats pretty stand up of them.


Join the Elite Explorers for $20 each year.
Elite Explorer members see no advertisements, no banner ads, no double underlined links,.
Add an avatar, upload photo attachments, and more!
.


Are the valves still clicking on start up?

I used to get valve/lifter/rocker clatter on start up all the time. I get it less when using Castrol Magnetic oil. It also eliminated the knock I got on start up with the RV's 8.1 after it sits for more than two weeks.

I buy a three pack of one gallon jugs off Amazon. I can do the yearly oil changes on the Explorer and RV with enough leftover to keep them topped off for the year. Explorer has pan and main seal leaks but never drips on the floor, RV burns about a quart every 2,000 miles (been doing it since it was new, known issue with the 8.1).
Nope. No noise. I am almost to 100 miles. Praying it stays that way. Going to drive it this week and change oil next weekend.


wow rhino line the roof that should be cool! Interesting to see how you do that I guess there will be a line where rhino meets paint at the A pillars and B pillars, Rhino liner can be installed pretty dang thick!
I cant believe the roof leak cannot be found? I have heard of interior shops using a fog machine to find cab/seal leaks before

So glad shes back in operation! A smooth running 4.0 can outlive us now that we are not 20 anymore :)


I used soapy water and compressed air and it definitely is the gutter area. My body guy couldn’t sort how to fix it- but it is getting surface rusty now and since he has passed I don’t think it would be economical to have some other body guy work on it- so I think rhino will be a good solution.


kill that rust first!!


Got that done tonight. Thanks for the encouragement.

took the gutters down to raw metal:

Gutter 1.jpg
Gutter 2.jpg
Gutter 3.jpg


I guess all of them have this seam under the gutter. I thought maybe it has had a roof skin at some point in its life- but I the underside looks factory and it is pinch welded. I just can't believe they are built this way. No wonder it leaks! Can anyone confirm this is factory?

My body guy said he scraped out all the old. That wasn't true. The reason it was leaking is because old seam sealer was in there and it was rusting a little underneath.


Next I painted it with some rust converter primer. Should be good to go for the rhino folks tomorrow. They have some warranty work to do too on the bed.

Gutter 4.jpg


I also installed the new throttle body. It seems to run better. Smoother. There is a sticker on it that says dont clean it. I can see where the butterfly is coated with a coating to make it fit really tight. The original one my dad cleaned- he thought it was grime and took it all off. Lol. Hold it up to the light and you can see all the way around the butterfly!


interesting about the throttle body!!
my rain gutters used to look like that until. they rusted away
Yes looks factory nice work man!!


I had a little time today to work on the Ranger. It was my day off and it was kind of cold outside. I probably should have done something else, but I wanted to work on the ranger in my dads garage.

First off, I replaced the rear window with another from a junk yard. The rubber was beginning to dry rot and I found one at the junk yard that had a topper and the rubber was in good shape. I installed it with 3m Window Weld butyl tape. I read on here this was how the factory installed them. Before I used some 1/4" weather strip. I am hoping this, along with the roof coat will fix it. I think the roof doesn't look half bad! The Rhino liner place also used the harder version of their coating this time. they said it would be better for uv fading and also tougher. My bed had a ton of scratches and chips and they warrantied it by going over it with the tougher stuff. So far, so good. Looks more like Linex to me- but if it lasts well and is tougher than I am ok with it.

New Roof.jpg

I also installed new front brake lines and bled the brakes. The old ones were cracked in a couple spots. Got these Raybestos RockAuto specials. I have seen some questions about SAS brake lines recently, so I figured I would document how I did mine too.

I can't remember what the middle line is- I think maybe an f150 rear line? Ill have to research that. The two outers are both for a 1977 f150. I had to shorten the passenger hard line a little and use a different end to fit the explorer center line- had to do a double flare too.

I made the mounts on the arms from some little rubber mounts I got at ace hardware.

Brake Lines.jpg
Brake Lines 2.jpg
Brake Lines 3.jpg
Brake Lines 4.jpg
Brake Lines 5.jpg
Brake Lines 6.jpg


I also charged the ac and worked on the idle a little. I did the procedure someone attached- @donalds I think- it worked out ok. It does idle lower. I think the limitation is my throttle cable was shortened to take up the stretch that it really won't go any lower. I also tweaked the TPS until it was reading correctly.

It just doesn't quite idle correctly yet. It seems to hang a little high with clutch in or in neutral until I come to a stop. I am really tempted to try a Aircharge Temp sensor- because that is the only one I didn't swap.

I also installed the headliner and that is really nice to have again. No leaks so far- I think it may be fixed.


I have a little oil drip. I thought maybe the intake didn't seal well last time- because it kind of appeared since the first few miles- but i checked it over good and it isn't that or the valve covers. I think maybe it is the rear main. It has definately slowed, so I am going to keep an eye on it. I used the new ford seal with a sleeve and a driver- so I thought my rear main leaks were over. Maybe that was just a silly thought.


One other thing- I got a radiator from rock auto. It is leaking. No warranty. Lasted since the paint. Ugh. I think Autozone will get my money on the next one and a lifetime warranty. When I change it I will also change the oil. I am at about 700 total miles. 600 since the last oil change.


post #232- used a 94 f150 rear line for the center line.


roof came out awesome!!

oil leak can be valve cover or oil filter mount, those leaks can appear to be rear main sometimes

Where is the radiator leaking from?

Getting there! Now you can drive the sucker again!! woooooohoooooo!!!


Everything is dry except between the engine and tranny down low. Checked everything really close last night. My only hope is that when I ran it without valve covers it pooled up somewhere and is still working its way out. I read somewhere that the dipstick holes are different on the early and late blocks so I gave been watching that but it is dry. It 100% is leaking less than it did a week ago- so I attribute that to oil pooling up. I thought last time it might be the low oil sensor or the oil filter mount last week- but yesterday they were dry. I also had some drips on oil pan bolts so I thought that might be it. Anyway, feels a little lazy but I am going to keep an eye on it.

The radiator is leaking on the tank seam on the lower driver side. I ordered a Murray one from orielly last night. The other parts stores had their house brands- that was the only one I recognized. $120 with a coupon and a lifetime warranty. Last one I hope to need.

It’s been a riot to drive again. The low first second and third are really close ratio and they are fun to row through. I haven’t gotten it much past 3k rpm, so I am feeling confident after the oil change I can really open her up and rally some dirt roads.


I noticed an odd but again familiar clunk the other day.

IMG_2808.jpg


Stupid shock problems again!

My new remote Resi fox Shocks are 20.9 compressed and 35.020 extended

My old fox shocks were 19.7 compressed and 31.82 extended.

3 more inches of droop and that isnt enough I guess...


Looked like plenty on the lift with everything unloaded from the front end. I must jump my truck more than most. I dont know. I think I am going to have to limit strap the front. The driveshaft really can't take this much droop- so maybe that is why it is on the passenger side. I dont know why limit straps bother me so much! I just need to do it. Going to see about getting a new end from fox. Might put the old shock in when I order that. Seems dumb to put the old one back on and break it again.


Also- headliner has stayed dry! Stoked to have that issue resolved.


Does the shock contact the radius arm anywhere but at the mount? When I had a Superlift the shocks would contact the radius arms, but the body was down.

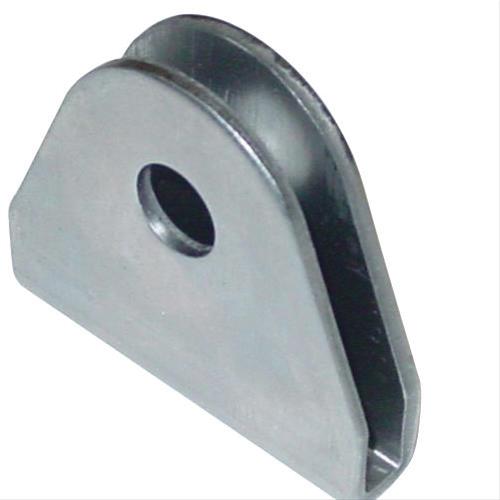
Limit straps are cheaper than shocks. I used tabs like these welded to a plate where your coil springs are located, but you could weld them just inside the shocks on the radius arms.
For the upper mounts, I used tabs with a 3/16" spacer under them welded directly to the frame. I then used the tab as a guide and drilled a 1/2" hole through the frame. Instant double sheer tab. Unload the suspension, then order straps that are 1" shorter than the distance between the two mounting tabs. Don't order any eBay or Amazon crap. Get them from a supplier like WFO or RuffStuff.
You can see both tabs in this picture.
20221205_112148.jpg


It looks like at full droop the shaft bound and snapped. It's fixable. Let me know if you want to rebuild it. We can get a new shaft from Fox, and rebuild it.


Thanks @Stic-o. The threads on the shaft are fine- thankfully. On the eyelet they are a little stripped. Luckily the eyelet is softer than the shaft and easier to replace. I am hoping to get a new eyelet from fox. I asked about getting a price and the sales lady didn't call me back. They also have a tool for holding the shaft.
Shock.jpg


@BKennedy they don't contact anything but the mounts. Of course, the mounts move in a curve due to the radius arm's curve. so at ride height they are vertical, when drooped, they cycle the bushings one way, then the other when stuffed.

I dont think it is the mounts. This has now done this with bilstiens, with the non resi foxs and now with the remote rest foxs. I think they must be over extending the shocks. I ran it pretty hard while hunting, could have caught air even.
Hunting.jpg
Pretty loaded on the way there and back. Unfortunately, I got some custom pin striping too.


Well, you built it to use it. Those higher speed dirt roads are harder on a vehicle than just about anything.


I have been working with fox to get the correct parts. They sent me some eyelets that ended up being threaded too small for my shocks. They have been kind and diligent to get me the correct parts. In the mean time, I have been running around with 3 shocks and found a good spot to flex and measure last night. Urban wheeling. Ha.

Fully extended on articulation, the side without the shock comes to 32” at the most. I wasn’t lifting a tire- so I really think it would go a little further- but I can’t see 3” further. They only thing I can think is that I got air born and the weight went down to 35”.

E4A63640-74C3-4BE9-BC37-8F33CA2BA497.jpeg


I also realized I have some death wobble and it is due to some really worn tie rod ends. I guess I could grease them more. When I ordered them I also ordered some parts to put the 12” fox shocks in the rear outboard. I think there is plenty of room after last nights session.
CF6BB6EF-CD9B-4EA4-AAB3-FB5D9F95C441.jpeg


A little something like this:

61534D05-397D-46A4-B389-B953987C0E34.jpeg
0CFA545A-FF84-4683-9ED1-1A7BDC202702.jpeg


Join the Elite Explorers for $20 each year.
Elite Explorer members see no advertisements, no banner ads, no double underlined links,.
Add an avatar, upload photo attachments, and more!
.


I would say the compression is set up just about perfect.
C0180ACC-6D05-4151-9A42-0FEDF619B974.jpeg


It could use some air bumps.


Back
Top