How to: - My A4LD Rebuild Diary - Part 3 - Reassembly | Page 4 | Ford Explorer Forums - Serious Explorations

  • Register Today It's free!

How to: My A4LD Rebuild Diary - Part 3 - Reassembly

Prefix for threads which are instructional.
Bands

A few thoughts on bands. Not a lot of choice here, the low reverse band is cast iron and should last a long time. The intermediate and OD band are single wrap and identical. Until 92 the OD was "double wrap". Let's compare

15286Dscn4702-med.jpg


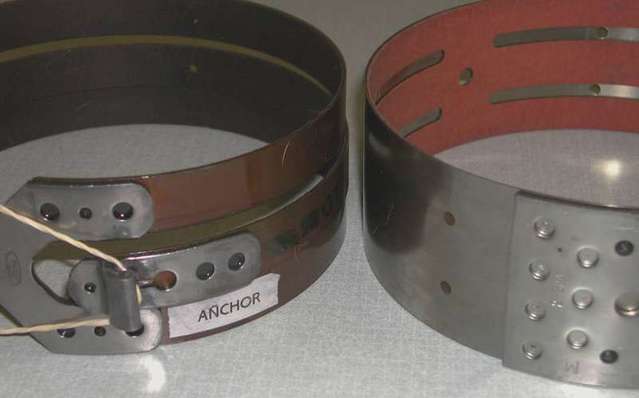
The old double wrap is on the left. Notice I markedthe "anchor" side in case I ever wanted to reuse it. Here's a closer look. Side width is the same...

15286Dscn4701-med.jpg


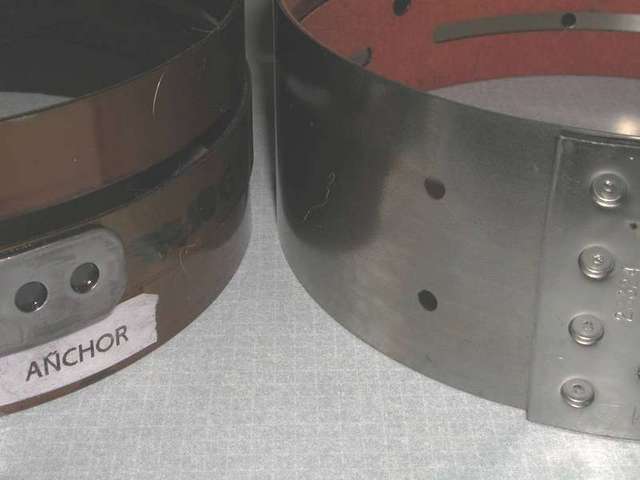
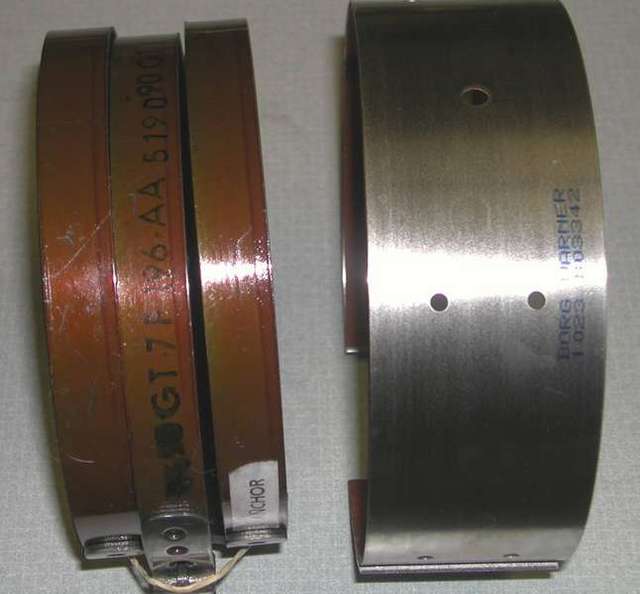
Somehow the double wrap band seems less "strong" to my uneducated eye. In any event FORD left it in 1992. Here is what I mean:

15286Dscn4703-med.jpg


Coming up in this post... band adjustment screws and locknuts.


Join the Elite Explorers for $20 each year.
Elite Explorer members see no advertisements, no banner ads, no double underlined links,.
Add an avatar, upload photo attachments, and more!
.


I see you got Borg-Warner Frictions for the bands...since friction material can be so important to the longevity of the tranny, maybe we should take notes on thicknesses and compare. I'd be willing to do the same on whatever brand I end up getting.

Great writeup on the servos, levers, and bands...keep up the good work Glacier!!


Brain... gonna be tough to measure the friction materials accurately but will do my best. I think you overestimate friction material loss on a properly adjusted transmission, but we shall see. Thank you(!) for your kind words, in something as long running as this now and then it's nice to know someone is getting something out of it.

The ground down rear race was to be pressed on today...(my next press is a 20 ton! - word of advice, don't buy anything less!) so next week once again starts assembly time. I hope to get some pics of the Omega shop here in Sacramento (bellhousing turning) and what he does. He's pricier than the other guy in the SouthEast, but since he is local and one of two known places to get the belllhousing bushing turned in place, I'd like to show what he does. Turning that babbit bushing in place is a critical item in my view.

There is going to be a delay in getting the OD apply lever ("A" instead of "C" - FORD only), but I should get it put back together up to the center support, and show how to make your own DIY rear clearance measuring tool (It's all done just waiting to post it). I think for some the pump adjustment will be a critical component. I have the OTC tools and think I should work out a rental (eg. postage and handling and security deposit) arrangement so people who want to rebuild themselves can use factory tools to set up the front pump properly). (no DIY tools here). We should be getting this all put back together soon. Patience, Stay tuned.


GOOD NEWS! The ground rear race has been successfully pressed onto the "snout" in the case. SO I am back in business. Need to machine the case rear governor bore and do a few other things on this case (like scotchbrite all the servo bores etc), but at least I can get back into the assembly business.

After all this do I still believe in the rear race kit from Sonnax? Absolutely, it fixes a major weak point in my view - still - but MEASURE and GRIND the race first! Isn't difficult to do. So once again the thread moves forward! Sorry for the delay - post 4th we'll finish this baby off!


Nooooooooooooooooooooooooooooooooooooooooooooooooooooooooooooooooooooooooooooooooooooooooooooooooooooooooooooooooooooooooooooooooooooooooooooooooooooooooooooooooooooooooooooooooooooooooooooooooooooooooooooooooooooooo......i thought this was going to go all the way to the end..to the instalation....oh well, at least it covered what i needed to know about the 1-2 shift governer. Concider me an interested reader on this fine bunch of threads, keep up the great work!!!


I got my clutch compressor today and it worked great on tearing down the clutch packs...$30 well spent (tool + shipping).


Back to work

Ok please forgive me... life.... gets in the way. ANYWAY.

Time to gauge the rear case clearance. Manuals say to use the OTC tool. Tough to find (I am lucky enough to have it) but guess what, you can make your own! This post will show you how, and also give me a chance to rejoice on making the new rear case bushing work! (see earlier posts on my trials and tribulations).

Ok to start... you have to put the rear case assemblies into the case (shown earlier in this thread and will be covered in detail later) and then measure from where the case center support would go. Here is the factory (OTC) gauge, and the home made one, side by side...

15286Dscn4747-med.jpg


and anther pic

15286Dscn4750-med.jpg


The home made one is exactly 6-3/4 inches long with slight rounded corners. It is made from 3/4 inch pine.... You will see where to drill the holes when you use it.... (above the measurement points....which will depend on whether you stay with a #4 washer or go to a #5 bearing... more later). The factory gauge is exactly .700 thick. The home made will vary based in the mill that made the lumber. So I measured at each set of holes.... and marked it accordingly....

15286Dscn4748-med.jpg


and the other end

15286Dscn4749-med.jpg


So here is the Factory gauge inside the case on the "sill" or "ledge" for the center support

15286Dscn4751-med.jpg


And here is the measurement at the upper end being taken..this is for the latest version of the A4LD with a bearing, instead of washer... called number 5, as opposed to the number 4 washer. This needs the upgraded center support. (also let me remind you - again and again - this is not super exact stuff. a couple/few thou either way is way within tolerance for accuracy..)

15286Dscn4753-med.jpg


and the reading is....

15286Dscn4754-med.jpg


Minus .700 equals 1.789... now we take another measurement on the opposite side

15286Dscn4755-med.jpg


and we get

15286Dscn4756-med.jpg


minus .700 equals 1.792.... average around 1.790/1.791... from the chart in the manuals we need a number 5 select bearing number F3TZ-7C096-D... (4 notches on this one.)

Ok so what if we DON'T have the factory tool? Let's try our home made one...

In the case..

15286Dscn4759-med.jpg


And a measurment taken

15286Dscn4758-med.jpg


result obtained is

15286Dscn4760-med.jpg


minus .760 (on this set of holes) equals 1.788... in the interest of space and time the other side was close and I came out 1.790 average. Remember the range here for end play is .004 to .024 - for a 20 thou window.... home made is GOOD enough. Hope this little demo helped.

Next step? get the selective bearing and assemble the guts up to the front pump.. stay tuned


Rear case thrust Bearing

We decided which one we needed. Not cheap -$25. Here's what $25 gets you

15286Dscn4764-med.jpg


remember these are "selective" so thereare diferent sizes. Ours is identified by 4 notches.... here it is at the center support point where it will live

15286Dscn4767-med.jpg


When I bought the new style support I thought they hadn't pressed the race all the way on. Now I realize why i looked that way, see the extended race?
15286Dscn4766-med.jpg


well it completely encloses the installed torrington bearing

15286Dscn4768-med.jpg


which as you can see, when installed sits slightly "proud" of the race
15286Dscn4769-med.jpg


The new style center support has bearings, not washers, on BOTH SIDES. Pricey devils.... here they are

15286Dscn4774-med.jpg


Next up... brand new center support - gets a mod.


Center Support Sleeve Mod

The new center support is going to get a sleeve to support the OD unit (discussed earlier). Sonnax makes this. Here is the bushing sleeve which will be added

15286Dscn4770-med.jpg


Here is the installation tool....with the sleeve on it

15286Dscn4772-med.jpg


Oriented so holes line up, and waiting to be pressed in.. yes I used red locktite! If you do this be sure to "support" the center support on the opposite side with a large or socket or something, DO NOT PRESS DOWN ON THE EXTENDED RACE alone or you will damage the center support !

15286Dscn4775-med.jpg


And installed! Mod complete, notice torrington bearing (to OD drum). The new model center support is machined to keep this centered and in place.

15286Dscn4777-med.jpg


Well I have it all back together - up to the front pump. I am going to need a #1 selective to set the front clearance, and, as luck would have it, need to find a band anchor for a single wrap band... forgot the anchor was for double wrap. Anyone want a double wrap OD band anchor - for postage?

I took a gazillion pics and will work on them and getting them posted with text. I think I'll start another additional thread so you don't have to wade thru what you already saw if you are a regular reader (sufferer) of this series.

Now for some fun at my expense. To start with I can put the guts in an A4LD faster than anyone you know. Why? Cuz I have done it 3 times today!

First. Built the case to the front pump... the realized I hadn't put the governor body in first.... which meant taking EVERYTHING out cuz the output shaft HAS to go through the governor body!

Then redid it.... to the pump. Was very pleased with my speed. THEN I sawthe rear planetary sittin there on the workbench. Shjt. Everything out to the reverse drum, and back in. under 15 mins. Am I good (and stupid) or what? I have learned a few little tricks I'll share, so my idiot moments will not be wasted.

So. Ok my hands are dirty and I'm just like everyone else reading this. We have our days! (I'll offer a lame excuse....I was up til 1 am helping a buddy replace his AC system on a Vanagon converted with an Audi engine..mechanical work done at midnight..finished the evacuation at 1 sharp!...then recharged it.. so I was tired today! [editors note - AND STUPID].

New thread, part 3, section two - Assembly, coming up. Thanks for stayin with me.


regroup bump


Well, I ended up getting Borg-Warner bands as well (both single wrap), and I noticed something kind of interesting. I had ordered two, but they only had one in stock, so my order was split into two. The first band I picked up looked exactly like the one Glacier got (friction material being light tan orangish in color). When I got the second order in, I noticed the band was a little different. It had 5R55 in big letters on the outside of the band and had a darker friction material. So I pulled out both bands and stuck a micrometer and a balance to both of them to find the differences.

Here's what I found:
Light: .061" total thickness, .019 metal, .042 friction, 229.5 grams
Dark: .068 total thickness, .024 metal, .044 friction, 256.5 grams

Now, that might not seem like much of a difference, but the dark one has almost 5% more friction material, over 26% thicker metal for the band, and over 11% more mass. I'm of the mind (and I think I've made this clear) that, barring other failures, the friction material dictates how long a transmission lasts. If a normal one makes it 100K miles with your driving style, this could add almost 5K miles of life to the tranny. If you get 200K, you could get and extra 10K miles out of it.

But another interesting thing is that the added mass helps to sink the heat created when the band is applied. After all, there are two ways the heat travels...into the band and into the drum. I also have to think that having an extra thick band could help alleviate any anchor pull-through problems that might happen.

This is significant to me because Frankentranny will have a solid OD drum from a 5R55E, and I'm going to be using a larger diameter servo (also from the 5R55E -> the cover has a code of ZC instead of AB or BB), which will put more stress on the band and rivets holding the band anchors onto the metal band. The larger servo will put almost 20% more force and stress on the band than the stock servo. :eek: I'm going to order another band (so I'll have one left over) just to try to get another of the heavier type. So 26% thicker metal to handle 20% more force...seems reasonable to me.


Brain - were the part numbers the same and/or this was a running production change? or were they different? If so what was the number on the 5R band? If it is a direct swap for the A4 and 4R bands it might be a worthwhile upgrade. The friction material in trannie using the 5R plates is already from both the A4/4R AND the 5R (TC A4/4R, bands A4/4R and plates 5R), so I'm not worried about the ATF - it'll be a synthetic, covering both transmissions. After all, as near as I can tell the changeover from Mercon to MerconV was in part to deal with the new friction materials being used in the 5R - or does anyone have a better explaination for that?


Both were recieved from TranStar (nice guys there BTW), and they both had the same TranStar part number listed on the box, but the bands themselves had different strings of characters on them. They are the same length, width, and the anchor plates look very similar (the dark one had deeper rivets to get through more metal).

Here's the printed info for the lighter one:
TranStar label (outside of box): B27320H 8/25/04 10755BW
Printed on the band: Borg Warner 1659 C04048

Here's the printed info for the heavier and darker one:
TranStar label (outside of box): B27320H 8/30/04 16223BW
Printed on the band: Borg Warner 0444 A04208
Printed in much larger letters on band: 5R55-V57452HX-5R55

I'm not sure if this is a different part # or a running change, but it is the band that is listed from TranStar for "BAND INTERMEDIATE C3/A4LD 74UP". I was thinking that the parts sometimes have a date code when they are direct printed like they are, so maybe the C04048 means August 04 of '04 and the A04208 means August 20 of '04, but then I looked back at the printing on your band and figured that's not it.


Back
Top