How to: - My A4LD Rebuild Diary - Part 3 - Reassembly | Page 2 | Ford Explorer Forums - Serious Explorations

  • Register Today It's free!

How to: My A4LD Rebuild Diary - Part 3 - Reassembly

Prefix for threads which are instructional.
Ok time to start putting parts back in. I am going to need to make some measurements for select fit bearings, and also am still fussing with the input shaft bushing. I don't like the clearance and may replace it - so I am sort of "dry assembing this" at this point. That means for those still reading, if there is something you want to see more clearly, holler and on the second go around I'll try and highlight it.

The first thing in (onto the new race) is the rear sprag or rear one way clutch, different names for the same thing. Most books omit a CRITICAL point. If it is ONE way, WHAT WAY SHOULD IT TURN WHEN INSTALLED? The answer is clockwise, so when you reach in and are installing it, do so with a clockwise rotation

15286Dscn4610-med.jpg


I've added an arrow (crude as it is) to demonstrate this:

15286Dscn4609A-med.jpg


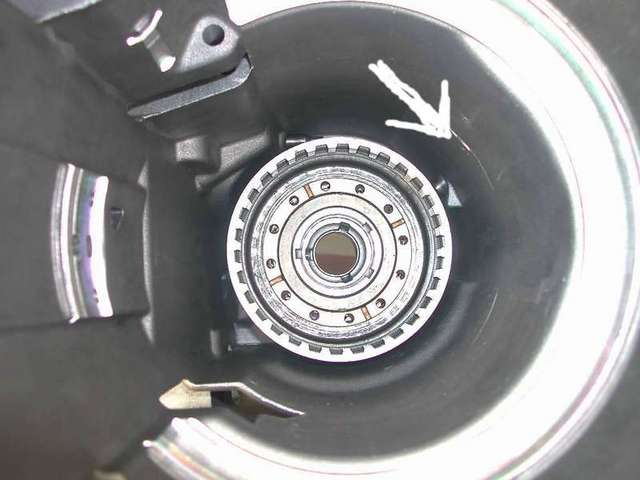
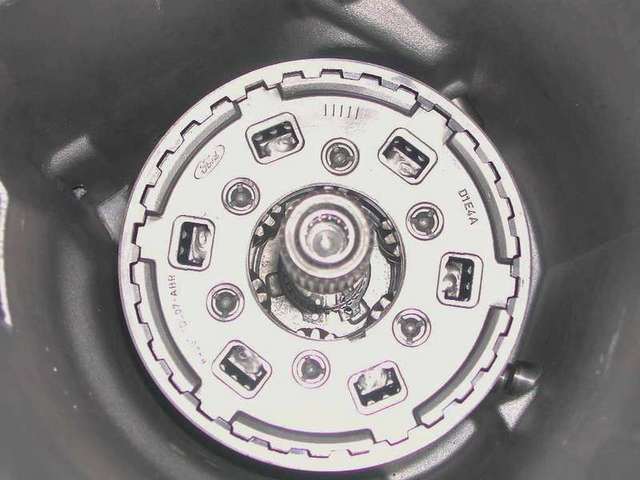
If you look at the center area (I call it the "snout") you will see that there are two sets of three indents. The outer one (with irregularly spaces) is where the tangs on a thrust washer go. Here that washer is installed, you can see the tangs have engaged the little slots.

15286Dscn4612-med.jpg


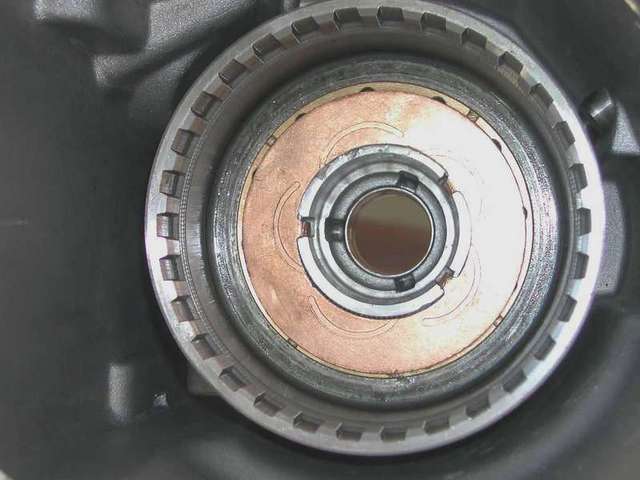
This rides against the back of the output shaft ring gear. That in turn splines thru the output shaft, so I slid the output shaft in thru the case bushing in, and put the ring gear on top of it:

15286Dscn46141-med.jpg


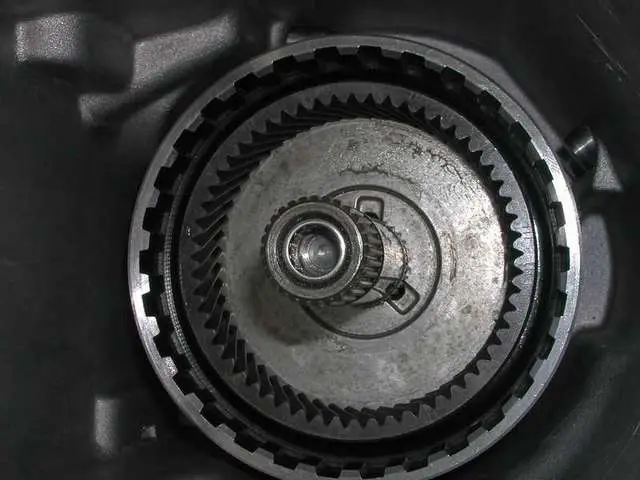
Now you add the NEW snap ring. Since I will be taking this apart I reused the old one, but in the final final, it will be a new one. On top of this there is an oil dam for the 4.0 (improves rear planetary oiling) and for now I am leaving that off. I'll show that on the final assembly. Here's the ring gear, snap ringed into place. That also holds the shaft in the case from now on.

15286Dscn46151-med.jpg


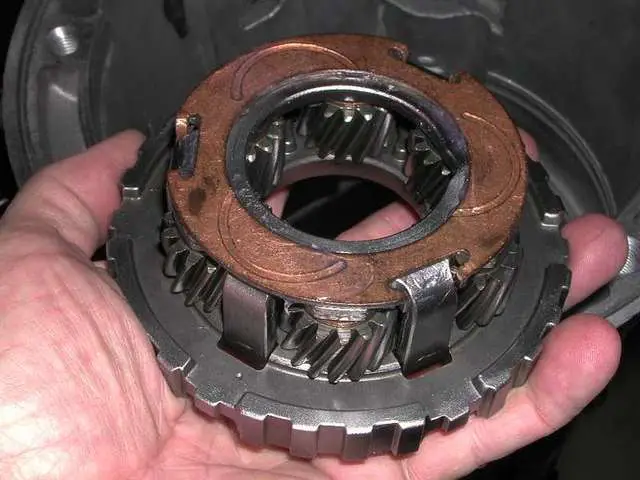
Next the rear planetary. Make sure you have a steel 6 pinion version. My old one was crumped, so this on is brand new. A thrust washer clings to the back with 6 prongs, like so:

15286Dscn46161-med.jpg


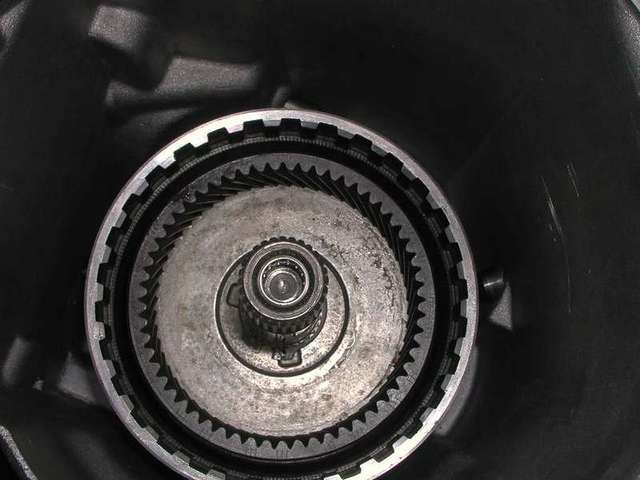
Insert this into the ring gear, and you have a complete (sans front thrust washer) rear one way clutch installed. (Have a beer)

15286Dscn4617-med.jpg


Join the Elite Explorers for $20 each year.
Elite Explorer members see no advertisements, no banner ads, no double underlined links,.
Add an avatar, upload photo attachments, and more!
.


Ok, we left off looking at the front side of the rear planetary. Seemed to be a tough call to find the right thrust washer, but I managed finally, and here it is installed.

15286Dscn4633-med.jpg


The rear shell with the planetry gear slides into the rear planetary and the washer on the planetary rides on the bck of the shell, shown here

15286Dscn4634-med.jpg


The intermediate drum, and the rear shell mate together to form a unit of a fixed length. (The forward drum is inside, along with 2 sets of clutches and the forward planetary - this puppy is HEAVY !

15286Dscn4636-med.jpg


You know it is together right when the tabs and slots mate us so...

15286Dscn4637-med.jpg


This is the business end of the intermediate drum... where the center support enters. There are two possible selective locations here. (where washer or bearing of a predetermined thickness adjusts rear case half end play) Up top for a thrust washer (#4) or down inside for a bearing (#5).Arrows show the locations (ignore the messed up part of this pic.)

15286Dscn4638-med.jpg


I'll go into more detail, but this measurement is, at the moment, my problem. More to come.


the Sonnax Boost Valve pics have been added to the valve body section.

Ok, a VERY brief discussion of some tools needed for reassembly. We need to measure end play - both for the rear part of the transmission behind the center support, as well as the forward OD portion. You need a gauge bar,or an old center support you an drill.... or, you can make one of your own, I'll show you in another post. You also need something capable of measuring depth. A Caliper works fine (and can be picked up for about $20 these days) ad of course a depth micrometer is "perfect" (but you don't really need it if you have caliper. Here's the tools I decribe:


15286Dscn4641-med.jpg


The gauge bar rests on a ledge in the case where the center support goes. You measure down thru the slot to the points you want, and subtract the thickness .700)for afinal measurement. You compare that to a chart and find the thickness of washer or bearing you want. Here's the "official" FORD gauge bar.

15286Dscn4643-med.jpg


I'll add to this and show them in use. (Stay tuned)


some of the pics are broken for me? Does it do this to anyone else?


NO it IS broke. An entire page of pictures in the gallery I link to disappeared. I will reload them. Sorry.

Thurs 6 pm Pacific... missing pics back in....

Finished dry assembly to where I meaasure for the rear case select fit bearing (determines end play for rear half of the case, behind the center support) . Guess what? even using the thinnest select fit bearing or washer (there are 2 places you can go to) I am too tall. e.g. positive number, not a space. I'm working on it now, but the rear case upgrade, which was a problem.... may be to blame. I really love that rear case fix though, and now am exploring alternatives.... stay tuned. Worst case fix ? New case... noooooooo. [This mix and match is a real ***** in upgrading - but someone has to do it]


The Spring compressor above is made by K-D tools, P/N KD2398.
Price ranges from $140 to as low as $80.
sjdiscounttools.com


Ok I'll come back and edit and post some pics showing what I am talking about, but, as you read above, I ran into problems with inadequate rear case assembled clearances. The rear case race replacement is the culprit... it never did install "FLUSH" with what I call the snout. Proud by maybe .030 to .050 (haven't measured it yet). That took up all my available clearance, and now am about .030 lacking. After thinking long and hard about WHERE I might remove some material to make my clearance come back into whack, I have two places in mind. First is in the brass rings in the rear sprag (remember those pics, comparing to stock?) I could take out .030 there (or .015 on each) and doubt it would be missed - they are thrust spacers, and all brass. The second place is at the center support I can thin the width of the aluminum support outer rim (where the snap ring rests) by turning it in a lathe to get the fit I need. More pics and details on this "work around" coming soon. Thanks for your patience. Ain't this fun ? <g>


well..... I think I have 2 choices. Try and remove the race and see why it isn't going flush and reinstall, or get a new case. let me show you. here's the race on the snout.... it is not flush

15286Dscn4646-med.jpg


Putting the caliper to it.....


15286Dscn4648-med.jpg


I find this is how much too high...

15286Dscn4649.jpg


There is my .030 problem. Now, how to take up that much. There are really 3 choices... remove it from the rear planenetary ring carrier ... here

15286Dscn4645-med.jpg


Pros? Lotsa meat here. Cons, hardened polished bearing surface.

Then there is the back of the planetary

15286Dscn4644-med.jpg


Pro's... might get half here, not bearing. Cons, needs to be strong, and has pin heads for the gears in it.

3rd choice ? Try and remove the race and start over. That is what I am going to do.

(HUGE SIGH)


Do you think that the race didn't seat on the snout b/c of the extra thickness of the washer?

I'm about ready to start the reassembly of my a4ld as well. This is not what I would like to be faced with.

Also, did you fill the holes you drilled in the rear of the case to punch out the rear race?

Brett


Brett.... the hole first. No. The washer more or less covers them anyway and what leaks past is that much more oiling. I wondered about that thick washer - looking back I think I mentioned it. I want to get it apart (proving to be a *****!) to measure. I believe in that mod wholeheartely. I'd measure the race thickness and the washer then measure your snout... I think it WILL fit.

Sonnax said be careful of the tang on the washer, it may need to be ground down. I checked and it *seemed to fit flat*... did it really? I'd grind the tang down no matter what. IF I get mine apart, I'll let everyone know what I find.

See if your supplier will let you measure before you buy. (and get a BIG press and GRIND THAT TANG!

Oh also... minor narrowing of the outlet shaft bore.... but ok.... I touched mine up witha reamer... ultimately did a bad job of it, and replaced it. Was ok. Wanted a FORD factry bushing there. $22 vs. $5. No way. HTH.


I have the Sonnax upgrade rear race and washer as well. It is the same "height" as the original race. The washer is much thicker (you have a good comparison pic). But I'm not sure if that makes a difference b/c of the "wave" in the original washer.

The tang on my washer does need to be ground some. I did measure. I have a 93 a4ld case. I have not put it together yet b/c I'm awaiting machining of the center support and bellhousing. Not to metion I also have to put together the drums and replace the fwd drum and pistion.

Brett


Do me a favor....measurethe height of the "snout" and combine the thicknesses of the washer and race... compare. As for the wave vs thick washer, that was my thought, exactly.

Are you doing both bushings in the center support? I'm opting for just the press in OD support one. Did you upgrade the center support and Front drum to the bearing model?

Did you opt for the 5R plate frictions ?


Well.... after much frustration I simply cannot get the race out of the case. THAT BABY IS ON THERE! If I keep trying I'm just gonna booger the case... so.... new case. I priced a used one ($125 - and would need the rear case mod for $60) versus NEW (ok not the mod in the rear but NEW - for $200). I ordered a new case today (ouch).

I intend to rebuild the trannie coming out same as this one, so we can retry the rear case mod on it (anyone wanna buy a "bulletproof A4LD? <g>)

So next week, we should get it all back together. FINALLY.


It must have been all that locktite you put on the rear snout...

The new sonnax race is actually made to give a little more bite on snout. So it may not be necessary for the locktite?

Brett


Brett... when I first looked at the intended additional "splines" in the replacement race, I felt that to be extra safe, a little locktite help would be in order. By the time I struggled through pressing it on, I realized it might not be. So, I think you are right, and locktite there is not a requirement.


Sorry to hear you needed a new case Glacier, I really was hoping you were going to post that the stack mis-match was the result bearing thickness like this one from diary.1:
15286Dscn4178.jpg


Thanks.. wasn't the best news I'd had in a while either. But my mistakes, as well as successes are what I want to share. Both may help others..... helps everyone to eat humble pie from time to time as well


well crap. The case I orderedfor $200 came today - is was a USED case!! SO I guess I'll be buying the one for $125 and rebuilding it instead. So at least we will get the rear race issue resolved! (hopefully). Grrrrr. Bummer - I was all set to get going on this too.


A lot of internal hard parts are used. I actually picked up today a "reconditioned" fwd drum and piston. Mine were slightly damaged from the fwd clutch pack that burned up.

Brett


Join the Elite Explorers for $20 each year.
Elite Explorer members see no advertisements, no banner ads, no double underlined links,.
Add an avatar, upload photo attachments, and more!
.


Yeah I realize that.... one of my fave places is a transmission place that ONLY sells used.... they quoted me $125. ATC (I thought) only sold NEW parts, not used or "reconditioned" and when they quoted me $203 for the case, I just assumed (yes I know what THAT MEANS) that it was new. Oh well I'll get to try my hand on the rear case mod again!


Back
Top