Triton8273
Explorer Addict
- Joined
- April 27, 2010
- Messages
- 1,140
- Reaction score
- 2
In addition to my latest project "clearance lights" which the weather has been stopping me from doing.
I will be ripping the 3rd row seat out and making a two part compartment. It will function almost the same way as before. I will lay out an entire deck and make my cuts from there, with the smaller section where the jack is folding forward as it did, and the larger section folding towards the back.
I have not decided if i will make any organized sections, so for time time being it will just be two separate compartments. Possibly with gas springs to lift them up.
As opposed to using plywood with carpet on top, I will be using a material that many of you may not be familiar with unless you work in the marine industry. We call it Starboard or "marine plywood" and what it is is a plastic polymar board that is generally used in 1/4 inch just like plywood. Similar flexing capabilities but stronger and obviously wont rot.
Once I have it all finished I will add pics to this thread along with exact tools needed and exact measurements on the starboard so all you have to do is make the cuts and install it.
UPDATE:
TOOLS NEEDED!
5/16 socket
5/8 Spark Plug Socket
TORXT50 Socket
Vacuum and hazmat suit.
This is the left side when facing forward, you have these bolts on both sides of the seat, front and back.

To remove the bottom cushion, just fold it back and lift off.

Once you remove the bottom cushion, and unbolt the back rest. You will be left with the buckles which a held in with the TORX bolt which was a real ***** to get to move.

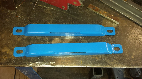
For the next few days it will go untouched, but the tool boxes still sit real nice on those side ledges.

I will be ripping the 3rd row seat out and making a two part compartment. It will function almost the same way as before. I will lay out an entire deck and make my cuts from there, with the smaller section where the jack is folding forward as it did, and the larger section folding towards the back.
I have not decided if i will make any organized sections, so for time time being it will just be two separate compartments. Possibly with gas springs to lift them up.
As opposed to using plywood with carpet on top, I will be using a material that many of you may not be familiar with unless you work in the marine industry. We call it Starboard or "marine plywood" and what it is is a plastic polymar board that is generally used in 1/4 inch just like plywood. Similar flexing capabilities but stronger and obviously wont rot.
Once I have it all finished I will add pics to this thread along with exact tools needed and exact measurements on the starboard so all you have to do is make the cuts and install it.
UPDATE:
TOOLS NEEDED!
5/16 socket
5/8 Spark Plug Socket
TORXT50 Socket
Vacuum and hazmat suit.
This is the left side when facing forward, you have these bolts on both sides of the seat, front and back.
To remove the bottom cushion, just fold it back and lift off.
Once you remove the bottom cushion, and unbolt the back rest. You will be left with the buckles which a held in with the TORX bolt which was a real ***** to get to move.
For the next few days it will go untouched, but the tool boxes still sit real nice on those side ledges.