Rookieshooter's 84 B2 Registry | Ford Explorer Forums - Serious Explorations

  • Register Today It's free!

Rookieshooter's 84 B2 Registry

rookieshooter

Moderator Emeritus
Elite In Memoriam
Joined
March 13, 2005
Messages
7,283
Reaction score
21
City, State
Martinsburg WV
Year, Model & Trim Level
84 BII "Li'l Samson"
Day one

PICT1888.jpg


Watch as this turns into one of the most unique Bronco IIs on the planet.
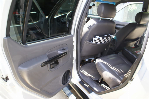
Just chopped the top.
There are hundreds of photos I'll go through and post some of the best here.
So I hope to do a Readers Digest condensed version of the build here.
This will take some time and will be updated up to the current build.
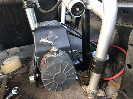
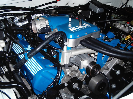
One theme of this build that has not changed over the years was that it would be simple to get to and work on parts. As the build progresses you'll see what I mean.

Copy2ofPICT3518.jpg


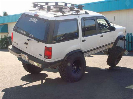
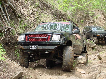
Starting to modify with no hard core plan yet, but later it starts coming together for a highly modified trail truck.

PICT2005.jpg


Took out the stock front axle and installed a D35 out of a 1st gen X.
But later in the build I'll go to a really hard core narrowed HP D44 4 link with coilovers.

PICT3159.jpg


Installed a Ranger tailgate that I kept on the truck for a few years.
Also the stock rear axle was trashed and an 8.8 installed.
It has leaf springs and stock wheel base at this point in time but will change later to a linked and longer wheel base.
Tubed bumpers that i picked up at Carlise truck show.
Later those will be replaced by a custom built bumper.


PICT3920.jpg


PICT3925.jpg


A great amount of time was spent designing the chopped top to be structurally sound. Over the years there is no measurable sag.


Join the Elite Explorers for $20 each year.
Elite Explorer members see no advertisements, no banner ads, no double underlined links,.
Add an avatar, upload photo attachments, and more!
.


Really keen to see the history behind your rig mate:dpchug::popcorn:


Various projects


PICT4139.jpg


PICT3960.jpg


A more finished appearance starting to take form. The time and effort to build that hinged drop down bulkhead makes for a Cool ride in the summertime...literally.
Some of the AutoMeter gauges are starting to be installed.

PICT4159.jpg


At this point there were all kinds of projects going on in the build. I found out real quick once this was taken on the street that the shiny aluminum had to go, talk about blinding light when the Sun is behind you.
Since this pic was taken i have gone through several drill motors, angle grinders, and two chop saws. Not mentioning having my sawz all rebuilt.

PICT4594.jpg


PICT4608.jpg


Measuring for the Lexan rear window.
And installed. A unique thing about lexan is that you can put it in a brake and bend it. I also installed hinge so I can easily stow it once removed.
Riding in this truck with the back window and the bulkhead down is just so Fun.
Also getting ready to weld up the cab overhead cage to the rear roll bar.
This in one of the main reasons the cab has not sagged since i chopped the top.

PICT4340.jpg


Starting to relocate the battery below the rear bed. Keeping a low COG has been a main concern on this build. Even to the point of the Aluminum heads.
Just the heads and battery alone counted for over 100 pounds removed from a high location.

PICT4867.jpg


Flipping the spring perches on the first 8.8 rear axle. Later I'll go to another 8.8 with Disc brakes.

First and foremost I'd like to thank all the help that i got along the way. A lot of ideas came from this site. A big Thank you.

PICT4854.jpg


PICT4880.jpg


Made a template to cover the bolt holes and some rust when I took off the the front stock coil buckets so I can do the front coilover mod.
The reason the plate is diamond shape is so most of the welds do not run parallel with the frame. I've seen frames crack under stress at the welds when the welds are perpendicular to the frame.
Have the plate tacked in place for welding. The coilover you see was just for mockup.

DSC04575.jpg


Bracket for rear cage mounted Hella work light.

DSC04580.jpg


To this day it's one of the most utilized aux lights that I use.

DSC04884.jpg


Wiper reservoir relocated from high on firewall to behind driver seat on floor.


Shocks and skinning of gas filler door

PICT3765.jpg


Tried all kinds of shock placements untill I later went with the outboard radius arm coilovers combination. Also you can see the battery box hanging down from the bed.

PICT4915.jpg


PICT4920.jpg


PICT4932.jpg


PICT4979.jpg


PICT4983.jpg


PICT4980.jpg


PICT4988.jpg


PICT5377.jpg

And now that I got a 22 gal fuel cell that I built, don't even need this anymore. Gas pump nozzel goes straight into the cell.
I'll come up with some idea for that door.


Tubed door, Coil hoops, tranny hump and cage


PICT5016.jpg


Mig welding the tubed doors. Running with the tube doors is not only fun, it really lets you pic a good line on when doing rocks. Not to mention over 100#s lighter then stock doors.

PICT5018.jpg


PICT5441.jpg


Also about this time (2005) a lot of time was spent on doing the coilover hoops. At first the coilovers were on the D35 axle and then the same hoops were used on the current pushed forward D44.
The brackets i used to connect the hoop to the frame interestingly eonough were made out of the Reese hitch that was once on the back bumper.

PICT5394.jpg


Rear axle upper shock mounts. Since then coilovers have replaced those Rancho's.

PICT5556.jpg


PICT5561.jpg


Fabbing up tubed tranny hump. Again the way it was built with removable top for ease of working on the tranny was planned in.

PICT5525.jpg


Starting to tie cage into frame.


Lite weight Doors
PICT5643.jpg


PICT5644.jpg


PICT5652.jpg


PICT5673.jpg


PICT5844.jpg


PICT5782.jpg


Side vent also removed. Then the window tracks were filled in with sheet metal, tacked in place, then body putty applied.

IMG_4368.jpg


PICT5665.jpg


From heavy to flyweight. Just need the vinyl windows.

IMG_0092.jpg


IMG_1927.jpg


IMG_0093.jpg


To remove the doors I modifed the stock hinges so all I have to is to pull two pins and the doors come right off.


Just "Wow!!!". Bowled over so far and it's only 2005:D


Just "Wow!!!". Bowled over so far and it's only 2005:D

How time flies when your having fun ;)

Coil hoop & Start of engine build

PICT5114.jpg


PICT5055.jpg


Here I'm putting some preliminary tack welds on the lower coilover mount on the D35. These brackets stayed just like you see them until I ditched the IFS and went solid a few years later.
Enough said on these coilovers until later.

And for the lovers of Old School carbed V8's enjoy. It's a 302 which I think has one of the best bore to stroke ratios you can get.

IMG_2697.jpg


Edelbrock Performer heads with 2.02" intakes and 1.65" ex. plus short runners for low end torque.

DSC03751.jpg


Installing the Comp Cam cam shaft. Later on when the ZDDP levels were reduced in the motor oils, I quickly wiped a cam lobe. Once the new cam was installed I now run racing oil made for flat tappet camshafts. This oil does have the proper amount of Zinc.


IMG_2638.jpg


Holley off road carb. I got one of these when they first came out but they had a casting flaws problem. Once Holley corrected this problem they sent me a new corrected one. It is by far the best fuel delivery system I ever owned.
I can stand the truck up as far as it can go and have never had that carb even burp. Now I do have several filters to keep the jets clean.

IMG_2773.jpg


Comp cam, MSD ignition, L&L headers, Edelbrock dual plane manifold for low end torque, roller rockers and other goodies.
And yes it is as bad as it looks :thumbsup:

On another note, you may want to go back from time to time cause I might add some more pics to a certain phase of the build, like I just did on the doors.
Literally thousands upon thousands of hours went into this build. Controversal...for sure, but I wouldn't have it any other way.


Engine Install


IMG_2796.jpg


Another modification that I did to for ease of maintenance was to modify the radiator support. At this point the stock radiator support has been cut out.
But you'll see that I made a removable one so engine can be installed or yanked out without lifting over the support. Also it let me move the upcoming radiator further ahead of the fan blade.


Radiator Install
IMG_2887.jpg


Ford Motorsport radiator.

Fuel System

IMG_3062.jpg


IMG_4267.jpg


All braided fuel line. Later i move the pressure gauge onto firewall and install an inline billet fuel filter just before carb.

IMG_3695.jpg


IMG_3708.jpg


IMG_3709.jpg


IMG_2859.jpg


I've ran several fuel pumps over the years. This was the first one. It was a Holley that made all kinds of racket and I even isolated it with rubber. It had internal vanes that wore out too quick. Note the above pic with all the internal galling. Check out all the fine particles laying near the shaft. Thank goodness I had several filtration systems before the gas entered the carb.
To this date I've got an inexpensive pump from Napa that has worked flawlessly.

IMG_3587.jpg


New 22 gallon tank.

IMG_3649-1.jpg


Modified new tank. Note the addition of the low mounted bulkhead fitting.
This was done so the fuel pump did not have to lift the fuel, but let gravity give it a hand.
All this so I could remove the gas tank a few years later and install fuel cell so I could stretch wheel base for a much much better trail ride. Note emphasize on the word much :thumbs

Dash Build along with mouse patrol cat. Or a Case Study in Mass Confusion

IMG_3775.jpg


IMG_3776.jpg


IMG_3777.jpg


IMG_3772.jpg


IMG_3747.jpg


One thing I did not want was any wire coming loose and bumpy trail rides or fluids of any kind getting into the wire connections, hence the wire connectors covered with heat shrink and then even using liquid electrical tape. Years later not one wire or connection has caused any problems.

IMG_3770.jpg


IMG_3783.jpg


IMG_2846.jpg


This speedo with just a simple 5 mile measured coarse will automatically set itself for any tire or gear change.


Remote Air Cooled Oil Filter

IMG_3731.jpg


Had to relocate oil filter and install the adapter that you see with the supply and return line. Also you can see the remote braided line that I used to relocate the oil pressure sending unit.

IMG_2834.jpg


Might as well open up the area in front of filter and let the rush of cool air strip away heat. Plus the fact that it's not mounted to the hot block really helps also.

IMG_3732.jpg


Both relocated filter and oil pressure sending unit.
Also you can see how the radiator is mounted under the removable radiator support for plenty of fan blade clearance.


C4/C5 hybrid tranny

IMG_2980.jpg


Advanced Adapter for bolting C4 tranny to transfer case.

IMG_2917.jpg


C4 tranny and V8 bellhousing.

IMG_3492.jpg


What I did was to pull the output shaft on the C4 and install a C5 output shaft and then use the AA adapter between tranny and transfer.

For years the transfer case was a 1350 which I later made my own slip yoke eliminator and worked flawlessly until I put an Atlas in much later in the build.
Info and pics of that will follow later.

IMG_3066.jpg


IMG_3065.jpg

One reason I run such low tranny temps in this air cooled fluid pan.

IMG_4547.jpg


Here is are the Hurst shifter and the 1350 transfer case mounted in the removable top.
Over the years that removable top has came in so handy.

IMG_4681.jpg


Painted some bed liner in cab. Also note the two front seat attaching tubes.
Seats are bolted to the cage and not floor.

DSC03763.jpg


IMG_4740.jpg


Here is where i mounted the B&M Super tranny cooler.
Then doing the plumbing in all stainless steel braided lines.
One side note, after several years of running this tranny, I can tell some of you that wondered why the tranny slips out of gear when doing extreme climbs is the fact the fluid does what fluid does...it seeks it's own level in the the pan. The way the pickup is made does not allow the fluid to be picked up due to the fact that fluid is still level no matter what angle the truck is. So it has to be kept at a fill level that the pick up is still in the pool of fluid. I always make sure mine is just a tab above full.
On my original build thread I even have a video of it coming out of gear due to low level as it does a climb. Lucky I was on soft dirt and not perched upon some rocks :eek:

Just found this clip of the tranny doing it's shifting compliments of a B&M Shift kit. Actually the shift kit from what I understand is less strain on the tranny due to it's none slipping qualities which means less heat :dunno:

th_MVI_3075.jpg


Also might want to turn up the volume. Now this is also with no doors so the sweet sound of the gutteral V8 is more appreciated LOL
Also this clip was taken later in the build obviously, but thought it would fit into this post.

Click it


First Custom Grill

IMG_4517.jpg


IMG_4521.jpg


IMG_4523.jpg


IMG_4531.jpg


At present time there is an all steel square tubed grill that I don't plan on changing along with Hella headlights .
The new style utilizes all steel construction.

All steel head liner


IMG_5554.jpg


Stock head liner was ripped out in favor of an all sheet metal one.
Placing insulation between stock roof rails.
The dome light you see came out of the donor car that the 302 came out of. An 81 Cougar. The red bulkhead that runs parallel with the dome light hides a lot of new wiring and relays.
One of the secrets to keep the integrety of the chopped top is the full roll cage. In the bottom Right of the pic you can see it penetrating the cab. It is a tight fit around the corner plate that I fabricated up.

IMG_5566.jpg


New sheet metal over insulation. The two roof mounted rocker switches are for rear roll bar work light which I still have to this day. I probably use this light more then any other aux light I have. Just so great to get all my hunting gear out of the rear bed.

IMG_5572.jpg


In all these years I have yet to get a rip in that headliner :D


In all these years I have yet to get a rip in that headliner:D

Hahaha, classic:D


Front Receiver Bumper built as fast as you can scroll down.

IMG_1489.jpg


IMG_1670.jpg


IMG_1773.jpg


IMG_1801.jpg


IMG_1811.jpg


IMG_1812.jpg


IMG_1814.jpg


IMG_1822.jpg


IMG_1830.jpg


IMG_1854.jpg


To this day the bumper has stayed the same except for some paint. If it ain't broke don't fix it.
Later you'll see that I add a Warn 8000 receiver winch that is able to be mounted in the rear also.
But I'm getting ahead of myself. Must be a Flash Forward thing ha ha.


keep up good work


Extended Radius Arms

PICT6185.jpg


Cut the welds.

PICT6186.jpg


Remove the threaded stud. Had to work at this for awhile.

PICT6203.jpg


PICT6201.jpg


Added longer and larger diameter extension. This was actually for a Fork Lift.

IMG_0772.jpg


To get the extended arm to line up perfectly under frame, i cut a slice in the arm, smacked with one very large hammer untill it lined up. Then welded over cut and boxed in other side.

PICT6480.jpg


Welded the extension and also boxed in the arm.

IMG_0582.jpg


Going to modify the stock front mounting bracket for the new arm.

IMG_0600.jpg


IMG_0615.jpg


IMG_0810.jpg


Then added some latteral support to the arm.

IMG_0995.jpg


Now I'm powder coating in a built oven.

IMG_0999.jpg


IMG_1222.jpg


Done. Over the next couple years this arm worked great... Untill good bye IFS and then I went with a solid axle 4 linked D44 and I'll never looked back.


Rear Axle

IMG_3446.jpg


IMG_3427.jpg


IMG_3422.jpg


IMG_3449.jpg


Cleaning up the axle and installing new brakes and associated parts.
At this point in the build I'm running leaf springs, outboard Rancho's and an above mounted traction bar.
Which have all went the way of the Dodo bird.
Leaf springs and Rancho's have been swapped for Coilovers, drum brakes have been swapped for disc's and a wristed radius arm suspension handles the torque and gives it more flex then the leafs ever had.

IMG_3319.jpg


A rear axle truss was fabricated along with an 8.8 Independent diff cover.
I also ran 3 welds about an inch long where the axle tubes press into the housing just in case it wanted to spin in the housing.
The 8.8 is still working great to this day.

IMG_3149.jpg


IMG_3157.jpg


IMG_3183.jpg


Front Sway bar mods.

IMG_1474.jpg


Here I'm threading one DOM tubing for a front disconnect for the sway bar.
I'm actually turning the lathe by using a long pipe wrench. The lathe makes for a true tap to bore alignment.

IMG_1476.jpg


IMG_1462.jpg


Sound's so sweet that V8. Having to get parts from across the ocean to do any mod's sometimes leaves me with a few doubt's as to whether every thing is going to fit when the time comes to put the jigsaw together. Reading and seeing what you've done replaces those insecure doubt's with "F*** it. If it don't fit, we'll make it fit!" Thank's for that mate!:thumbsup::thumbsup:


Join the Elite Explorers for $20 each year.
Elite Explorer members see no advertisements, no banner ads, no double underlined links,.
Add an avatar, upload photo attachments, and more!
.


Relocated Battery

IMG_5042.jpg


IMG_5046.jpg


This location will put more weight over rear axle which it needs due to the chop but just as important lowers the COG substantially.

Air cleaner and snorkel

IMG_5105.jpg


Altering the air cleaner that came off the 81 Merc Cougar donor car for the 302. Here I'm flipping the snorkel 180 deg. so I can run a snorkel up thru the cowl. Also i added a 1" stainless collar to the part that holds the air filter. You can see it riveted to the housing.
Reason...I'm going to run larger air cleaner then what it came with for more cfm's to carb.

IMG_5106.jpg


And here it is flipped and getting ready to install in the new location.

IMG_5526.jpg


.
IMG_5528.jpg


IMG_5529.jpg


Next I'll modify the rubber boot that was also on the donor air cleaner.
Need to make it work on the high tech snorkel ha ha. PVC plumbing pipe

IMG_0041-2.jpg


IMG_0042-1.jpg


IMG_3043.jpg


Here I'm making a plenum chamber where the snorkel above the window cowl and from carb will meet.
There was much work in altering the firewall in this part of the build. Not only for the snorkel but to modify the firewall to let fresh air come into engine compartment to cool the beast.
More on that later.

IMG_3047.jpg


The black part of the snorkel is the same PVC except sanded down for a smooth finish at the couplings.


Back
Top