- Joined
- September 6, 2006
- Messages
- 719
- Reaction score
- 169
- City, State
- South Central PA
- Year, Model & Trim Level
- 1994 Explorer
- Callsign
- yosty
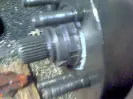
Saginaw pump from a 1990 E-150


I've decided it was time to make my own mounting bracket to the 4.0 ohv
The diameter I made the piece that the pump mounts to was 6.5" and the thickness is 0.25"
The saginaw pump has 4 mounting bolts. The factory uses 3 so that is what I did. 2 of the mounting holes were on a different plane than the other. The 1 hole I used that was on a different plane than the mounting plate, I spaced out with a piece of 0.5" steel that I flap wheeled to fit snug.

The 2 plates for bolting up to the cylinder head are 0.25" thick. I made a cardboard template off of the stock bracket to get me kind of where I needed to start.
The 3 pieces of pipe were 3.5" long and were around 0.5" internal diameter. The mount bolts are smaller than 0.5" (they are a metric size bolt) but it gave me some wiggle room for error. I believe the wall thickness of the pipe was close to 0.25"

Upon installing I realized the valve cover was interfering with the bracket so I trimmed to fit. Plasma cutters are amazing! It is very nice that I had a spare engine to mock this up on.

A very nice thing I found out, was the cylinder head bracket mounting surface is parallel with the pump mounting surface, also parallel with the serpentine belt. This made things easier as my work bench is amazingly close to level, providing a good point of reference.
From the work bench to the top of the first part of the bracket was exactly 4". I made sure the top plate was level with the bottom plate and tack welded the 3 pieces of pipe in. Checking level again and made sure it was 4" tall all the way around, I then burned it in with the mig welder.
The upright pieces are 1.5" wide x 0.25" thick x 4.875" length. I put them at 90 degrees with my angle finder and tacked into place.
I laid the pump mounting plate on top and used a combination of wood and various thicknesses of metal to get the front of the mounting plate to the special measurement of 5.125" keeping the top plate as close to level as possible. I was using reclaimed 0.25" plate steel that was a little warped so I got it leveled within 1 degree. Within 1 degree was close enough for me as I feel the belt probably can forgive a little.

I did a final check of all degrees and test fitting the belt. Had to redo several times to get the right belt tension. When I was happy I made it permanent.


I've decided it was time to make my own mounting bracket to the 4.0 ohv
The diameter I made the piece that the pump mounts to was 6.5" and the thickness is 0.25"
The saginaw pump has 4 mounting bolts. The factory uses 3 so that is what I did. 2 of the mounting holes were on a different plane than the other. The 1 hole I used that was on a different plane than the mounting plate, I spaced out with a piece of 0.5" steel that I flap wheeled to fit snug.
The 2 plates for bolting up to the cylinder head are 0.25" thick. I made a cardboard template off of the stock bracket to get me kind of where I needed to start.
The 3 pieces of pipe were 3.5" long and were around 0.5" internal diameter. The mount bolts are smaller than 0.5" (they are a metric size bolt) but it gave me some wiggle room for error. I believe the wall thickness of the pipe was close to 0.25"
Upon installing I realized the valve cover was interfering with the bracket so I trimmed to fit. Plasma cutters are amazing! It is very nice that I had a spare engine to mock this up on.
A very nice thing I found out, was the cylinder head bracket mounting surface is parallel with the pump mounting surface, also parallel with the serpentine belt. This made things easier as my work bench is amazingly close to level, providing a good point of reference.
From the work bench to the top of the first part of the bracket was exactly 4". I made sure the top plate was level with the bottom plate and tack welded the 3 pieces of pipe in. Checking level again and made sure it was 4" tall all the way around, I then burned it in with the mig welder.
The upright pieces are 1.5" wide x 0.25" thick x 4.875" length. I put them at 90 degrees with my angle finder and tacked into place.
I laid the pump mounting plate on top and used a combination of wood and various thicknesses of metal to get the front of the mounting plate to the special measurement of 5.125" keeping the top plate as close to level as possible. I was using reclaimed 0.25" plate steel that was a little warped so I got it leveled within 1 degree. Within 1 degree was close enough for me as I feel the belt probably can forgive a little.
I did a final check of all degrees and test fitting the belt. Had to redo several times to get the right belt tension. When I was happy I made it permanent.
") Thanks
Thanks