LD50 Full-size axle thread `93 Ex | Page 6 | Ford Explorer Forums

  • Register Today It's free!

LD50 Full-size axle thread `93 Ex

Looking good. Congrats on the body work too. :thumbsup:

I don't remember...did you already have radius arm mounts that you were going to incorporate or are you building from scratch?


Join the Elite Explorers for $20 each year or try it out for $5 a month.

Elite Explorer members see no advertisements, no banner ads, no double underlined links,.
Add an avatar, upload photo attachments, and more!
.


Good question, I don`t know yet. I have the stock mounts from the D44 axle, but I`m not sure how well they could fit. I actually want to raise the rear a little more before working on that, and the rear height really affects where the mounts go, or at least the drop. If I could cut to fit, it`s definitely a good idea..


Turns out I`m building from scratch, I figure trying to incorporate pieces from the stock F150 mounts would be too iffy.
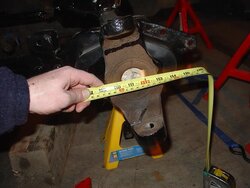
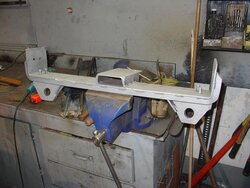
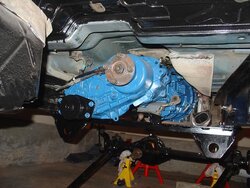
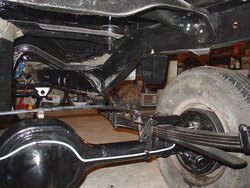
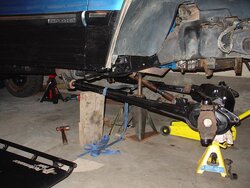
So after double checking that everything is sitting exactly as it will when done, lift-wise, I was able to double check the drop of my brackets which are 3 inches from bracket to center of hole.
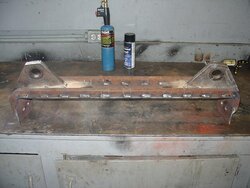
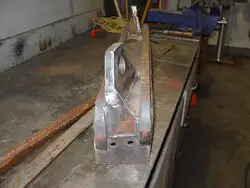
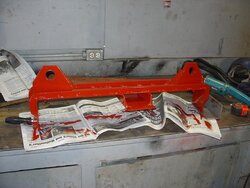
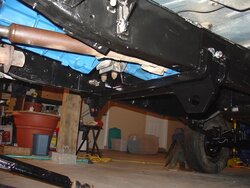
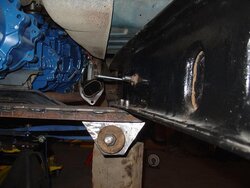
When in doubt over-engineer! The bushings need a 1 &1/2 inch diameter hole through metal 3/4 of an inch thick, so my bracketry you can see is all 3/4 of an inch thick. once I am satisfied that it is lined up exactly how I want it, by measuring everything, everywhere, I will tack it up, then trim down some of it and reinforce it. I`ll post a bunch of measurements for reference after I`m sure of the fit up but for now here is some pics of my progress:

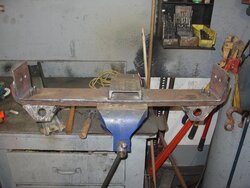
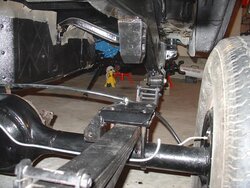
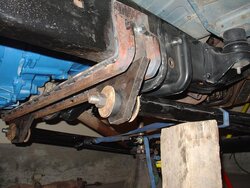
-edit- the dowels can be seen in the third pic. The dowel furthest back (rearward) actually goes into the hole that the front part of the stock T-case skidplate bolted to originally, I started by marking where that hole was on the plate, and calculated the second hole from there.
 

Attachments

  • Radius bracket lineup 1.JPG
    Radius bracket lineup 1.JPG
    65.2 KB · Views: 1,231
  • Radius bracket lineup 2.JPG
    Radius bracket lineup 2.JPG
    68.2 KB · Views: 1,202
  • Radius bracket lineup 3.JPG
    Radius bracket lineup 3.JPG
    51.1 KB · Views: 1,217


Very nice work. I noticed in an earlier pic that you had the front and rear diff sitting in a pile. I was wondering if you still had the manual hubs and wanted to sell them?


Sorry, I gave them to a friend with an Explorer so he had spares.

I do have for sale:
-a set of 4- 1.5 inch performance wheel and tire wheel spacers.
-2 inch poly coil lift spacers with the proper camber adjusters to compensate.

Anyone who`s interested, please PM me...


WOW. Great work keep it up.

Was it you that was asking on the backspacing on the rims if so sorry because I forgot....


Yeah, any info on your rims would help, but I could probably figure it out. I have some stock rims from my axles so that helps. I am getting the same tire as you, so I was interested.

But that`s fine, you go wheelin` and be all cool with your big Explorer, while us poor builders forge on un-assisted because no-one will take time to help us out.
:D :p: :D


Asked a friend to come over and help with the final measurements before tacking the radius arm mount together. We measured six ways from sunday, but once we had the front end even side for side, we have a measurement of 109 3/4 inches from the above pic, to the machined surface in the second pic.
The actual brackets the arms were mounted to were lined up measuring from the frame on one side to the end of the arm on the other -after assessing where they wanted to naturally sit.
 

Attachments

  • final measurement d44.JPG
    final measurement d44.JPG
    56.5 KB · Views: 1,159
  • final measurement d44 2.JPG
    final measurement d44 2.JPG
    47.3 KB · Views: 1,148


Once it was tacked, I made some rough measurements for the tranny mount and took it off and brought it to my workplace to weld up.

I started by cutting off the part of the 3/4 inch bracketry that extended past the frame hugging metal of the other bracket. Then I welded a gusset in place, over top of the cuttoff end.
 

Attachments

  • radius bracket finish 1.JPG
    radius bracket finish 1.JPG
    50.2 KB · Views: 1,171
  • radius bracket finish 2.JPG
    radius bracket finish 2.JPG
    50.3 KB · Views: 1,148


Then I welded in a gusset in the place behind with the most room..
 

Attachments

  • radius bracket finish 3.JPG
    radius bracket finish 3.JPG
    46.8 KB · Views: 1,145


Then I made the tranny mount out of some channel iron, I had to trim off 1/4 inch to get it to sit lower. I drilled the holes, then went home with the piece to tack it in place under the truck. I returned to work and welded it up, sanblasted the whole thing, and brushed on some primer.
 

Attachments

  • radius bracket finish 6.JPG
    radius bracket finish 6.JPG
    54.3 KB · Views: 1,142
  • radius bracket finish 5.JPG
    radius bracket finish 5.JPG
    55.1 KB · Views: 1,176
  • radius bracket finish 4.JPG
    radius bracket finish 4.JPG
    55.9 KB · Views: 1,138


looking good there LD


Wow great work, I'm alway's in awe of what you can do. Can't wait to see it again in person.

Carson


Thanks,

I cleaned up and put some fresh POR15 on the frame where I had to heat the bracket up; I spraybombed my primed bracket, then today when everything was dry I put it on the truck. I`m pretty happy with how it turned out.
Next I gotta make the cat fit above the bracket better, I saw it coming that it hung down too low, but I got an easy fix for that.

here`s a bunch `o pics:
 

Attachments

  • radius bracket finish 7.JPG
    radius bracket finish 7.JPG
    61.3 KB · Views: 1,124
  • radius bracket finish 8.JPG
    radius bracket finish 8.JPG
    59.7 KB · Views: 1,122
  • radius bracket finish 9.JPG
    radius bracket finish 9.JPG
    60.9 KB · Views: 1,084
  • radius bracket finish 10.JPG
    radius bracket finish 10.JPG
    68.3 KB · Views: 1,124


Wanted to get some more pics on here.
I finished tying in my Emergency brake to the 9 inch using a stock 79 Bronco replacement on the driver`s side, and on the other side I used a "Universal brake cable", which is basically an extra long brake cable you can make any length. This enabled me to tie into my existing E-brake bracket.

The next post is pics of the rear to show how I routed stuff, fastened stuff down, etc. I also have some 4.5 inch energy suspension bumpstops in. I`d love to go all out and install hydraulic bump stops, maybe one day but not now.

-still gotta get a breather hose in and secure the brake line where it comes from the frame, but it`s going good so far.
 

Attachments

  • rear axle finishing 0.JPG
    rear axle finishing 0.JPG
    63.8 KB · Views: 1,123


...
 

Attachments

  • rear axle finishing 1.JPG
    rear axle finishing 1.JPG
    70.5 KB · Views: 1,133
  • rear axle finishing 2.JPG
    rear axle finishing 2.JPG
    49.3 KB · Views: 1,111
  • rear axle finishing 3.JPG
    rear axle finishing 3.JPG
    71.2 KB · Views: 2,182
  • rear axle finishing 4.JPG
    rear axle finishing 4.JPG
    70.8 KB · Views: 1,105


Looks great! Why are your overload springs on upside down? Is there a benefit to this?
attachment.php


Join the Elite Explorers for $20 each year or try it out for $5 a month.

Elite Explorer members see no advertisements, no banner ads, no double underlined links,.
Add an avatar, upload photo attachments, and more!
.


Featured Content

Back
Top