How to: - 5R55E Valve Body Rebuild Diary | Page 40 | Ford Explorer Forums - Serious Explorations

  • Register Today It's free!

How to: 5R55E Valve Body Rebuild Diary

Prefix for threads which are instructional.


Join the Elite Explorers for $20 each year.
Elite Explorer members see no advertisements, no banner ads, no double underlined links,.
Add an avatar, upload photo attachments, and more!
.


Position for the drain plug

I have been looking through the data files here and may have missed it but where is the best location on the trans pan for the drain plug? Finally got around to pulling the valve body and there was an inch and a half piece of the gasket missing right by the reverse servo. I am using the bonded gasket, the Ford fix-it valve, and the Superior kit. I was so nervous when I started taking the valve body apart that my hands were shaking. Go figure. I also got the new EPC valve, just to cover my tookus. I did notice when I was putting the new EPC valve in that it seemed to come out way too easy. That was because the bracket that hold it in was missing the piece that hold it in. Duh! Tomorrow I get the bracket and we will see what happens. I could not have gotten to where I am without all of you out there. God bless you all! Yes on the Lucas trans additive!


I can't say definitively that this is 'the best' location, it just happens to be 'my solution' ...
I bought a generic magnetic oil drain plug from AutoZone with a matching nut at a hardware store. I drilled an over-sized hole in the center of the circular area on the fluid pan (which lines up with the circular 'tube' on the filter) and MIG welded the nut to the outside of the pan w/ welds on both inside & outside the pan, making sure I stayed away from the flat area of the nut. Grind it smooth and ... give me a few days and I'll let you know if it's leak proof!
I believe I've seen others who soldered (yes, soldered, not brazed) nuts on the inside of the pan due to concerns of the length on the bottom of the pan/knocking it off on rough roads. However, I don't believe this should be an issue considering the exhaust pipes extend well below the pan.
However, I'm always open for suggestions/improvements!
 

Attachments

  • DSC00224a.jpg
    DSC00224a.jpg
    64.6 KB · Views: 1,235
  • DSC00225a.jpg
    DSC00225a.jpg
    51.4 KB · Views: 993
  • DSC00227a.jpg
    DSC00227a.jpg
    71.7 KB · Views: 987
  • DSC00232a.jpg
    DSC00232a.jpg
    108.6 KB · Views: 1,144


Trans pan drain plug

I thought about putting the plug exactly where you suggest but I have the SOHC engine which has the cat under the pan and the trans fluid would drain directly on the cat. If I had the OHV engine your location would be perfect. Nice pictures and nice job by the way.


OK, finally wrapping up my WAY overdue project!

http://www.explorerforum.com/forums/showpost.php?p=2607607&postcount=651

Thought I'd post some 'lessons learned' and photos ...
I pulled the pan, pulled the reverse servo piston and there was nothing to push on, so my assumption (based on the expert advice received in this forum) was a broken reverse band.

Since I would have to tear deep into the guts to access the reverse band, I decided to do a complete rebuild. I dropped the tranny and ordered a Master Rebuild kit (Murphy Automotive, Florence, AL), a re-built valve body from Central Valve Body, an adapter for the tranny case for my engine stand ( http://www.norcoindustries.com/products/model/78109.html ), several Ford special tools (seal installers) on eBay, and several Lubegard items, which in hindsight, I considered essential. I like their firmer (green) Assemblee Goo ( http://www.lubegard.com/~/C-185/Dr.+Tranny+Assemblee+Goo ) for holding bearings in place during assembly. Petroleum jelly worked fine for items I didn't need 'stuck' in place for assembly. Their Seal-E-Zee set ( http://www.lubegard.com/C-193/LUBEGARD+Seal-E-Zee+Application+Cone+Set ) was also extremely helpful. Between that, the Ford special seal tools, several sockets, Lisle Transmission/Transaxle Plugs, item # 23400 ( http://www.amazon.com/Lisle-23400-Piece-Transmission-Transaxle/dp/tech-data/B000P0U04G ), and an old salt at the local Ford dealer, I was able to install all seals easily. For aligning the pump, the old salt at the local Ford dealer who does their transmissions, recommended using the new torque converter to align it vs. the special Ford tools. We'll see if that works! For compressing the clutch packs, I made my own little tool (see photo) out of a dozen 8d nails, a shock absorber washer, and some time on the MIG welder & bench grinder. That, along w/ a deep reach wood clamp and the table, it worked great!

I bought a 'donor' tranny that proved helpful during re-assembly (it was only $150 and I used all of my VERY clean parts from my original transmission and replaced the items in the donor transmission ... two rebuilds - essentially - at once!) My 're-assembly' memory wasn't as good as it could be and I felt the ATSG manual wasn't as detailed as it could have been, hence a digital camera and lots of photos during dis-assembly was also very helpful!
Thanks again for the help and advice provided by several key members, I don't think I would have attempted it w/o tapping into that knowledge posted herein ... great wealth and depth of knowledge!

Install of the tranny should happen in the next week, followed by the road test and another follow-up post ... we'll see! The proof will be in the pudding!
 

Attachments

  • DSC00223a.jpg
    DSC00223a.jpg
    58.8 KB · Views: 993
  • DSC00219a.jpg
    DSC00219a.jpg
    77.3 KB · Views: 1,011


Forgot to include photos of the original 'culprit' ...
 

Attachments

  • DSC00235a.jpg
    DSC00235a.jpg
    66.8 KB · Views: 1,141
  • DSC00233a.jpg
    DSC00233a.jpg
    78.5 KB · Views: 1,021


(and yes, I realize that this is a Valve Body rebuild thread, but this is where I started my quest for info, so my apologies if this is posted inappropriately!)


I love the home-made tool, it's fellas like you that help everyone else out.

Not sure about using the converter to align the pump, hope it works though.


I'm not sure if all TCC solenoids have screens but the one in my hand now does not have a screen. Does the screen show up only in certain versions or years?


I have been looking through the data files here and may have missed it but where is the best location on the trans pan for the drain plug?

3398.jpg


This spot works pretty good. I drilled the pan and then I took the metric nut and cut a few slots across the bottom to enhance drainage. Then I remove the washer to protect it from the heat, and insert the plug into the hole I drilled, then run the metric nut down finger tight. The nut goes INSIDE the pan. This holds it in place whilst I place three tack welds from inside the pan. When it is cool, I remove plug to reinstall the sealing washer.


Forgive me if this info is already in the mega thread!

The 5R55E is working fine in my 95k mile '97 XLT 4x4 with tow package, but I'm planning some light/moderate towing duty next year and want to prepare. Recent 180mile trial run with the 2,000lb 6x10 enclosed trailer went well.

Does the rebuilt VB from centralvalvebodies include a NEW Ford EPC valve and the updated solenoid bracket?

This is my plan:

- rebuilt VB (mainly for convenience and lack of experience on my part)
- new EPC (if not included)
- new solenoid bracket (if not included)
- viton D-rings for reverse servo
- band adjustment
- full flush (following VB install/verification)

Anything else I should be considering while I'm in there?

BK


A large tranny cooler, temp gauge and an external filter.


A large tranny cooler, temp gauge and an external filter.

Yep, got those items covered. Trying to get clarification on worthwhile small items to address during the VB refresh/swap.

BK


That's a good list.

I would also do the set screw installation which Sonnax has recommended. If you try that, make a new thread and post your story of finding the Sonnax update or page about it, and the set screws you find. I bought 2-3 sizes, the exact size suggested isn't at typical Lowe's etc.


That's a good list.

I would also do the set screw installation which Sonnax has recommended. If you try that, make a new thread and post your story of finding the Sonnax update or page about it, and the set screws you find. I bought 2-3 sizes, the exact size suggested isn't at typical Lowe's etc.

I'll need to look into this. This will be my first time into an auto tranny, so I'm a bit apprehensive about hammering set screws in place...

BK

28sxxs7.jpg


Very good, you found it. The article suggests that a few places could use the better reinforcement, but I would only place them as they pictured. Those are sturdy areas, just don't use a set screw which is larger than us suggested. Only the threads of the screws should engage the channel walls. The set screw shaft diameter should be smaller in diameter than the channels that they are tapped into.


OK, this is the VERY last of my 'lessons learned' and final follow-up to previous posts before I move off of the Valve Body thread and find a transmission thread to continue ...

If you’ve ever had an engine apart and back together, you can keep your work area clean, you have a large, undisturbed table to keep your work organized on, you can read (and follow) directions and have half a mechanical brain, I would highly recommend any of you to tackle a transmission rebuild!

Install of the transmission went fine. Had to do some fine tuning on the fluid level. I got very erratic readings of the fluid levels from way overfilled to under filled. It took several attempts to finally horn in and get consistent readings on the proper level.

I was very concerned with the fact that my external filter and my external cooler were not getting warm after operation, however, the bell housing and the pan would get VERY hot! I expected the external cooler to get somewhat warm. My initial assumption was that there was an obstruction in the external cooler lines, so I removed the fitting connections and back blew them out. I have another '98 Explorer that I am disposing of that has the external cooler, but not filter. I ran it up and noticed that after at operating temperature, the external cooler also was not the slightest hint of warm, but that the bell housing and the trans pan were just as hot as my freshly rebuilt tranny. Too hot to press and hold your hand against them ... which just seems WRONG in my mind! Any similar experiences out there?

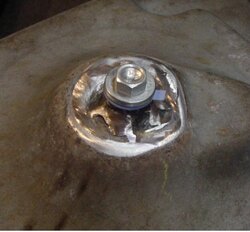
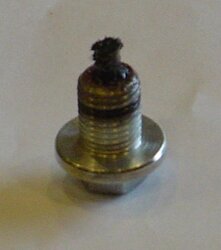
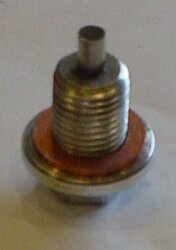
The blue plastic washer on the drain plug (several posts back) did not seal well and seeped slightly, so I removed it and replaced it with a copper washer. No seeps with the copper washer. 'drdoom', we have the same drain plug washer ... are you experiencing any seeps with that blue washer? You can see the collection of fuzz on the magnetic drain plug after about 100 miles of operation on the rebuilt transmission. No flakes, no chips, just pure fuzz/goo when wiped off.

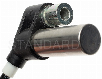
Attached is a photo of another home-made tool. This is my version of the "Torque Converter Handles T81P-7902-C." Each are made out of one bolt, one washer, 3 nuts and two sleeves each. The thread size is not common and I was not able to find the nuts and bolts at Lowe's/Home Depot, but had to go to a smaller/Mom-n-Pop’s specialty hardware store to find that thread size. All the other parts were picked up at Lowe’s. Screw all three nuts onto a bolt until they touch (don’t tighten them up to each other) and tack them together. Remove ‘nut set.’ Put the sleeves onto the bolt w/ the large washers, then tighten the nut assembly onto it. Tack it all together w/ enough threads to attach to the torque converter mounting studs (I allowed for the threads of 2 nuts to attach to the torque converter and 1 nut to attach/weld to bolt shaft). I was never able to fully seat the torque converter onto the shaft using the torque converter handles. Each time (3x) I had to stand the transmission up (vertical) and seat the torque converter from a vertical position, so the handles weren’t all that useful to me.

So, I am now experiencing about 30-60 seconds of slipping once I start the car and put it into either D or R. If I accelerate very slowly, it goes away after 30-60 seconds and shifts very smoothly and consistently, or if I wait several minutes in P for everything to warm up, I get no slippage.

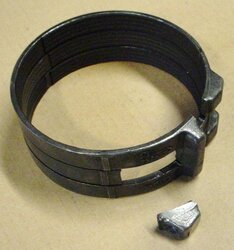
So, it's off the Valve Body thread and over to a pure tranny thread to see if this is a band (re) adjustment that's needed to eliminate that initial slippage. Is it common to have to readjust the front/intermediate band adjustment screw (tq to 120 in/lbs, back off either 2 or 2 1/2 turns depending on whether front or int) after the initial adjustment?

Anyone, anyone, Bueller, Bueller? :)

Thanks guys (gals?)!
 

Attachments

  • DSC00252a.jpg
    DSC00252a.jpg
    44.2 KB · Views: 899
  • DSC00259.JPG
    DSC00259.JPG
    59.7 KB · Views: 882
  • DSC00254a.jpg
    DSC00254a.jpg
    62.4 KB · Views: 941


I would pull the cooler feed line and see if you have any flow. Sounds as though you do not. It may be that your cooler is plugged. Did you flush the lines and cooler as part of your rebuild? Should be done in every case. Especially if you grenade your tranny and that is why you are rebuilding.

If you are getting slippage you are damaging your clutches. Find out why. I wouldn't drive it personally if it is slipping.

You should not have to re-adjust the bands again after the initial break-in.


I have an external filter and a factory towing cooler, and they both get rather warm.
PS: My blue drain plug washer is not seeping. I see in your photos you have the nut on the outside, it should be on the inside, that way you are not relying on the weld to be airtight. With the nut on the inside, the weld just holds it in place, and the actual sealing takes place right against the pan.


Join the Elite Explorers for $20 each year.
Elite Explorer members see no advertisements, no banner ads, no double underlined links,.
Add an avatar, upload photo attachments, and more!
.


. . . I was very concerned with the fact that my external filter and my external cooler were not getting warm after operation, however, the bell housing and the pan would get VERY hot! I expected the external cooler to get somewhat warm. My initial assumption was that there was an obstruction in the external cooler lines, so I removed the fitting connections and back blew them out. I have another '98 Explorer that I am disposing of that has the external cooler, but not filter. I ran it up and noticed that after at operating temperature, the external cooler also was not the slightest hint of warm, but that the bell housing and the trans pan were just as hot as my freshly rebuilt tranny. Too hot to press and hold your hand against them ... which just seems WRONG in my mind! Any similar experiences out there? . . .

The 5R55E external ATF cooling loop is thermostatically controlled. It opens when the torque converter fluid reaches 150 degrees F. If the remote oil filter has a back flow preventer and is connected incorrectly (transmission output to filter output instead of input) there will be no external flow. If you have a scanner you can monitor the transmission temperature PID to determine when external flow should occur.


Back
Top