jsotomar
Active Member
- Joined
- April 8, 2012
- Messages
- 92
- Reaction score
- 1
- City, State
- Philadelphia, PA
- Year, Model & Trim Level
- 2002 Ford Explorer XLT
Hi All...Creating this to showing all how to mod your own headlights with Halo's!
{Order did get a little screwed up with the color purchase of the LED rings, but still looks good") }
}
:ttiwwp:
First off, took me about 2 hours for first light, then 30 minutes for 2nd light. Things you will need for mod:
1. 160mm (2 Rings) = $25. Most come as a set. For Low-Beam housing
http://www.ebay.com/itm/181015550835?ssPageName=STRK:MEWNX:IT&_trksid=p3984.m1439.l2649
2. 100mm (2 Rings) = $15. Most come as a set. For High-Beam Housing
http://www.ebay.com/itm/181001184119?ssPageName=STRK:MEWNX:IT&_trksid=p3984.m1439.l2649
3. Rotary Tool. Bought from Harbor Frieght = $15 (Best thing ever since slice bread)
http://www.harborfreight.com/80-piece-rotary-tool-kit-97626.html
4. Hot Glue gun and sticks
5. Clear (caulk) Silicone
6. 18 Gauge Wire, Solder, Soldering Iron, Black Tape
7. 9V Battery
NOTE:
Cut = Cut hole with Rotary tool all the way through headlight housing (Making a hole)
Slice = Make an incision with Rotary tool **NOT a HOLE**, this will allow more sturdiness and grip the ring can hold onto.
TEST LED Rings, before gluing to headlight housing.
...Alright here we go...
1. Take Headlight out by pulling up on two tabs on the back of the headlight.
2. Remove 4 metal clips that hold the clear plastic to the headlight housing. Then Remove the Clear plastic, might be hard because there will be old sealant. Just be careful to pry with a screwdriver, and not go Hulk on it and break headlight pieces. My headlight did not need to be put in the oven, but if yours is too hard to open/pry, you might want to consider the oven.
3. Place the clear plastic aside. Make the measurements of how you want the 160mm ring to look. The 100mm will basically fit right on.

4. When cutting hole for 160mm ring, make sure you keep testing the fitment of the ring in the hole. Don't want to get too crooked, or leaning. If I were to do it again, I might have cut the hole a little bit farther towards the back to sit more flush.

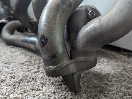
5.Here I made a slice for the 160mm ring. A little deep enough to hold the ring, but not enough to go through the headlight housing.

6. This is the back of the Low-Beam housing. You can see where I made the cut for the ring. Enough room to fit, but not alot so it won't be dangling.

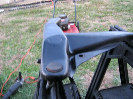
7. Now to the 100mm. Make a slice just like in the picture. Forgot to take a picture of the hole I made for this ring, but I think its pretty self-explanatory. For reference, look at Picture1. You can see where I put the arrow for cutting the hole.

8. Once you're done with fitting the rings, take them out. Clean the housing with a towel/air compressor. (There will be alot of dust).
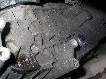
9. Remove the crappy red/black wires that come with it (Their eventually going to break loose, might as well replace them now). With your new wire, solder them on to the + / - leads. Make sure the wire will fit through the holes you cut earlier.
Picture shows wire being ran though hole.

10. Once all new wires are soldered, test fit one last time. If you're good with your results, it's ready to HOT GLUE! First make sure the rings are in notch with the Slices; and the wire would no have to problem routing through the hole as it sits. Run the wires through the hole at this time.
11. While holding the ring firmly against the housing, glue the back of the ring. I glued the ring basically like a compass. N - S - W - E . With 4 glue points, your ring should be good. Be sure to glue the back of where you made the ring is in the slice as well.
12. Glue the holes that were cut. Make sure to press into the hole with the glue gun, so the glue can spread easily inside the hole. Don't put too much or the glue will overfill onto the chrome housing, and can be visible. Also, turn the headlight around and glue the back of the holes. This will allow more strength and less crap to get in.
13. In the end, you will get something like the picture below. Also a good idea, too clean the headlight again at this point. I used a soft cloth from autozone (Microfiber).

14. At this point, you can connect both +'s together, and both -'s together. Connect them to the 9V battery for testing.
Not bad at all for my first try...

15. After testing and cleaning, remove the old silicone on the headlight where the clear plactic went. Apply new silicone into the slot, and put the clear plastic back on headlight. While holding firmly, put back on metal clips. If clips seem too loose, then tights with a pair of needle nose pliers.
16. Let sealant cure, then put headlight back on. Run wires to DRL fuse in the fuse box under the hood. Secure wires with zip ties. (Everyone loves a clean install)
*Haven't posted up pictures of headlights installed because I still need to run the wires to fuse box. That will be hopefully tonight.

Others:


Thanks for Looking!!
{Order did get a little screwed up with the color purchase of the LED rings, but still looks good
}:ttiwwp:
First off, took me about 2 hours for first light, then 30 minutes for 2nd light. Things you will need for mod:
1. 160mm (2 Rings) = $25. Most come as a set. For Low-Beam housing
http://www.ebay.com/itm/181015550835?ssPageName=STRK:MEWNX:IT&_trksid=p3984.m1439.l2649
2. 100mm (2 Rings) = $15. Most come as a set. For High-Beam Housing
http://www.ebay.com/itm/181001184119?ssPageName=STRK:MEWNX:IT&_trksid=p3984.m1439.l2649
3. Rotary Tool. Bought from Harbor Frieght = $15 (Best thing ever since slice bread)
http://www.harborfreight.com/80-piece-rotary-tool-kit-97626.html
4. Hot Glue gun and sticks
5. Clear (caulk) Silicone
6. 18 Gauge Wire, Solder, Soldering Iron, Black Tape
7. 9V Battery
NOTE:
Cut = Cut hole with Rotary tool all the way through headlight housing (Making a hole)
Slice = Make an incision with Rotary tool **NOT a HOLE**, this will allow more sturdiness and grip the ring can hold onto.
TEST LED Rings, before gluing to headlight housing.
...Alright here we go...
1. Take Headlight out by pulling up on two tabs on the back of the headlight.
2. Remove 4 metal clips that hold the clear plastic to the headlight housing. Then Remove the Clear plastic, might be hard because there will be old sealant. Just be careful to pry with a screwdriver, and not go Hulk on it and break headlight pieces. My headlight did not need to be put in the oven, but if yours is too hard to open/pry, you might want to consider the oven.
3. Place the clear plastic aside. Make the measurements of how you want the 160mm ring to look. The 100mm will basically fit right on.
4. When cutting hole for 160mm ring, make sure you keep testing the fitment of the ring in the hole. Don't want to get too crooked, or leaning. If I were to do it again, I might have cut the hole a little bit farther towards the back to sit more flush.
5.Here I made a slice for the 160mm ring. A little deep enough to hold the ring, but not enough to go through the headlight housing.
6. This is the back of the Low-Beam housing. You can see where I made the cut for the ring. Enough room to fit, but not alot so it won't be dangling.
7. Now to the 100mm. Make a slice just like in the picture. Forgot to take a picture of the hole I made for this ring, but I think its pretty self-explanatory. For reference, look at Picture1. You can see where I put the arrow for cutting the hole.
8. Once you're done with fitting the rings, take them out. Clean the housing with a towel/air compressor. (There will be alot of dust).
9. Remove the crappy red/black wires that come with it (Their eventually going to break loose, might as well replace them now). With your new wire, solder them on to the + / - leads. Make sure the wire will fit through the holes you cut earlier.
Picture shows wire being ran though hole.
10. Once all new wires are soldered, test fit one last time. If you're good with your results, it's ready to HOT GLUE! First make sure the rings are in notch with the Slices; and the wire would no have to problem routing through the hole as it sits. Run the wires through the hole at this time.
11. While holding the ring firmly against the housing, glue the back of the ring. I glued the ring basically like a compass. N - S - W - E . With 4 glue points, your ring should be good. Be sure to glue the back of where you made the ring is in the slice as well.
12. Glue the holes that were cut. Make sure to press into the hole with the glue gun, so the glue can spread easily inside the hole. Don't put too much or the glue will overfill onto the chrome housing, and can be visible. Also, turn the headlight around and glue the back of the holes. This will allow more strength and less crap to get in.
13. In the end, you will get something like the picture below. Also a good idea, too clean the headlight again at this point. I used a soft cloth from autozone (Microfiber).
14. At this point, you can connect both +'s together, and both -'s together. Connect them to the 9V battery for testing.
Not bad at all for my first try...
15. After testing and cleaning, remove the old silicone on the headlight where the clear plactic went. Apply new silicone into the slot, and put the clear plastic back on headlight. While holding firmly, put back on metal clips. If clips seem too loose, then tights with a pair of needle nose pliers.
16. Let sealant cure, then put headlight back on. Run wires to DRL fuse in the fuse box under the hood. Secure wires with zip ties. (Everyone loves a clean install)
*Haven't posted up pictures of headlights installed because I still need to run the wires to fuse box. That will be hopefully tonight.
Others:
Thanks for Looking!!