Whats In A Name?
It was hot humid august night. The winds have all but vanished. I was doing my best to keep the sweat out of my eyes. The A/C was dying in my 94 Explorer, lovingly named "Pugly", and there was no relief in sight. I decided it was time to stop throwing good money into bad. I was gonna do the unthinkable,.......I was going to commit the most heinous crime of them all! I was going to trade Pugly in for a newer model! Oh the heart break! The insanity of it all! I couldn't believe the thoughts were even going through my head.
I managed to get the old girl back home, to her resting place. She seemed at ease in her familiar surroundings. I had to come up with an explanation to let her know of my evil plan. So i just gave her that old wink and grin that she likes to see from me as we made it back home from another day of adventure in the treacherous Midwestern terrain. I did my best in hiding my cynical thoughts, as I walked around to her rear flank and gave her that little pat on her bumper, as I always have when we part for the night.
The next morning I gave her a real good bath, cleaned behind her mirrors, and brushed her grill. She still looked pretty good for her age. Oh sure she had the tell tale signs, gravity has got its firm grip on her, and I am not the best cosmetics guy in the world. she didn't seem to mind too much, she still kept her nose up and drove with pride.
After looking at many vehicles I just could not find anything that had the same feel as my old girl. Then it happened! Was I seeing a mirage? Was I so desperate to find another rig that I was blinded by insanity? I found my replacement! I quickly made a sale with the owner, and brought it home.
When I pulled in the driveway, my heart sunk as I looked into the yard to see my 94 looking at me in disbelief. She was sunning herself in the grass looking all shiny and then, she just looked away from me. My heart was tearing in two. I parked the new rig, and walked up to her and gave her a soft spoken "Hello". No reply. I tried to tickle her mirrors, no response. The tension was so great, you could have cut it with a 32 count fine tooth hacksaw. I had to explain to her that she gave me great satisfaction for many years, and we made a terrific team together, but the time has come for her to just relax and enjoy her final days. She finally revved up, and understood, her days as my work horse has ended (so we thought).
I introduced her to her daily driver replacement. The shiny new(er) next generation of her kind. The 95 Explorer XLT. She warmed right up to it. Before you know it they were swapping stories. Now I had to ask her for help. I needed a name for the new ride,
so I went to find her, and what did I see? Those two were grill to grill in the driveway. rubbing chrome! I had to get the water hose out and break them up! Sheesh, she was acting like a girl at the prom dance! I let the name thing drop for awhile.
The new(er) Ex needed to get its shots, and a physical. When I got the word on it's health, I about had a coronary. "What do you mean Doc"! I yelled. "Your kidding right"? I asked. The Doc just shook his head and gathered his tools. As he walked away, He said it had a 50/50 chance of survival. My stomach knotted up, my teeth ground, my heart raced, and I could feel the energy build up as I let it all out, "Why! Why! Why did this have to happen"! I screamed.
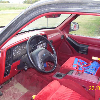
The prognostic exam from the doc was as such. It had a blown steering rack, the shocks were gone, the brakes were non existent, front sway bar was cracked in half, the 3rd brake light was out, none of the windows or the moon roof would work, the door locks were broke, the rear end LS clutch pack was burned up, the tires were all in need of replacement, the spare was a Firestone recall and flat, the engine had a nasty tick to it, the TPS was shot, the MAF was corroded, the battery had a dead cell in it, the hood shocks were not working, the rear hatch lock was jammed up and you couldn't open it with out a key in the lock, The carpet was stained to no repair, the rear window wiper didn't want to work, and we could not tell what year its engine swap came from. it was a mess, to say the least.
I went in the house to get my gun. I was gonna just put it out of its misery right there and then. I suddenly realized I was out of ammo, from shooting at the jeep that was in my field. I went to the computer to find a place to buy some cheap ammo, and I stumbled across this website, explorerforum.com that said it could heal any ford Explorer no matter what the problems were! I jumped for joy, I could not believe the things I was reading! I wore out the search button, asked a bunch of questions. I quickly broke out my pen and paper, feverishly writing down things as I was learning! I had found a cure for everything that was wrong with my new transport. It was a Godsend, an angel from the SUV heavens!
I sprung into action. I worked day and night, Pugly was right by my side the entire time, helping me in any way she could. I never seen this side of her, and was really amazed at how well she handled the pressure. She gently squeegeed the sweat out off my fore head with her soft wiper blades as I worked away. After an entire weekend of work, I collapsed. I needed some rest, and so did the 95. The sun crested over the hills, and awoke me to a new day. I shuffled my feet to the window facing the driveway, peeled the drapes gently back, and peered out at the 95. WOW!
It had a its color back, and was looking great! Now as the time went on, (and most of my paychecks), and the selling of almost everything I own, for funds to get the 95 to its former glory.
After some time to reflect on this name thing, I strolled up and whispered into Pugly's passenger side mirror, and she giggled with delight.
I climbed up onto the front bumper in my pajamas and robe half opened, with a cup of coffee in one hand and the daily newspaper in the other, I raised my arms with out stretched hands and proclaimed the new name of the 95.
BEHOLD...........THE BLACK HOLE!!!!!!!! (Then the neighbor yelled at me to close my robe)
The End................(or is it just the beginning?)
Actually, only some of this really happened.
View attachment 324381
It was hot humid august night. The winds have all but vanished. I was doing my best to keep the sweat out of my eyes. The A/C was dying in my 94 Explorer, lovingly named "Pugly", and there was no relief in sight. I decided it was time to stop throwing good money into bad. I was gonna do the unthinkable,.......I was going to commit the most heinous crime of them all! I was going to trade Pugly in for a newer model! Oh the heart break! The insanity of it all! I couldn't believe the thoughts were even going through my head.
I managed to get the old girl back home, to her resting place. She seemed at ease in her familiar surroundings. I had to come up with an explanation to let her know of my evil plan. So i just gave her that old wink and grin that she likes to see from me as we made it back home from another day of adventure in the treacherous Midwestern terrain. I did my best in hiding my cynical thoughts, as I walked around to her rear flank and gave her that little pat on her bumper, as I always have when we part for the night.
The next morning I gave her a real good bath, cleaned behind her mirrors, and brushed her grill. She still looked pretty good for her age. Oh sure she had the tell tale signs, gravity has got its firm grip on her, and I am not the best cosmetics guy in the world. she didn't seem to mind too much, she still kept her nose up and drove with pride.
After looking at many vehicles I just could not find anything that had the same feel as my old girl. Then it happened! Was I seeing a mirage? Was I so desperate to find another rig that I was blinded by insanity? I found my replacement! I quickly made a sale with the owner, and brought it home.
When I pulled in the driveway, my heart sunk as I looked into the yard to see my 94 looking at me in disbelief. She was sunning herself in the grass looking all shiny and then, she just looked away from me. My heart was tearing in two. I parked the new rig, and walked up to her and gave her a soft spoken "Hello". No reply. I tried to tickle her mirrors, no response. The tension was so great, you could have cut it with a 32 count fine tooth hacksaw. I had to explain to her that she gave me great satisfaction for many years, and we made a terrific team together, but the time has come for her to just relax and enjoy her final days. She finally revved up, and understood, her days as my work horse has ended (so we thought).
I introduced her to her daily driver replacement. The shiny new(er) next generation of her kind. The 95 Explorer XLT. She warmed right up to it. Before you know it they were swapping stories. Now I had to ask her for help. I needed a name for the new ride,
so I went to find her, and what did I see? Those two were grill to grill in the driveway. rubbing chrome! I had to get the water hose out and break them up! Sheesh, she was acting like a girl at the prom dance! I let the name thing drop for awhile.
The new(er) Ex needed to get its shots, and a physical. When I got the word on it's health, I about had a coronary. "What do you mean Doc"! I yelled. "Your kidding right"? I asked. The Doc just shook his head and gathered his tools. As he walked away, He said it had a 50/50 chance of survival. My stomach knotted up, my teeth ground, my heart raced, and I could feel the energy build up as I let it all out, "Why! Why! Why did this have to happen"! I screamed.
The prognostic exam from the doc was as such. It had a blown steering rack, the shocks were gone, the brakes were non existent, front sway bar was cracked in half, the 3rd brake light was out, none of the windows or the moon roof would work, the door locks were broke, the rear end LS clutch pack was burned up, the tires were all in need of replacement, the spare was a Firestone recall and flat, the engine had a nasty tick to it, the TPS was shot, the MAF was corroded, the battery had a dead cell in it, the hood shocks were not working, the rear hatch lock was jammed up and you couldn't open it with out a key in the lock, The carpet was stained to no repair, the rear window wiper didn't want to work, and we could not tell what year its engine swap came from. it was a mess, to say the least.
I went in the house to get my gun. I was gonna just put it out of its misery right there and then. I suddenly realized I was out of ammo, from shooting at the jeep that was in my field. I went to the computer to find a place to buy some cheap ammo, and I stumbled across this website, explorerforum.com that said it could heal any ford Explorer no matter what the problems were! I jumped for joy, I could not believe the things I was reading! I wore out the search button, asked a bunch of questions. I quickly broke out my pen and paper, feverishly writing down things as I was learning! I had found a cure for everything that was wrong with my new transport. It was a Godsend, an angel from the SUV heavens!
I sprung into action. I worked day and night, Pugly was right by my side the entire time, helping me in any way she could. I never seen this side of her, and was really amazed at how well she handled the pressure. She gently squeegeed the sweat out off my fore head with her soft wiper blades as I worked away. After an entire weekend of work, I collapsed. I needed some rest, and so did the 95. The sun crested over the hills, and awoke me to a new day. I shuffled my feet to the window facing the driveway, peeled the drapes gently back, and peered out at the 95. WOW!
It had a its color back, and was looking great! Now as the time went on, (and most of my paychecks), and the selling of almost everything I own, for funds to get the 95 to its former glory.
After some time to reflect on this name thing, I strolled up and whispered into Pugly's passenger side mirror, and she giggled with delight.
I climbed up onto the front bumper in my pajamas and robe half opened, with a cup of coffee in one hand and the daily newspaper in the other, I raised my arms with out stretched hands and proclaimed the new name of the 95.
BEHOLD...........THE BLACK HOLE!!!!!!!! (Then the neighbor yelled at me to close my robe)
The End................(or is it just the beginning?)
Actually, only some of this really happened.
View attachment 324381