My First Explorer, 2000 EB | Page 17 | Ford Explorer Forums - Serious Explorations

  • Register Today It's free!

My First Explorer, 2000 EB

As per the instructions above here's the info:
2000 Explorer Eddie Bauer Edition 5.0
I'm from Parsons KS and you can contact me easily through a PM here.

Well, they aren't good pics. They were provided by the seller using a cell phone. But this is my 2000 Explorer Eddie Bauer Edition. I am going to "visit" it today at the sellers house and pull the radiator. My next day off I get to install a new one (would do them both today, but had to order the radiator). Jon (Turdle) has already provided me with the link to the radiator replacement thread. (Thanks again Jon)

Mods will be slow due to funding and the need to finish putting an engine in my other vehicle (seen below). Probably just go with exhaust and slightly more aggresive tires when funds allow. Any suggestions for basic upgrades? LOL I'm a seasoned Veteran with Thunderbirds, but a newbie with Explorers.

Explorer01.jpg


Explorer02.jpg


Explorer03.jpg


Explorer04.jpg


Explorer05.jpg


Explorer06.jpg


Explorer07.jpg


My other vehicle can be seen here:

GT_Touched_SM.jpg


Join the Elite Explorers for $20 each year.
Elite Explorer members see no advertisements, no banner ads, no double underlined links,.
Add an avatar, upload photo attachments, and more!
.


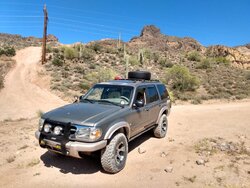
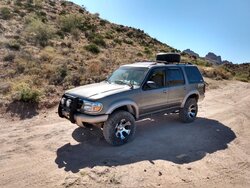
Got the lift done, the seat fixed, and decided to do some "social distancing". I headed out to the desert (well.... Bulldog Canyon) for some testing and pics. Yes it's dirty... Its in the freaking dusty desert! LoL

The last two pics are to show you the outside temp, and how well my radiator and transmission cooler work. 😊 Granted, I had the AC off....
 

Attachments

  • IMG_20200502_141339989_HDR.jpg
    IMG_20200502_141339989_HDR.jpg
    240.7 KB · Views: 100
  • IMG_20200502_141351365_HDR.jpg
    IMG_20200502_141351365_HDR.jpg
    208.7 KB · Views: 99
  • IMG_20200502_141736295_HDR.jpg
    IMG_20200502_141736295_HDR.jpg
    327.5 KB · Views: 104
  • IMG_20200502_144818477_HDR.jpg
    IMG_20200502_144818477_HDR.jpg
    236.8 KB · Views: 118
  • IMG_20200502_144824760_HDR.jpg
    IMG_20200502_144824760_HDR.jpg
    265.9 KB · Views: 101
  • IMG_20200502_144925642.jpg
    IMG_20200502_144925642.jpg
    148.5 KB · Views: 100
  • IMG_20200502_154804664_HDR.jpg
    IMG_20200502_154804664_HDR.jpg
    251.3 KB · Views: 110
  • IMG_20200502_145719622_HDR.jpg
    IMG_20200502_145719622_HDR.jpg
    129.8 KB · Views: 101
  • IMG_20200502_145726894_HDR.jpg
    IMG_20200502_145726894_HDR.jpg
    223.8 KB · Views: 107


Join the Elite Explorers for $20 each year.
Elite Explorer members see no advertisements, no banner ads, no double underlined links,.
Add an avatar, upload photo attachments, and more!
.


Ditto, enjoy the Spring, before it gets really hot!


It must've been an awesome trip. I'm very much excited to hit the road again and drive a long distance with my friends. Right now, I'm doing some work adjustment on my rig. I'm waiting for the lift kit I ordered from 4wheelonline. I will replace my tires as well and probably add a rack for our bikes. I got plenty of time to work on it so my rig would be ready as soon as this pandemic is over. By the way, the photos are truly impressive, quite a scenic place you've been to. I like it.


Well, I have a confession to make. On my last outing one of my fog lights committed treason and went AWOL. It is presumed dead... Lost in the desert. Cause is believed to be a bad welding job on the bracket as it also is missing. To that end I have replaced the welded brackets with one that is both welded on and bolted on... Let's see this one abandon ship!
As the lights are only available in pairs, I ended up with three, the remaining loyal light and the 2 new recruits. I made a bracket that is one bar running between the grill guard. The lights are wired into the OEM fog light circuit as the OEM fog lights were given an honorable discharge.
 

Attachments

  • IMG_20200508_194116167.jpg
    IMG_20200508_194116167.jpg
    120.3 KB · Views: 110
  • IMG_20200508_194102523.jpg
    IMG_20200508_194102523.jpg
    161.2 KB · Views: 103


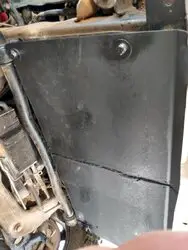
Made and it installed a skid plate to fit under the radiator and transmission cooler. It even helps direct air up towards the cooler.
 

Attachments

  • IMG_20200514_145524673_HDR.jpg
    IMG_20200514_145524673_HDR.jpg
    184 KB · Views: 103
  • IMG_20200514_145521010_HDR.jpg
    IMG_20200514_145521010_HDR.jpg
    163.5 KB · Views: 98
  • IMG_20200514_145510429_HDR.jpg
    IMG_20200514_145510429_HDR.jpg
    151.3 KB · Views: 95


Drat... One of the lift gate glass hinges is stripped. Gonna have to replace the entire thing. Used ones on eBay are around 25.00. I suppose another trip to pick a part is in order. If it ain't one thing it's another....


Yea driver's side. And I probably will get a lot... Stupid PIA problem. LoL got more important things to do to get ready for CO.


Well there was only one explorer that had those glass hinges left at the pick a part. And it's rear glass and door were locked. That was fun to get out. But I got it and got it fixed (kinda, even they weren't perfect).
Got a hitch modified and installed, I think it tucks up under the bumper quite nicely.

IMG_20200630_190315379.jpg
IMG_20200630_190250547.jpg
IMG_20200630_182127659.jpg
IMG_20200630_191111192.jpg


Well I spent the day (well, the afternoon) installing a PA speaker. Why? LoL cause the CB has a jack for one of course. Installed a fancy grommet in the firewall so I can run all those wires for lights, speakers, etc safely and easily.
Also ground off the turning stops on the lower control arms. Don't know if it's a good idea, but I do know that my turning radius is markedly greater since I installed them. We shall see.


Has anyone else been irritated at the fact there are tie downs in the cargo area toward the back, and in the middle, but not at the front of the cargo area? I plan on correcting that problem. I'll post pics when done.


Yup. Installed E tracks so there is a tie down point anywhere I want, from front to back, and side to side.

Also installed a couple of rings closer to the hatch, and single E track mounts on the seat flaps, for use when seats are folded down.


I just ordered simple tie downs similar to the OEM ones. I'll mount them right behind the seat, and maybe a couple other places.


Well, I've inspected everything I can on the heating system. The vacuum operated valve in the heater hose seems to be working, the blend door seems to be working. (That's the door directly behind the glove box... Right?)
So I may have heat and not be able to tell. It's hard to know if the heat is working when it's 100* out! I guarantee I can go out there now and it'll blow hot air out. LoL


LoL yea, it gets down to 90 by then...


I got the brake fluid flushed (first time since manufacture I believe). What with the upcoming trip to CO, towing the camper and Black Bear pass I thought every little bit counts. Then picked up a heavy tub with a snap on lid for all the spare parts, so I can load them into the back of Lil Eddie and not have them flying all over.
Next up... I need to take out the transmission cooler (or at least loose it up) and flip the fans. Turns out that even though they are spinning the right way, they are curved such that they have to face a certain way... Damn the little stuff.


Join the Elite Explorers for $20 each year.
Elite Explorer members see no advertisements, no banner ads, no double underlined links,.
Add an avatar, upload photo attachments, and more!
.


Finally got the alignment done. Though it's not perfect, it's a whole lot closer than it was. Just can't get the camber perfect (due to torsion twist) but it's darned close. The castor is good and the toe is great. One step closer to CO. 😁


Back
Top