-
Ford Explorer Community - Maintenance - Modifications - Performance Upgrades - Problem Solving - Off-Road - Street
Explorer Forum Covers the Explorer ST, Explorer Sport, Explorer Sport Trac, Lincoln Aviator,
Mercury Mountaineer, Mazda Navajo, Ford Ranger, Mazda Pickups, and the Ford Aerostar
Register Today It's free!
You are using an out of date browser. It may not display this or other websites correctly.
You should upgrade or use an alternative browser.
You should upgrade or use an alternative browser.
Completed Project Kirby's 1991 Ranger Build Up
- Thread starter Kirby N.
- Start date
Use this prefix for completed projects that are not "How to" articles or threads asking for help.
Elite Explorer members see no advertisements, no banner ads, no double underlined links,.
Add an avatar, upload photo attachments, and more!.
Kirby N.
Elite Explorer
- Joined
- February 6, 2001
- Messages
- 2,654
- Reaction score
- 465
- City, State
- Colorado Springs, CO
- Year, Model & Trim Level
- 1991 Ranger
Well, I had some time to tinker today. I had to pull the head off the jeep due to a couple cooked exhaust valves. So it is down right now and I had some time.
First thing, I was getting some death wobble and come to find out the tie rod ends on both ends of my tierod were so sloppy. So sloppy. Just completely worn out. I did replace the tierod ends on my drag link recently for the same reason, but haven't changed the ones on my tie rod. I ended up going with a Ruff Stuff Engineering passenger side tie rod end. The cool thing about these, is that they come pre drilled for the taper that will fit the drag link. I used Moog for the other end.


Quick Solid Axle Steering note:
The lower drag link joint- you have the choice of using a normal tie rod end, which is what I used on mine- this is a similar end to the one on the drivers side of the tierod, but left hand thread. That is what I used on this setup. Its the ES2234. I believe I got it in a kit from ruff stuff originally.
However, as you can see in this picture- its not the ideal setup.

especially upon compression- there is a really good chance that the jam nuts and the link will make contact.
I should have used the ES2027L. This is a high angle joint that has more shaft and would get the jam nut up out of the way.
I think I was able to push my explorer axle a little further and it wasn't an issue because I used this joint on the bottom of the drag link (I built it with helms, so it wasn't something that I was worried about when I built it- but later swapped to the gm y link). The other think that allowed it to be further forward was that I didn't have a drop pitman arm and I had a higher ride height.
First thing, I was getting some death wobble and come to find out the tie rod ends on both ends of my tierod were so sloppy. So sloppy. Just completely worn out. I did replace the tierod ends on my drag link recently for the same reason, but haven't changed the ones on my tie rod. I ended up going with a Ruff Stuff Engineering passenger side tie rod end. The cool thing about these, is that they come pre drilled for the taper that will fit the drag link. I used Moog for the other end.
Quick Solid Axle Steering note:
The lower drag link joint- you have the choice of using a normal tie rod end, which is what I used on mine- this is a similar end to the one on the drivers side of the tierod, but left hand thread. That is what I used on this setup. Its the ES2234. I believe I got it in a kit from ruff stuff originally.
However, as you can see in this picture- its not the ideal setup.
especially upon compression- there is a really good chance that the jam nuts and the link will make contact.
I should have used the ES2027L. This is a high angle joint that has more shaft and would get the jam nut up out of the way.
I think I was able to push my explorer axle a little further and it wasn't an issue because I used this joint on the bottom of the drag link (I built it with helms, so it wasn't something that I was worried about when I built it- but later swapped to the gm y link). The other think that allowed it to be further forward was that I didn't have a drop pitman arm and I had a higher ride height.
Kirby N.
Elite Explorer
- Joined
- February 6, 2001
- Messages
- 2,654
- Reaction score
- 465
- City, State
- Colorado Springs, CO
- Year, Model & Trim Level
- 1991 Ranger
I also found a deal on a RTT I couldn't pass up. It is an ARB simpson 3. I think we are going to try to do a little camping this summer. This should be perfect for that.

I also went to the junk yard today and grabbed a throttle cable. I had modded the other one so that it would open up the throttle completely and with the new engine and throttle body- I feared it might have something to do with that. Quick swap. It ideas a little lower. About 800 rpm.
I also went to the junk yard today and grabbed a throttle cable. I had modded the other one so that it would open up the throttle completely and with the new engine and throttle body- I feared it might have something to do with that. Quick swap. It ideas a little lower. About 800 rpm.
- Joined
- December 22, 2021
- Messages
- 6,996
- Reaction score
- 5,416
- City, State
- Los Angeles, CA
- Year, Model & Trim Level
- 1998 XLT 4x4
24 Rngr 4x4
nice truck! looks like how id build one if i did one lolI also found a deal on a RTT I couldn't pass up. It is an ARB simpson 3. I think we are going to try to do a little camping this summer. This should be perfect for that. View attachment 439445
I also went to the junk yard today and grabbed a throttle cable. I had modded the other one so that it would open up the throttle completely and with the new engine and throttle body- I feared it might have something to do with that. Quick swap. It ideas a little lower. About 800 rpm.
Kirby N.
Elite Explorer
- Joined
- February 6, 2001
- Messages
- 2,654
- Reaction score
- 465
- City, State
- Colorado Springs, CO
- Year, Model & Trim Level
- 1991 Ranger
Last thing, I made a pretty large purchase today.
My front driveshaft is limiting my droop on the drivers side. And though my transmission gear swap has helped, I still want a little lower gears. I had decided I wasn't doing another doubler like I had in my explorer and on this build I would do an atlas. However, Advance Adapters no longer supports our platform. Thats not handy.
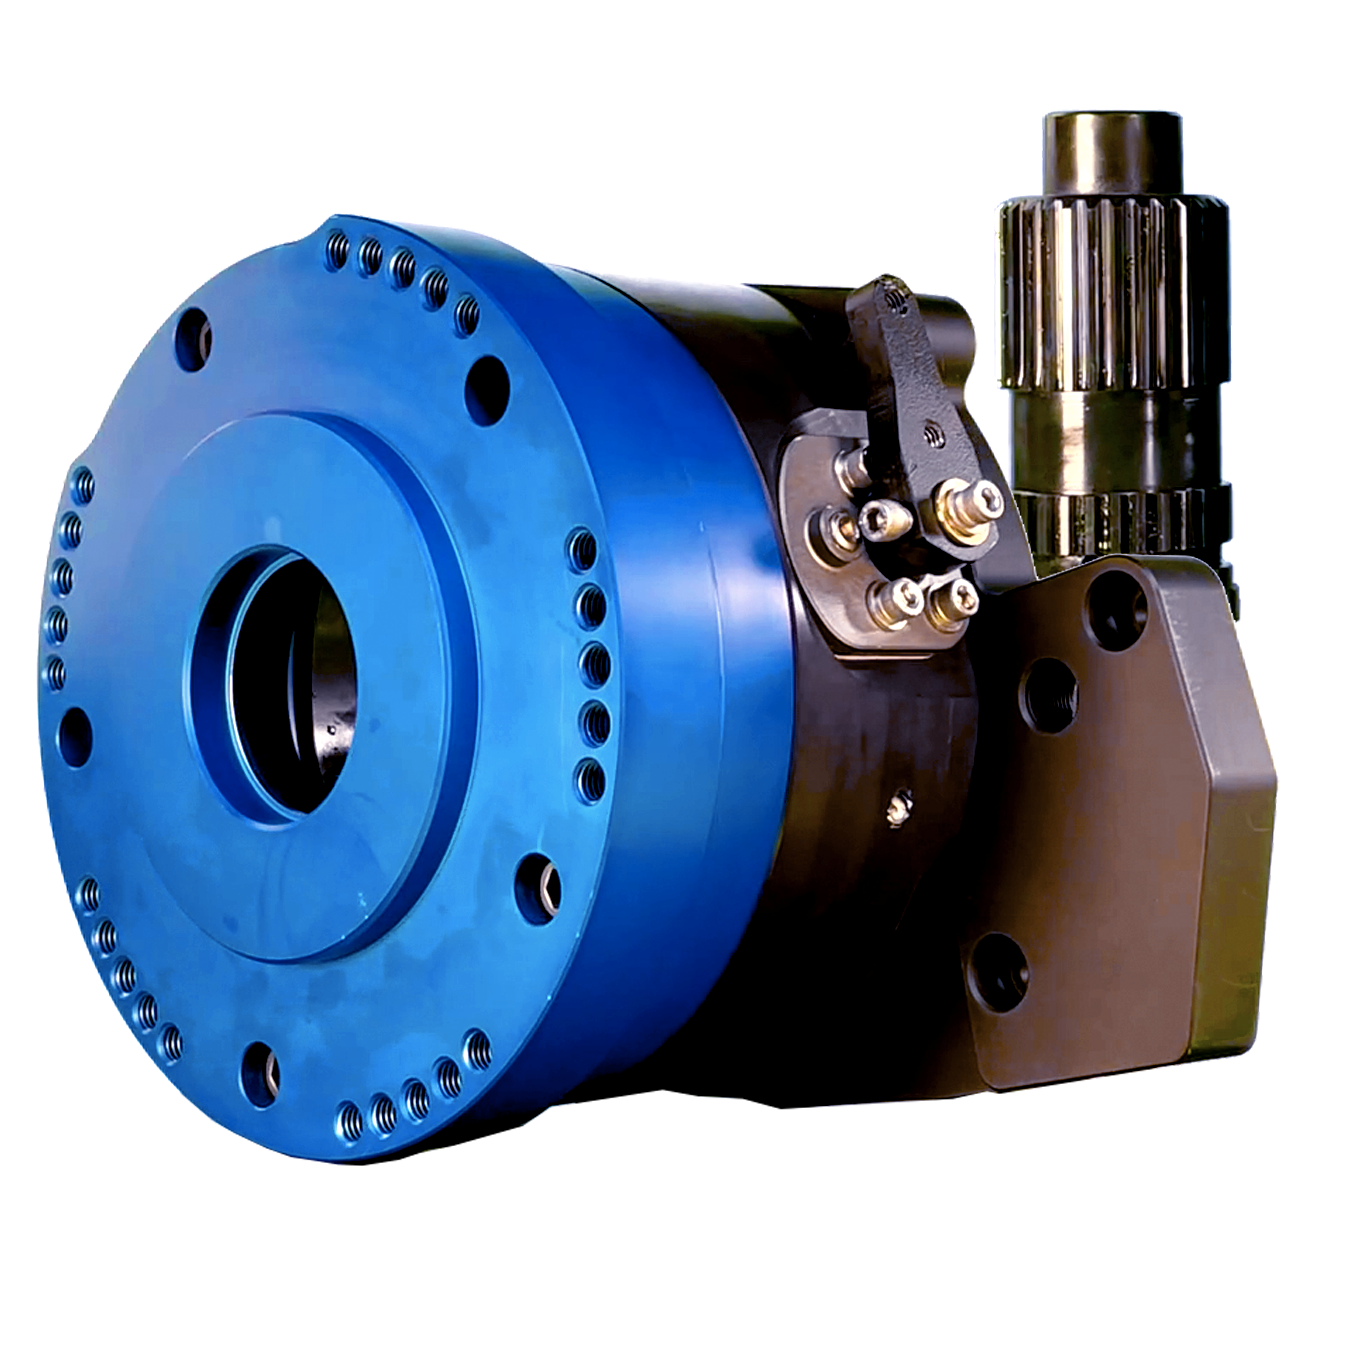
I ran across Behemoth Drivetrain a few months ago: Behemoth Drivetrain I know they used to have a terrible reputation but they have been purchased by a new owner, Jim. I called and spent some time talking to Jim and to his lead guy, Dillon, and I was really pleased to learn about where they have taken the company. Their shorty case for the 1354 Ranger and Explorer transfer case is a really innovative idea. It incorporates the whole front housing of the case into the doubler for a super short setup. The doubler basically houses the planetarium from both cases. It comes in at just over 4" over all!! I have 7" until I would interfere with the gas tank. Plenty of space.
I am pretty sure this case will fit in a Explorer Sport without getting into the gas tank.
This design also includes a support bearing on the shaft between the cases and a unique design for the intermediary shaft that allows it to be shorter because the transmission shaft goes inside the intermediary shaft.
When I had the d and d doubler, Duffy, the creator of the kit, told me never to put the front case in low when the rear case was in high. He said that would break the shaft in a heartbeat. That was a bit of a bummer because I wanted to use 2 low at times- and shifting the front without shifting rear would allow 2 low even when the hubs were locked. It also just made me feel a bit uneasy about the strength and reliability of the thing.
Also, with the d and d kit that I ran in my explorer, I had to cut the front case and weld in a block off plate to cover the hole where the chain went. This wasn't a huge deal, but I suck at tig welding so I had to get a guy to do it. Mine didn't leak after the second try at sealing it- and luckily the guy I had weld it did a wonderful job. But they were a little prone to leaking.
Behemoth said I can do whatever I want and the shaft won't break. front case in low, rear in whatever.
Ill have to lengthen the front driveshaft- that will help with the amount of available travel before my driveshaft bottoms, and I will have to shorten the rear driveshaft- which will help with the vibes it makes at 85 MPH.
I will post pictures when it gets here. Everything I am seeing and learning about it- I think it will exceed my expectations.

 behemothdrivetrain.com
I have never seen a doubler quite like this. I am really stoked to put it together and have low gears again. Once you have had low gears, nothing really compares.
They also have this beautiful billet tcable shifter- I got the twin stick setup. The doubler allows a ton of clocking options. My case hangs down maybe an inch now- should be able to fix it.

My front driveshaft is limiting my droop on the drivers side. And though my transmission gear swap has helped, I still want a little lower gears. I had decided I wasn't doing another doubler like I had in my explorer and on this build I would do an atlas. However, Advance Adapters no longer supports our platform. Thats not handy.
I ran across Behemoth Drivetrain a few months ago: Behemoth Drivetrain I know they used to have a terrible reputation but they have been purchased by a new owner, Jim. I called and spent some time talking to Jim and to his lead guy, Dillon, and I was really pleased to learn about where they have taken the company. Their shorty case for the 1354 Ranger and Explorer transfer case is a really innovative idea. It incorporates the whole front housing of the case into the doubler for a super short setup. The doubler basically houses the planetarium from both cases. It comes in at just over 4" over all!! I have 7" until I would interfere with the gas tank. Plenty of space.
I am pretty sure this case will fit in a Explorer Sport without getting into the gas tank.
This design also includes a support bearing on the shaft between the cases and a unique design for the intermediary shaft that allows it to be shorter because the transmission shaft goes inside the intermediary shaft.
When I had the d and d doubler, Duffy, the creator of the kit, told me never to put the front case in low when the rear case was in high. He said that would break the shaft in a heartbeat. That was a bit of a bummer because I wanted to use 2 low at times- and shifting the front without shifting rear would allow 2 low even when the hubs were locked. It also just made me feel a bit uneasy about the strength and reliability of the thing.
Also, with the d and d kit that I ran in my explorer, I had to cut the front case and weld in a block off plate to cover the hole where the chain went. This wasn't a huge deal, but I suck at tig welding so I had to get a guy to do it. Mine didn't leak after the second try at sealing it- and luckily the guy I had weld it did a wonderful job. But they were a little prone to leaking.
Behemoth said I can do whatever I want and the shaft won't break. front case in low, rear in whatever.
Ill have to lengthen the front driveshaft- that will help with the amount of available travel before my driveshaft bottoms, and I will have to shorten the rear driveshaft- which will help with the vibes it makes at 85 MPH.
I will post pictures when it gets here. Everything I am seeing and learning about it- I think it will exceed my expectations.
Ranger SHORTY Strongbox DIY Case
The DIY Ranger Shorty Strongbox underdrive by Behemoth Drivetrain is engineered for extreme strength, low weight, and incredible performance. This DIY model is case only - allowing you to choose and install your own gears. Gear Compatibility: The Ranger Standard Strongbox DIY case is designed...
I have never seen a doubler quite like this. I am really stoked to put it together and have low gears again. Once you have had low gears, nothing really compares.
They also have this beautiful billet tcable shifter- I got the twin stick setup. The doubler allows a ton of clocking options. My case hangs down maybe an inch now- should be able to fix it.
- Joined
- August 3, 2000
- Messages
- 35,053
- Reaction score
- 11,986
- City, State
- NORTH IDAHO, 7B
- Year, Model & Trim Level
- B2 "Slightly" Modified
- Callsign
- FOURTEN
drool!!!!!!!!!!!!!
how much does that set you back? Have to mod some mounts and some driveshafts but man your ranger just went next level with this!!!
how much does that set you back? Have to mod some mounts and some driveshafts but man your ranger just went next level with this!!!
Kirby N.
Elite Explorer
- Joined
- February 6, 2001
- Messages
- 2,654
- Reaction score
- 465
- City, State
- Colorado Springs, CO
- Year, Model & Trim Level
- 1991 Ranger
The box itself is $1395. Then the shifters. I didn’t get cables with the shifters- not sure what length will be ideal. Behemoth offers 4’ cables, others offer assorted lengths. Wondering if I ought to get 1 4 footer and see if I can make it work. Never really setup cable shifters before. In my explorer I fabbed up another shifter off the stock pivot and hooked them up with all thread and heims. They weren’t quite setup correctly though- the handles traveled too far to get them engaged. Needed a longer arm past the pivot on the bottom side.
- Joined
- August 3, 2000
- Messages
- 35,053
- Reaction score
- 11,986
- City, State
- NORTH IDAHO, 7B
- Year, Model & Trim Level
- B2 "Slightly" Modified
- Callsign
- FOURTEN
cables waaaay easier
48" might be enough do they have a 5' option? Ill have to checkout their site
Cant believe we are talking about behemoth again! good!!
48" might be enough do they have a 5' option? Ill have to checkout their site
Cant believe we are talking about behemoth again! good!!
- Joined
- February 18, 2015
- Messages
- 5,613
- Reaction score
- 4,565
- City, State
- Phoenix Az
- Year, Model & Trim Level
- 1991 aerostar
Klune used to offer an under/overdrive unit that was divorced you could mount a transfer case to. It was discontinued by the time I was ready to buy it.
Brian1
Elite Explorer
- Joined
- February 2, 2000
- Messages
- 5,129
- Reaction score
- 688
- City, State
- Albuquerque, NM
- Year, Model & Trim Level
- 1991 XLT
- Callsign
- KG5BAQ
I have the older version of the Behemoth shorty doubler and like it overall but it was kind of a pain to install. It works perfect with the 1354 but once you put it in an Explorer chassis it gets interesting to get it to fit. The clocking options are pretty much non-existent, there is 1 hole you can use, maybe 2 if you are lucky or else it just wont fit under the floor or hang really low. Also, I hope they have changed the design and made the threaded bolt holes bigger for stock-sized bolts. The old ones used a smaller bolt than stock that had a lot of slop, so far it hasn't been an issue but that was one of my gripes.
Do you have a body lift? I had a 1" body lift and it helped to fit it under the floor but I still had to cut some body and exhaust heat shielding. I don't know how people without a body lift are fitting the doubler, I never found a good install write-up showing how it fits in the Explorer/Ranger. I detailed my install a little bit in my trail Explorer thread and I would put it up against any other install as one of the cleanest out there for the 1354 shorty. I used the cable but made my own shifters and bracket off the stock mounting points for a few reasons, the big one being I like to pull back to go into low gear and with their shifter setup you push the lever forward to go into low. That is backwards from any other 4x4 I have ever owned.
Looking forward to seeing your install. Once you get it in and start using it you will like it too.
edit - Link for my doubler install
- Joined
- November 29, 2000
- Messages
- 10,597
- Reaction score
- 4,990
- Location
- USA
- City, State
- San Diego, PRofK
- Year, Model & Trim Level
- 1994 XLT
Seems like a good way to add length to the drive train and get more gear options. I've planned on getting a NWF iBox for a while now, just haven't jumped in.
I was looking on Behemoth web site and they have lots of options, but nothing about an Atlas. The NWF box integrates with Atlas, but maybe the 300 box does that for Behemoth.
When they are talking about gears, do they mean the planetary gears? I'm letting my ignorance of transfer cases show here, but I have a NP231 planetary under my workbench.
Kirby N.
Elite Explorer
- Joined
- February 6, 2001
- Messages
- 2,654
- Reaction score
- 465
- City, State
- Colorado Springs, CO
- Year, Model & Trim Level
- 1991 Ranger
cables waaaay easier
48" might be enough do they have a 5' option? Ill have to checkout their site
Cant believe we are talking about behemoth again! good!!
Thats good news! Behemoth only has the 4' option. I did tell think Jim might have had better success changing the name! JB Custom Fab has some different length cables.
Kirby N.
Elite Explorer
- Joined
- February 6, 2001
- Messages
- 2,654
- Reaction score
- 465
- City, State
- Colorado Springs, CO
- Year, Model & Trim Level
- 1991 Ranger
I have the older version of the Behemoth shorty doubler and like it overall but it was kind of a pain to install. It works perfect with the 1354 but once you put it in an Explorer chassis it gets interesting to get it to fit. The clocking options are pretty much non-existent, there is 1 hole you can use, maybe 2 if you are lucky or else it just wont fit under the floor or hang really low. Also, I hope they have changed the design and made the threaded bolt holes bigger for stock-sized bolts. The old ones used a smaller bolt than stock that had a lot of slop, so far it hasn't been an issue but that was one of my gripes.
Do you have a body lift? I had a 1" body lift and it helped to fit it under the floor but I still had to cut some body and exhaust heat shielding. I don't know how people without a body lift are fitting the doubler, I never found a good install write-up showing how it fits in the Explorer/Ranger. I detailed my install a little bit in my trail Explorer thread and I would put it up against any other install as one of the cleanest out there for the 1354 shorty. I used the cable but made my own shifters and bracket off the stock mounting points for a few reasons, the big one being I like to pull back to go into low gear and with their shifter setup you push the lever forward to go into low. That is backwards from any other 4x4 I have ever owned.
Looking forward to seeing your install. Once you get it in and start using it you will like it too.
edit - Link for my doubler install
Thanks for the link. Your install is clean! Yours looks like an older version like you said- with previous ownership. From what I understand Jim has been building this Strongbox for less than a year. I first talked to him when I was building my engine in the fall, but I wanted to get the engine sorted before I ordered one. I understand that they improved on the shifting design and detents. Your shift fork looks significantly different than the one in the install videos. I hope they also changed the bolt holes that you mention. I will ask about that.
I dont have a body lift. I was able to get my explorer doubler flat with a little trimming under there and some hammer work- not a lot. Mine was a sport- so it may have been different than yours. I expect I might need to do the same to get this one flat- I will document what it takes. I also trimmed some un needed material off the top if I remember correctly. Your shifters look a lot like the ones I built for my explorer- but I like that cable orientation going around the back. That is brilliant. It is tough because there isn't many others using this setup. I want a stock looking setup like yours. That is what I will be shooting for.
I remember the first thing I did with my explorer doubler is stood on the brakes in the garage and smoked the rear the rear tires at idle. That destroyed my engine mounts. Haha! Then I had one rip apart on hells revenge and had to chain my engine down. I dont think that will be an issue on my ranger because I have your engine mounts and Rockranger's transmission mount.
- Joined
- September 1, 2002
- Messages
- 14,117
- Reaction score
- 1,719
- City, State
- Lake View Terrace, CA
- Year, Model & Trim Level
- '91 Navajo '99 X '19 Rngr
I have the Behemoth on my wish list. Not sure if I can make it fit in the Navajo though. There is not a lot of room there, with the 2nd gen tank in the 1st gen.
What pitman arm are you running? I can't believe how flat your steering link is. Mine in my Explorer has way more angle.
What pitman arm are you running? I can't believe how flat your steering link is. Mine in my Explorer has way more angle.
Kirby N.
Elite Explorer
- Joined
- February 6, 2001
- Messages
- 2,654
- Reaction score
- 465
- City, State
- Colorado Springs, CO
- Year, Model & Trim Level
- 1991 Ranger
I fit a d and d in my sport with the stock tank. My rear axle was moved back 1”, so I modded the stock tank mounts to set the tank back 1” too. Then I cut the front of the skid off and the dampner and bosses off the transfer case and it fit. Like I said earlier, I really think the shorty would fit with out all that. I also like the idea of less tcase hanging off the back of the tranny and the strength of the design replacing the whole front section of the rear case.
My drag link is pretty flat. Thanks for noticing. I worked hard to get it there when I built it. I am running a standard ranger drop pitman arm and relatively low ride height with I think I remember 6” springs and full height f150 buckets. I noticed on my explorer that part of what limited my travel was the axle moving drastically laterally through travel because my drag link was steep- I built my track bar to match so I wouldn’t have bump steer. It drove fine, but it inhibited travel.
My drag link is pretty flat. Thanks for noticing. I worked hard to get it there when I built it. I am running a standard ranger drop pitman arm and relatively low ride height with I think I remember 6” springs and full height f150 buckets. I noticed on my explorer that part of what limited my travel was the axle moving drastically laterally through travel because my drag link was steep- I built my track bar to match so I wouldn’t have bump steer. It drove fine, but it inhibited travel.
- Joined
- August 3, 2000
- Messages
- 35,053
- Reaction score
- 11,986
- City, State
- NORTH IDAHO, 7B
- Year, Model & Trim Level
- B2 "Slightly" Modified
- Callsign
- FOURTEN
60” cables a little easier to work with allow you enough room to make a full u turn and keep it from getting too tight of a circle
I have a bii with no body lift and a v8 stuffed in there with huge transmission, I still bet I can make one of these suckers fit") now just need some money hahaha
now just need some money hahaha
I have a bii with no body lift and a v8 stuffed in there with huge transmission, I still bet I can make one of these suckers fit
now just need some money hahahaKirby N.
Elite Explorer
- Joined
- February 6, 2001
- Messages
- 2,654
- Reaction score
- 465
- City, State
- Colorado Springs, CO
- Year, Model & Trim Level
- 1991 Ranger
@Brian1 I talked to Dillon today at behemoth. He said the shifter forks have been updated with billet steel instead of fabricated parts and the moving parts have been case hardened and hard coat anodized. He also said all of the assemblies use holes that are 1/32" of an inch larger than the bolt for clearance- which is an industry standard- and they haven't heard of sloppy bolts.
Brian1
Elite Explorer
- Joined
- February 2, 2000
- Messages
- 5,129
- Reaction score
- 688
- City, State
- Albuquerque, NM
- Year, Model & Trim Level
- 1991 XLT
- Callsign
- KG5BAQ
@Brian1 I talked to Dillon today at behemoth. He said the shifter forks have been updated with billet steel instead of fabricated parts and the moving parts have been case hardened and hard coat anodized. He also said all of the assemblies use holes that are 1/32" of an inch larger than the bolt for clearance- which is an industry standard- and they haven't heard of sloppy bolts.
Maybe I wasn't clear enough - If you take the factory transmission to t-case bolt and compare it to what the Behemoth is drilled and tapped for, the stock Ford bolt is larger and will not thread in them, not even close (and not because of a metric vs SAE difference). They, at least on the old version, require a smaller bolt to mate the doubler to the transmission adapter flange. To put some numbers to it it was something like the transmission flange has 1/2" holes for the bolts and the Behemoth is tapped for 3/8" bolts. A 3/8" bolt in a 1/2" hole was really sloppy and I was worried about torque rotating the whole doubler around the shaft at the mating face because of that slop but so far that hasn't been an issue I have noticed.
Its good they upgraded the shifting mechanism, the old one was kind of janky. The problem where it chewed up the inside of my case was probably because loctite was not used on the bolts holding the blocks to the swing arm when it was assembled at Behemoth.
Elite Explorer members see no advertisements, no banner ads, no double underlined links,.
Add an avatar, upload photo attachments, and more!.
Kirby N.
Elite Explorer
- Joined
- February 6, 2001
- Messages
- 2,654
- Reaction score
- 465
- City, State
- Colorado Springs, CO
- Year, Model & Trim Level
- 1991 Ranger
@Brian1 here is the response:
"Newer cases use 10mm bolts (0.394”). Older cases use 3/8” bolts (0.375”). Behemoth Drivetrain uses 3/8”. With only 0.019” difference, this is not going to be the issue. The through holes in the transmission adapter would be nearly the same “slop” with either thread size.
The industry standard for this through hole would be about 0.406” to 0.438”. We will almost always drill these to 0.406” on any components we are manufacturing.
Older Transfer cases from Ford, Chevy, Dodge, and Jeep will be 3/8" bolts. They all started moving to metric around the late 80's. Behemoth has always used standard bolts, no Ford case used 1/2" Bolts to mate to the transmission.
Explorer Features


Explorer Features
Similar threads
- Replies
- 15
- Views
- 1,268
- Replies
- 10
- Views
- 1,839
- Replies
- 25
- Views
- 14,688
- Replies
- 1
- Views
- 1,879
- Replies
- 17
- Views
- 3,232