ExplorerKing01
Well-Known Member
- Joined
- November 8, 2009
- Messages
- 115
- Reaction score
- 0
- City, State
- flower mound tx
- Year, Model & Trim Level
- 03 eddie bauer
okay thanks for cleaning that up for me i was kind of confused on the order
Bluebaboy, very interested in seeing the finished pics of your truck. Were you able to get the front bumper cover back on without lifting the bumper? I know mine was real tight with just the 1.5"...didn't look like enough clearance for another .5". also what did you do for your back bumper?
okay so you put the new body block on top of the the rusty metal disk
will let you know as i'm painting both bumpers at the moment and have not yet tryed to fit them. you think i'll have trouble?
If you cut enough off the bottom of the rear bumper you'll be fine but I can only imagine how much of a pain in the a$$ the front will be. I could be wrong though. Did you have to use a steering shaft extension?
I didn't cut either it hugs bottom of rear but will fit and front still fits fine...
No need for extension with 1.5 just make sure to unhook at start and rehook at end...

I didn't know cutting wasnt necessary.
Bluebaboy did a 2" bodylift, not 1.5" so he may have fitment problems
")
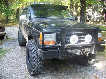
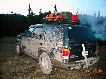
well after doing the 2 inch lift here's the results. was originally going to only do 1.5 lift but stumbled accross 2 inch alloy blocks from my neighbour.
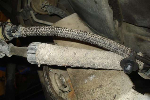
Any way after getting under car and checking that nothing would be affected by the lift , mainly cables for auto as on floor and steering which i didn't have to disconnect as is on a slide and just extended itself as i gently lifted .All good.
I had to do a fair bit of cutting on the rear bar . Cut the curve out of the bottom and on the sides, so when you look from the back you can see i bit of the steel bumper underneath,as to far to stretch. Nothing major though.With the front bar i only cut a tiny bit underneath and was easy to fix. As the bumper won''t stretch down over the two mounting brackets i just cut a bit of square steel,not heavy gauge about 630mm long and scrwed it underneath to the side of the original brackets at the height that the plastic bar sits at now.Then that gave me a edge to screw the bottom off bar too.
Took it for a test drive and was very pleased that there was no weird sounds coming from anywhere.Drove as before but better if you know what i mean.Will post pics up soon as stuffed up the painting of rear bar and am redoing.
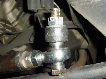
I started this project on my '02 Mountaineer and the preliminary stuff was fairly easy. Removed the seats, grill, trim, etc. in less than an hour. Most of the mounts broke loose with only minor difficulty. I expected some trouble because my '91 Explorer broke my buddy's nice Craftsman breaker bar before we got that lift installed, but once I got the metal disc to stay put, I was able to crack them loose pretty easily. I am having trouble with two of the bolts and that is why I am posting, to ask for help. The two I am having a hard time with aren't the front two like most people have been. I am struggling with the center set. They are located directly above the frame and I cannot get my wrench on the metal disc to hold it while I break the bolt loose? How did y'all get to that one? I can take it to my friend's house in a few days to weld a piece of rebar or something to the disc so it can't spin, but did you guys get it without welding?
okay this mite be a stupid question is liquid wrench better then WD40
Liquid Wrench is FAR better than WD-40. WD-40 is not a penetrating oil, it's a Water Displacement formula.
If you really want a good penetrating oil, use PB Blaster.
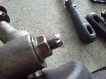
Welded some bolts to the center discs to keep them from spinning. Worked quite well. The only other problem I ran into was that my bolts didn't match what everyone else used. B, C, D, E were all the same size and I used 120mm on all of them. The 130s worked but I couldn't reuse any original bolts except A and one of those was bent so I had to replace it. Other than that, lift went ok and its done. I have an odd problem though, since the lift when I stop at a red light my idle will drop a couple hundred rpms then jump up a few hundred then die. Did I pull something loose?