Adjustable bump stops | Ford Explorer Forums - Serious Explorations

  • Register Today It's free!

Adjustable bump stops

DB_1

Elite Ranger
Joined
October 23, 2001
Messages
3,765
Reaction score
42
City, State
La Quinta, Ca.
Year, Model & Trim Level
97 SC Ranger xlt
I guess this could have went in a couple different forums but I'll put it here:D

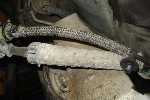
My first version of bump stops didn't work out so I figured something adjustable was in order. I took a page from the guys running the bling air bumps and made my own bump cans.

I used 2" HREW and cut the seam out, the seam made for a nice straight line to cut from. Then I used 1.75" tube for the bump stop to mount to.
Next was to take some 2"x .188 wall square tube and cut one side out for the 2" round tube to sit in. It seemed to be a stronger approach than just using flat plate welded to the tube plus I had a nice flat back to bolt to the frame.
The bolts had to be inserted first between the round and square tubing before welding since it would be near impossible to insert a nut inside after the fact. I could've welded nuts on there but this was easier.
Finally, I used 3/4" x .120 wall tube for the pinch bolt rings. I suggest using a band saw or sawsall to cut this small tubing. Deburring after using an abrasive saw is a royal PITA.

I didn't want to paint them until I was sure they would work and it looks like they will:thumbsup: I'm gonna have to make an adjustment on the passenger side, the coil rubs on the bump stop on full droop.

Here's some pics:

dscn0110.jpg


dscn0111.jpg


dscn0112.jpg


dscn0119.jpg


Join the Elite Explorers for $20 each year.
Elite Explorer members see no advertisements, no banner ads, no double underlined links,.
Add an avatar, upload photo attachments, and more!
.


Adjustable bling bumpstops - thats money DB, freaking money right there.

bling1233607244.jpg


Those came out bling fo sho! :cool:


Thanks...a couple suggestions if you decide to make your own bump cans, don't use an abrasive saw to cut the pinch bolt rings or whatever you want to call them. It took me forever to deburr those little suckers, probably took the most time to deal with than anything else:rolleyes:
The other thing is turn down the voltage and wire speed (if your using a wire feed welder) a notch so you don't burn through the rings.


I like! I'll have to add this to my "to do" list for the Pumpkin.


I like! I'll have to add this to my "to do" list for the Pumpkin.

Thanks;)...speaking of the Pumpkin, is it gonna be ready next month?


So are the Bolts welded to the square tube or in there loose and to slide a wrench in behind there to tighten them up ?


Thanks;)...speaking of the Pumpkin, is it gonna be ready next month?

I do plan on bringing it. It's going to have it's doors on it though.


So are the Bolts welded to the square tube or in there loose and to slide a wrench in behind there to tighten them up ?

The bolts are in there loose and there's just enough room to get a wrench in there. In hindsight, I could have cut the square tubing longer with the ends angled to access the bolts easier...coulda woulda shoulda:p:

Good news Rick, it'll be good to see you and everyone else who can make it out:salute:


Great Idea Dave:thumbsup: So is the Idea that if you compressed to hard it would compress more?


This also gave me another Idea? What if you took say a factory shock and cut part of the shaft off and put a bump on the end? Cheap bumpcan:D


Great Idea Dave:thumbsup: So is the Idea that if you compressed to hard it would compress more?


This also gave me another Idea? What if you took say a factory shock and cut part of the shaft off and put a bump on the end? Cheap bumpcan:D

If I understand you correctly, only the urethane compresses...how much? I'll have to wheel it and adjust accordingly, that's the beauty of the set up. The main function for these in my case is to keep the diff from crashing into the X-member and tires off the coils.
I don't expect to be hitting huge sets of whoops and still have a Cadillac ride.

As for your other comment...try it, i'd like to see how that turns out:p:


I gess that why I have a RTI rampatmy disposal:p: However I still have no bumpstops:(


I think Stic was asking if the pinch bolts tighten enough to keep the tubes from telescoping under hard compression. Or at least that's what I'm wondering! :D


way to go Dave, thats thinking outside the box, your Ranger has come a LONG way in the last two years = jealous!!

friggin sweet idea and implementation

I wonder though, once you get the height set correctly why do you need the adjustment?


Bill, I guess time will tell if those pinch bolts will hold. I've only given it the crawl-up-a-rock test but we'll see how it does on the big hits.
I'm using 1/2" bolts on mine but I believe the aftermarket bump cans use a smaller bolt like 3/8" or so. I would think mine has plenty of clamping power...I hope:D

Jaime, I already made one height adjustment while testing these out so for me this design was worth it. My original version wasn't even close and I have no real way to flex this thing at home so it's a bit of trial and error. You are right though, once they are set you probably don't need the adjustment but it's nice to know it's there;)


Cool design, I do fear that with the right hit, it will slide the "inner shaft" right through the mounts. FYI, that has been an issue with air/hydro bumps and a lot of guys now have some sort or ring or lip built into this to eliminate the can from sliding. They adjust the amount of air for how much compression if I recall. We had this issue when guys first started designing clamps for wakeboard towers as well, the only solution was a clamp that was actually oval. I was around the design end when this was just taking off and 90% of the companies were doing it wrong and customers where buying really good looking garbage. This type of clamp was the answer, more oval

pf2-chr_top850.jpg


That is just to hold a couple 20 lbs wakeboards on a boat, not a full truck.


In all reality, if you're bombing down a wash that will be the hardest these will ever compress, not on an off camber wheeling situation. It would be then that you'll ensue the damage that you are trying to avoid. Like I said, from what I've seen there is no amount of tightening a pinch bolt that will help this.

I'll add a picture of what you could to to prove me wrong, draw a line 1" down from the can. If you go wheeling and measure that line at the end of the day you will know if it moved. If not, bravo, I'll eat my words.

The other ideal situation to find out your max bump travel doesn't need an RTI ramp. You need to know how much your bumpstops compress. I have bumpstops on the front of my truck that look very similar to the rubber ones you have dave. static they sit about 4.5", but compressed they crunch down to 2.25-2.5".

I was pushing tires into my fenders, firewall etc. Here is how I fixed this as well as determined how much my bump stop would compress.

1) jack up truck, support by frame, allow suspension to droop free
2) remove coil spring(or coilover) you can and should keep your shock on there if they are already mounted
3) place wheel back on truck
4) jack up and cycle suspension and see what/where will hit first. Can that be cut/trimmed? then I'd suggest that, if it is a crossmember/frame you will hit, then set your bumps in place for maximum uptravel while utilizing your bump stop to fully compress before you contact the frame. Give yourself an inch for good measure. If your shocks limit your uptravel, I'd suggest changing the mounts.

I got lucky, I mounted my bumps, cycled the suspension with the coil out and tire on and the ones I picked up did the job great. Even a rubber bump stop acts like a secondary suspension to soak up some of the deep bumps. I definitely noticed it when driving.

Stic-o- as for cutting apart an old shock, won't work. A regular "stock" shock doesn't have enough charge to extend on it's own. It would push up once and be done.
 

Attachments

  • wmdscn0119.jpg
    wmdscn0119.jpg
    46.6 KB · Views: 1,425


Once you figure out the ideal bumpstop height, you could drill a hole through both tubes and put a hitch pin in. If you ever want to change height, drill a new hole! :cool:


Join the Elite Explorers for $20 each year.
Elite Explorer members see no advertisements, no banner ads, no double underlined links,.
Add an avatar, upload photo attachments, and more!
.


Dan, all good points and well taken. I've got plenty of uptravel, more than I can currently use mostly because the tires get into coils on full stuff. By full stuff I mean in a Truckhaven notches articulation kind of way and not a whoop section where the axle as a whole is moving up and down.
Where the bump stops land in either of these situations varies by about 2-3" meaning in side to side articulation, the landing area on the axle is pushed away from the center of the bump stop.
Currently my lower shock mounts are as far out as they can be and the top mounts are in as far as they could be without the C/O rubbing on the frame on full droop.

I will wheel it as is and see how it does while taking note of any movement. When i'm comfortable with a height setting, I'll probably weld a 2" sleeve on the 1.75" tube that the bump stop is mounted to.

Steve, like Dannyboy said a stock shock won't work mostly because real air bumps are really just air shocks so the spring rate gets stiffer as it compresses. A normal shock does not have this action...good intention though:)


Back
Top