CV Axle Replacement How To (Pictures) | Page 13 | Ford Explorer Forums - Serious Explorations

  • Register Today It's free!

CV Axle Replacement How To (Pictures)

Good work, keep at it.

Go slow installing that seal. Those have springs in the backside of them, to hold the seal against the shaft. Those are easy to dislodge while installing, if you miss and hit the inner portion a little. Get a good fitting tool to install it, and make it go in evenly.


Join the Elite Explorers for $20 each year.
Elite Explorer members see no advertisements, no banner ads, no double underlined links,.
Add an avatar, upload photo attachments, and more!
.


Good work, keep at it.

Go slow installing that seal. Those have springs in the backside of them, to hold the seal against the shaft. Those are easy to dislodge while installing, if you miss and hit the inner portion a little. Get a good fitting tool to install it, and make it go in evenly.

Hey, Many Thanks Don!
As it turned out, "Yanking my Shaft" turned out to be quick & easy....(NOT the way to go as a Real Man)...... :^)
However, The Differential seal for the "inner" that I shared earlier turned out to be the Wrong seal, (I needed a larger diameter).
Once I pulled the CV shaft out... (Still looking prime after 300K.... How could That be???), I realized the Seal that I needed was about another inch in diameter than the seal I copped from NAPA, (back in August, once "plans" started taking shape). Outer "dirt seals" were correct though and I've got that outer side install procedure down Pat, thanks to y'all's advice.
I took this picture, (attached, couldn't "insert" here), of the "inboard sides" of the wrong seal, next to the correct seal, (That I packed with heavy grease), and the "spring" from the old seal, so that others can get a view of what all the fuss is about with that "spring that may get tossed into the differential", if not stayed by the lube. (Yeah, I had to run out to the Advance store 3 miles away, but Jeep made it o.k..... & next to the Advance, is a beer store that sells 16oz. PBR Tall Boys). :^) Toughest part of the whole "side track" of doing this seal while I was in there.... Installing the New Seal..... YIKES!!!! Sucker would NOT line up...... 2 Hrs. Later, I caught an edge, and used a Ball Joint press adapter to hammer the dog~gone thing in at least partially, to then work around the edges and finally get it flush. Heavy Grease internally, to keep that "spring" where it should be, and synthetic lube externally, to reinstall the CX axle back smoothly...... And a wee bit of blood from smashing my thumb with a hammer...... #JustBecauseIcould
Earlier, before my reply/thanks post this afternoon, I gave it all a good look, and topped off the Differential oil and it took about a pint, (75-90 gear oil). It was that much fluid going in that made me realize that I'd better address this issue now, while I had it all apart. Sure, probably added another 5 hours to the project, but it'll pay off in the long run, without additional slop being tossed about underneath from the differential. I don't believe that I ever ran the differential dry, (topped it off about 6 months ago when noticing the "slop" while doing an oil change, and I was still studying all this great info, prepping for the Ball joint & Hub replacements. (Left Front Hub was Horribly noisy for at least 2 years, and was obviously TOAST when I looked at it's inner side once removed Sunday). (I drove it like toast for about 20K....... Frightening what could have happened..........
Darkness ensued this evening but, just need to reinstall the knuckle, tying it to the new Hub, Upper control arm, (with upper ball joint....which was also TOAST), lower ball joint and new outer tie rod end. (Are there "inner" tie rod ends???)(just seems to be some shaft that crosses from side to side, covered with "cv boot" type of rubber).
I marked all Caster/Camber lobes prior to removal of the upper control arm, and reset to those marks upon reinstallation. However, with my last alignment having been about 3 years ago, as things were already wearing thin, I'll take it over for an Alignment by noon tomorrow. I think the guys there will be relieved that all the bolts and nuts are "free", from being rusty, unmovable bindings, and hopefully they will give me a true alignment. (I've always been suspect previously that my alignments were fudged, as a LOT of these fasteners required major torque, freeze~out and some torch action to free during this project).
Other Items I also addressed: Cleaned and lubed brake caliper glide pins, new (anti) sway bar links & bar bushings, new shocks, extra lube points, (control arm/upper ball joints came with NO lube points.... Come on NAPA).....????
300K+ miles on this baby.... (Odometer plastic drive gear disintegrated years ago around 235K, then drove it another 6 years.....)(Ordered replacement after reading all about it HERE on Explorer Forums) Odometer Now says 285K.....
****, that's a Lot of typing......"Garçon, more PBR por favour"....... THANKS!!!!!

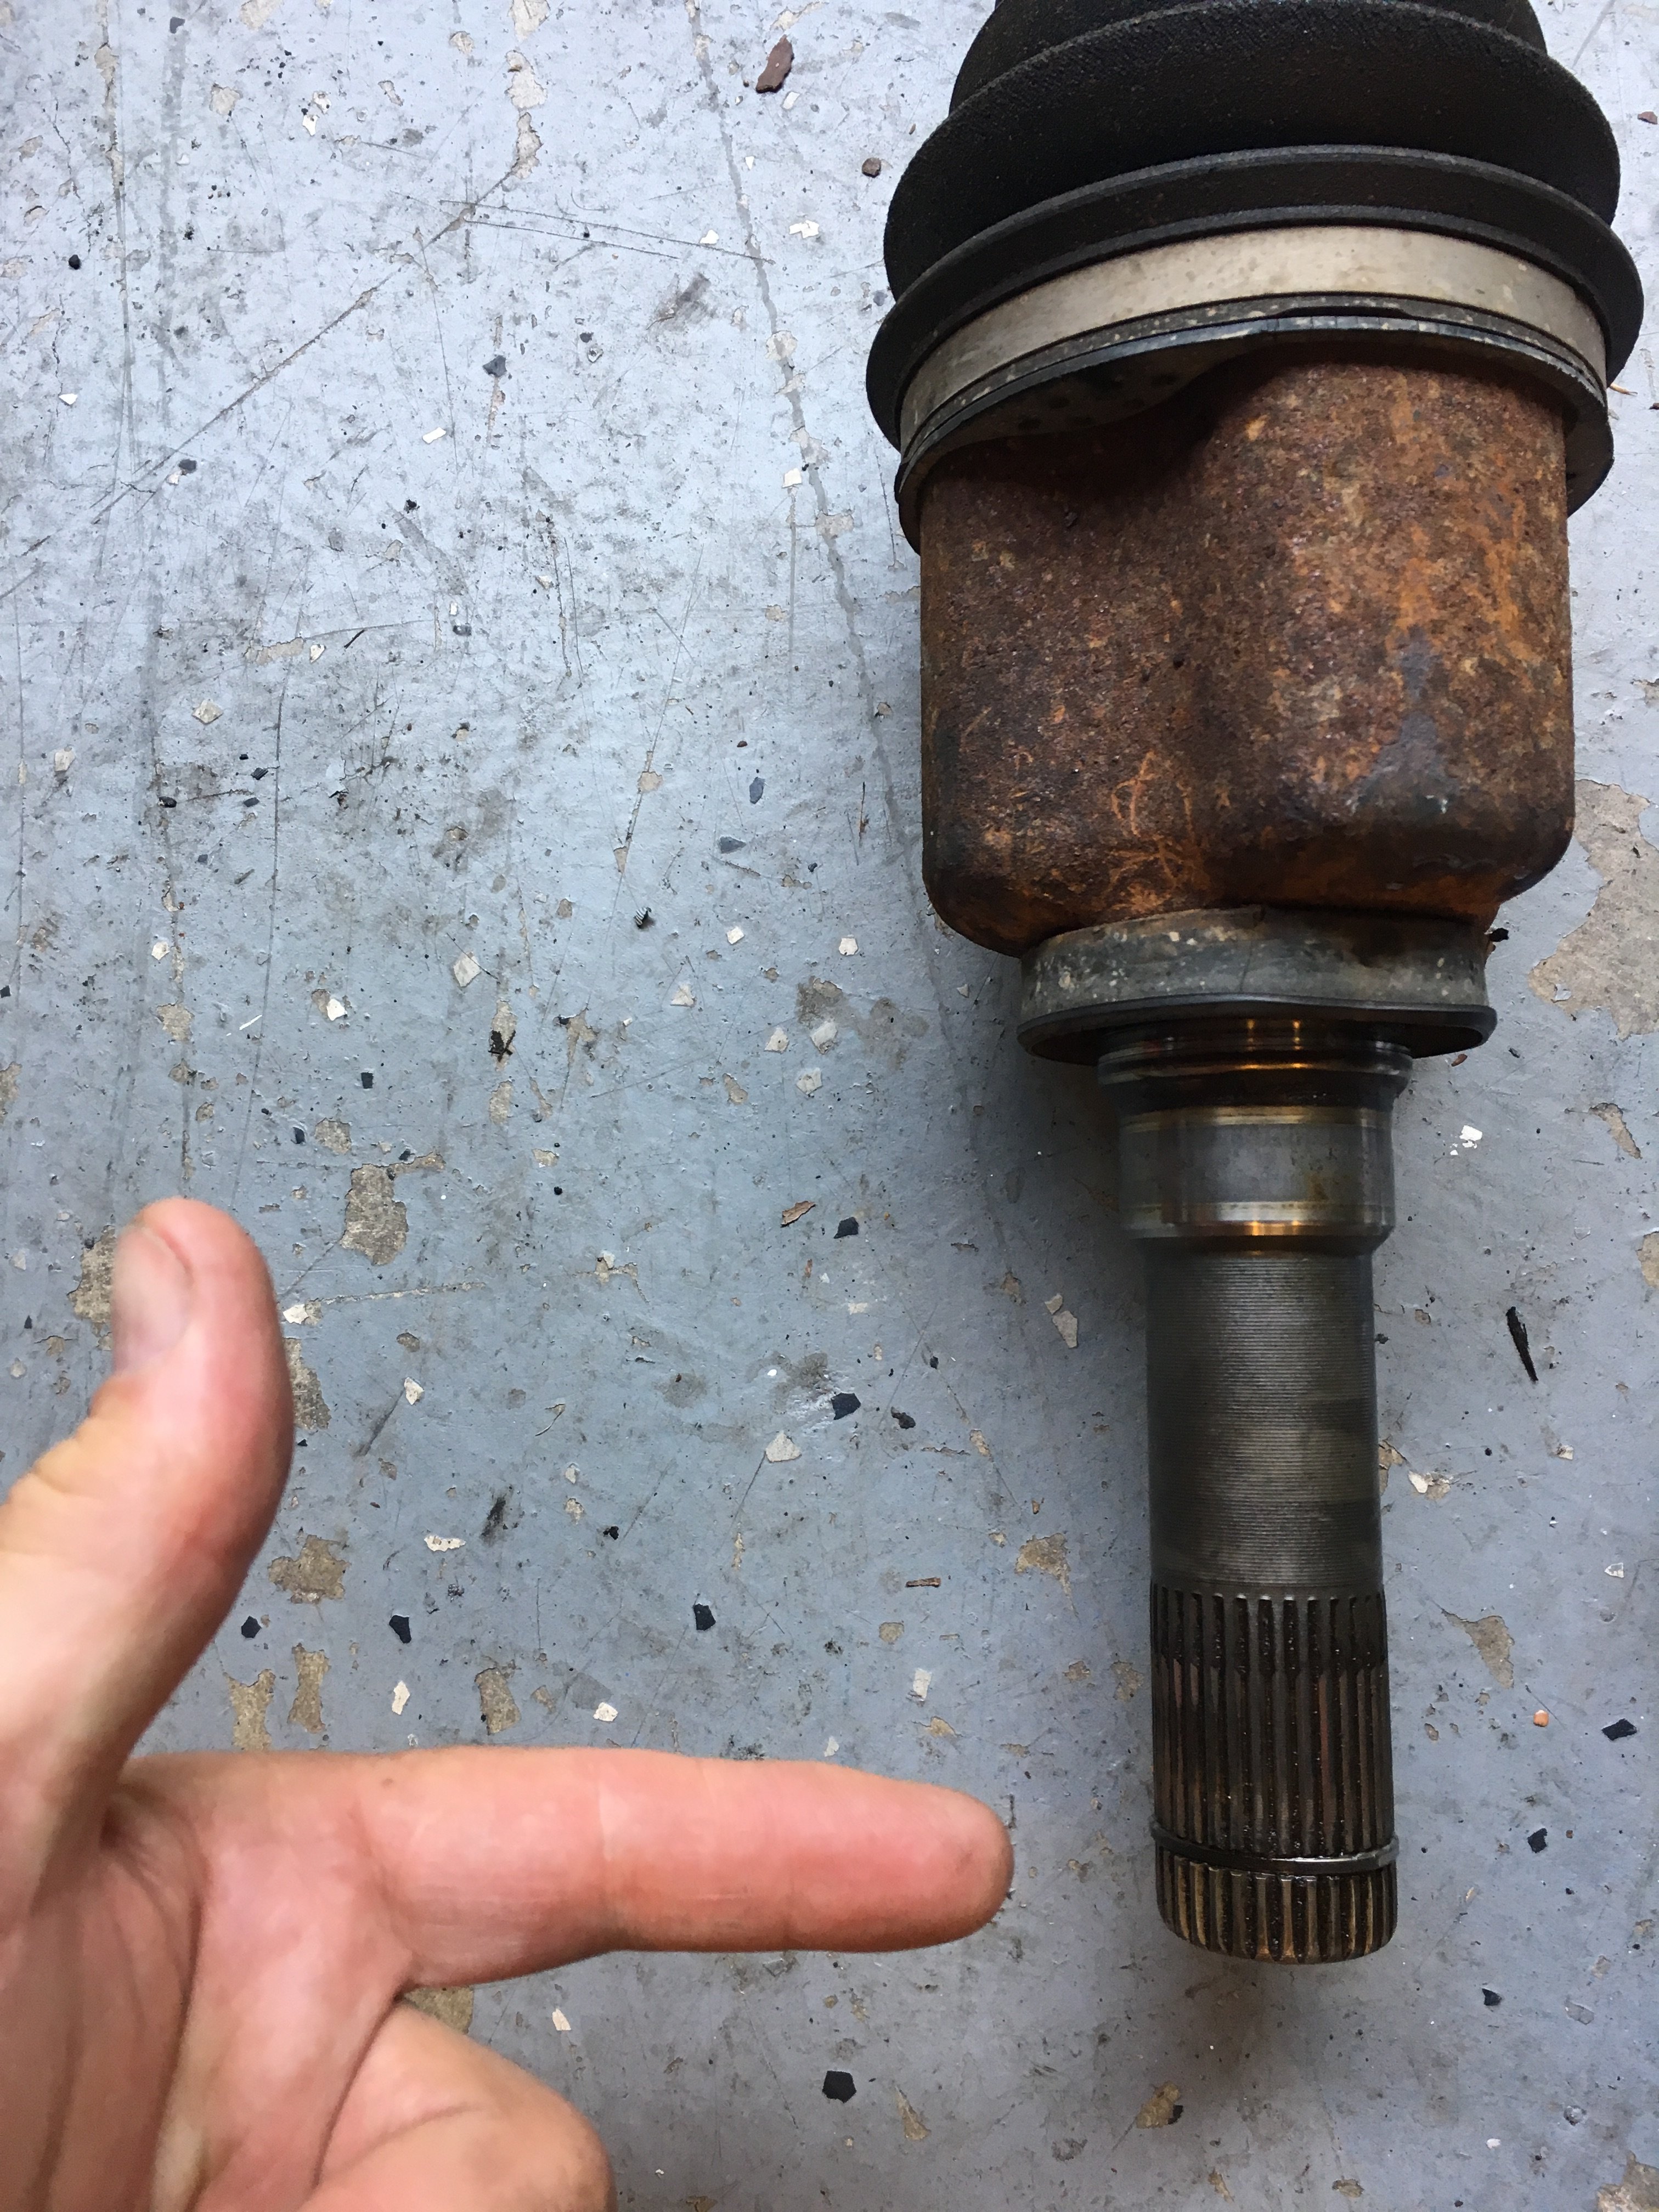
image.jpeg


Good job, those axle seals are large, and one side is smaller than the other. I've got to get my Mercury back together also, it;s been apart for almost nine months. It's odd to see it with no axles in it for so long. Maybe tomorrow, nice weather for a change too.


Good job, those axle seals are large, and one side is smaller than the other. I've got to get my Mercury back together also, it;s been apart for almost nine months. It's odd to see it with no axles in it for so long. Maybe tomorrow, nice weather for a change too.

Hey, Thanks again Don.

Just about to head out a finish the "project" off. Cooler here today in Charlotte than it has been, (unusually warm), this past weekend.
Never been up to Knoxville, but was slated to head up just a couple of weeks ago to see British Comedian, Eddie Izzard, at the Tennessee Theater. Wound up not going as I knew I'd REALLY be pushing my luck with the Explorer, and the Jeep would have stranded me somewhere with that slipping Torque converter....... Most likely on my way up "the Big Hill"...... Thanks again!!!!
P.s., I now see that this Original Post s from 10 Years Ago???? Yikes!!!


My Super Ex-Girlfriend, that was a good movie, that's how I know that name Eddie Izzard.

This was one of the best threads about the CV axles of the 2nd gen's. I'm sure this has been read thousands of times, helped a lot of people I'm sure.


Hi All: This is a great thread and props to the OP for creating it.

Like a lot of people, I had a LOT of trouble getting the inboard splined shaft of the axle out of the differential. I read this whole thread, a lot of other threads, and watched videos like this one:
but I just couldn't figure it out: I was using a prybar in all sorts of different configurations, but the shaft simply would not come out.

Several posts have mentioned the "circlip" on the inboard splined shaft. This is critical. You can't see it when the axle is installed: it's inside the differential, around the inboard splined shaft. It clips into a detent inside the diff and keeps the inboard shaft from sliding in and out, which would jeopardize the seal. The thing is this: you almost guaranteed can't get the inboard shaft out of the diff by gentle prying or wiggling or wigglingWhilePrying, or even aggressive prying. A solid blow is required to pop the circlip out of its detent and release the shaft. I used a 10" 1/2" drive extension and a small sledge. Yes, the angle is wonky - especially on the driver's side, but worry not; drive it out with the 10" extension or some other driver. It *will* come out.

Inboard splined shaft, pointing at the "circlip"
Circlip


I'm in the middle of shaft and hub replacement on a 220K mile 1998 V8 AWD Mountaineer. No leaks from the axle seals!

Looks like I'll have to pinch down the clip on the left side axle because it WILL NOT go in. Curious thing, the old OEM axle had no clip, just an empty groove.

Edit: I took the ring off the new axle and pinched it down until the ends nearly touched. Byt the time I got it back on it was spread back to where it was originally. Upon further examination of the old axle, it does have a ring. Looks to be square section and it sits below the tops of the splines. That's a job for Sunday since it's almost 5:30 and starting to get dim in front of the shop due to the sun setting behind the grain silos across the street.

Never a noise from it until the bearings started to go. Figured I may as well change the axles while I have things apart. Had to put a new radiator in, because nobody just replaces plastic tanks anymore. Also recently rebuilt the transfer case. Rear end was getting whiny so I drained it and replaced fluid with extra high moly lube and the recommended friction modifier. Over time it's quieted down. Engine and transmission are still excellent, no noises they shouldn't make. :)

I'm removing the metal shields in the hub holes, never were on a very late 97 build 1998 Mountaineer I replaced the right side shaft on. The new shafts have the dust seals on the outer joints. Their outer lip is slightly inboard of the shoulder on the shaft, so they should not quite touch the stationary part of the hub.

Didn't have to disconnect the tie rod, just the lower shock mount so it could be tied to the rear, and the upper ball joint pinch bolt. Get the inner end pulled out and pus it up above the differential. Then turn the steering to the left a bit so the knuckle leans out as far as it can. Then you can compress the inner joint and angle the outer one to get it out of the hub hole in the knuckle.

The joints *would* fit through the knuckle if not for the boots. I suppose if one wanted to remove the large boot clamps then pull the boots back and squeeze them down this could be done without taking parts of the suspension apart. Then you'd have to put new clamps on the boots.


Let me know how that goes removing those dust seal rings, the steel ring on the backside of the spindle? I bought a pair of those thinking I was getting the dust seals. I had the seals eaten(melted) on two axles that I think were from Autozone. I had never messed with those before, I thought they were set in the rebuild process to the right depth. If they touch too much, they will first make noise(whirr), but if too much they will melt soon.


Let me know how that goes removing those dust seal rings, the steel ring on the backside of the spindle? I bought a pair of those thinking I was getting the dust seals. I had the seals eaten(melted) on two axles that I think were from Autozone. I had never messed with those before, I thought they were set in the rebuild process to the right depth. If they touch too much, they will first make noise(whirr), but if too much they will melt soon.

I just put a chisel on one edge and drove the ring through the hub hole. Once it was knocked loose I was able to get hold of it and pull it back through the hole, then toss it onto my dumpster. Looks to me like the main function of that metal piece is to hold whatever water gets between it and the hub so that eventually it can get into the bearings.


That would do just that. My thought was it'd make a smooth surface for the dust seal to ride next to.


New hubs and shafts look great. Too bad they don't stay shiny. After getting everything back together and wheels on the ground, I torqued the hub nuts to 150 pounds, high as my wrench goes. Then I used my longest bar and got another 1/8th turn on the nuts.

Right side went much quicker than the left side. No fuss with a junky snap ring and having to take it off the old shaft. Just got in there with a big flatblade screwdriver and popped it out. New one snapped in easy as could be.

Unbolting the bottom ends of the shocks then using tie wire to hold them to the rear got them out of the way. Owning two 3 ton floor jacks helps a lot. ;) I left one under the middle of the crossmember and had stands under the lift points behind the front wheels. Also put on the parking brake and blocks behind the rear wheels. Safety fist, second, and fifth!

20181104_150304.jpg


20181105_115259.jpg


Watch the axle seals for a few weeks after having the axles out. I have my right one leaking slightly, and it was a new seal back in May or so. I've got two better outer TRE's to go in anyway, so I'll be pulling the right axle also, and topping off the grease again.

FYI;
Check your gas pedal bracket on the firewall too. I just got done repairing my 98 today where the three spot welds were just beginning to break. You can see them on the outer surface of the firewall, just to the inside of the steering shaft hole. The spot welds are small bumps on the flat surface there, all three in a line up and down. Don't rub it hard with your finger, just gently. If it's cracking there, the edges will be very sharp. I caught mine in time, the pedal deflected showed a lot of movement of the bracket it pivots on, and now it doesn't really move at all, like it used to be. I did the same thing preventatively with my 99 in 2006. I drilled through the two end spot welds, and used two short bolts with large integral washers. The big washers are important for it to work properly, small washers won't support the metal well enough.


Changed my passenger side one hoping it would alleviate my vibration issues.

Got a Precision unit from O'reilly on the recommendation of @Turdle. They gave me the wrong side. I should have checked it :rolleyes:. Explorer is sitting in my driveway on jackstands on Christmas. Next day, O'Reilly is out of stock for the correct side. NAPA is out of stock on both new and reman, in two stores in my area. Carquest has new one in stock. Used a coupon code to get 25% off, so price was $54.74 before tax.

FYI: Carquest part number NCV11110 (passenger side) was a GSP brand inside the box.


First off would love to thank each and every one of you. Replaced my hub assembly The other day on my 2000 explorer 4x4 with 303k+ due to very bad growling at all speeds. (Louder the faster I went) would go away if I turned to the right indicating that it was the passenger side bearing. While removing the old one, noticed a large amount of grease and gunk behind the axle nut and the very end of the CV boot was ripped all the way around. Never gives any clicking or anything so I figured leave it be don't have the money to order a new CV axle at the moment. After fighting to get off the old hub assembly I think I may have pulled too hard on it while it was still connected to the CV axle. Once I got the new hub on and everything seemed ok (besides the fact I forgot to tighten down the axle nut after hand tightening it) got out of the driveway 2 houses down and smacked myself, jumped out tightened it as tight as possible with a cheater bar (no torque wrench available) drove around the neighborhood noticed it would shake pretty bad around corners. Took them nice and slow for about 10-15mins. It was gradually going away. I figured maybe breaking in the new bearing? Take it out to a main road reached 60 no problems at all in a straight line. THEN slightest right turn at about 55-60mph and entire truck shakes as if the tire is about to fall off. Mainly coming from that front passenger side. Slowed way down, took a back road home and parked. Did a bunch of research on what it could be and found out its more thank likely the opposite side of the passenger CV axle, not the side that clicks. Ordered a new passenger side CV axle and about to get into it. This thread has helped tremendously!!!


You may have trashed the new hub's bearings with that short drive without the nut torqued down.


You may have trashed the new hub's bearings with that short drive without the nut torqued down.

Man I sure hope not!!! It is an easy fix and all but still! Really don't want to have to buy another one already!


Update: after working on swapping the CV axle, found out the TRE in a COMPLETE P.I.T.A!!! I don't think mine have ever been changed. Maybe once a very long time ago. And the old axle didn't just pop out, had to pry it out carefully!
Also I'm done for the night because I was unable to get the new axle to set in all the way into the diff. There's maybe 1/4" or so left for it to go into the diff. Tried pushing, slightly hammering, and prying. Can't get the dang thing to go in. Any options anyone??


I had to remove the snap ring from the old axle and use it to replace the one on the new axle because the new one was a cheap POS piece of wire that wouldn't stay tight enough to allow the axle to slide all the way into the diff. With the old ring on it just popped right in.


I had to remove the snap ring from the old axle and use it to replace the one on the new axle because the new one was a cheap POS piece of wire that wouldn't stay tight enough to allow the axle to slide all the way into the diff. With the old ring on it just popped right in.
Awe crap that'll mean taking it all back apart again. I'll have to check into that!!! Thank you!


Join the Elite Explorers for $20 each year.
Elite Explorer members see no advertisements, no banner ads, no double underlined links,.
Add an avatar, upload photo attachments, and more!
.


I had to remove the snap ring from the old axle and use it to replace the one on the new axle because the new one was a cheap POS piece of wire that wouldn't stay tight enough to allow the axle to slide all the way into the diff. With the old ring on it just popped right in.

Did you mean inside the old CV axle? There isn't one inside mine, there's one on the spline in the diff. Picture of old axle attached.

IMG_20190203_181836457.jpg


Back
Top