does this make my rear end look fat? | Page 4 | Ford Explorer Forums

  • Register Today It's free!

does this make my rear end look fat?

Wicked flex!

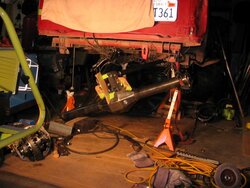
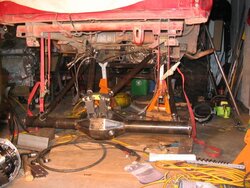
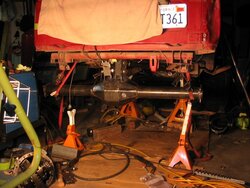
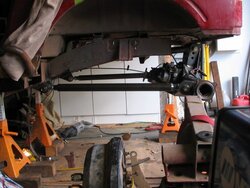
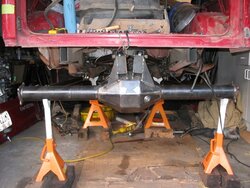
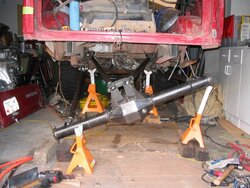
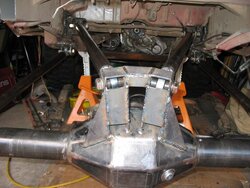
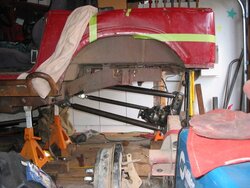
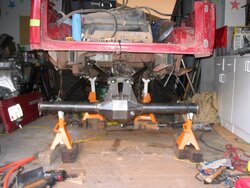
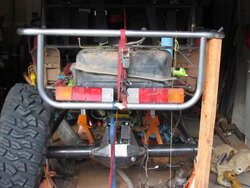
How about some wicked flex?

The axle can drop to the floor, no binding.

The axle can touch the frame on one side, and touch the floor on the other side, with no binding.

:hammer: :burnout:

dang, we need the smoking smilie here..
 

Attachments

  • flex-1.jpg
    flex-1.jpg
    68 KB · Views: 312
  • flex-2.jpg
    flex-2.jpg
    85.8 KB · Views: 323
  • flex-3.jpg
    flex-3.jpg
    70 KB · Views: 299


Join the Elite Explorers for $20 each year or try it out for $5 a month.

Elite Explorer members see no advertisements, no banner ads, no double underlined links,.
Add an avatar, upload photo attachments, and more!
.


:chug: very nice


Tom,

Am I missing something here? What are the bottom bolts for on the upper link mounts?


To help reinforce the bracket, and there is a spacer to keep it from shrinking when I weld it.


I see. :)

Looks great! I figured it was to give you another link mount option, I see this alot on desert trucks, they have multiple mounting points in the rear drag links and upper shock mounts for trying different positions and angles on the coil over mounts


tdavis said:
dang, we need the smoking smilie here..

We have the smokin' smilie :smoke:

Nice work :thumbsup:


It does that too.. I have three possible link points in that upper axle mounting point. Each one changes the anti-squat (lowering the links adds to it). Plus, I now have two trail spare bolts, nuts and washers. Just in case I damage or lose some part.


Got all the brackets and links all welded up today, and did the first trim of the frame.
 

Attachments

  • final-axle-1.jpg
    final-axle-1.jpg
    63.2 KB · Views: 283
  • final-axle-2.jpg
    final-axle-2.jpg
    75.8 KB · Views: 270
  • final-axle-3.jpg
    final-axle-3.jpg
    80.6 KB · Views: 283


The first three pics above are:

1) Full stuff, with 6" of up travel, side view.

2) Full stuff, rear view.

3) Up and down - 6" up, 8" down for 14" of travel.

the next three are:

1) at ride height, rear view

2) at ride height, side view

3) close up of the top bridge.
 

Attachments

  • final-axle-6.jpg
    final-axle-6.jpg
    68.6 KB · Views: 275
  • final-axle-5.jpg
    final-axle-5.jpg
    71.2 KB · Views: 273
  • final-axle-4.jpg
    final-axle-4.jpg
    70.4 KB · Views: 274


Tomorrow I start in the trimming of body panels, and hopefully tubing of the rear. :smoke: :hammer:


Gee Tom, thanks for building that for my Zuk...now when ya gonna ship it to me?? :p


Looks nice Tom!! :thumbsup:


Update..

Spent all weekend working on it..

I know, not much progress visually, but it's the details that slow you down. I put one axle shaft, and a tire on, and started working on clearance.

Travel is 5" up, 9" down of possible 14" of shock. Not as much as I'd like to get, but there is a cross member in the way of the driveshaft that I really do not want to hack out of the way, and making a horse collar type cross member is out of the question - it's just too damn tight in there.

At the full stuff (see the last picture) it now clears the coil overs by about 1". It was rubbing, but I had to break out the plasma and cut new brackets that move the shocks and coils over the needed 1".

Also the other side almost touches the floor - it misses by about 4". This thing is going to have wicked flex in the rear.

I should have the lengthened driveshaft back on Wednesday; the estimate was $125 to length it from 20" to 33".

Last, I updated the front 3rd member to a high-pinion unit; I haven't put the front back together yet. It's going to be a race to the Truckhaven run in February.
 

Attachments

  • fat-rear-1.jpg
    fat-rear-1.jpg
    65.2 KB · Views: 254
  • fat-rear-2.jpg
    fat-rear-2.jpg
    77.8 KB · Views: 242
  • fat-rear-3.jpg
    fat-rear-3.jpg
    79.3 KB · Views: 238


I like the gas tank as a weight! Looks good Tom. Do you have any help on this or is it all you?


That thing is going to be cool:D :smoke:


I do all my own stunts.. er fabrication.

Somehow, I've ended up making all the brackets I have used in this. Everytime I tried to use a pre-made bracket, it didn't work.. :confused:


Wow, Tom you have been a busy fella. Looks sweet, I hope to make it out for the Truckhaven run to see it in action.


Holy wheelbase increase! You will finally have room for more stuff too! Where's the custom cooler and BBQ mount??


Super nice Tom!
Drool.
Someday the BII will get a similar treatment.


Updates? 4 days (counting today) till you leave for truckhaven will there be some sickdays this week at work to make it :D


Join the Elite Explorers for $20 each year or try it out for $5 a month.

Elite Explorer members see no advertisements, no banner ads, no double underlined links,.
Add an avatar, upload photo attachments, and more!
.


I am done finish welding the majority of the tube, got the gas tank placed, my list is at:

1) put together the passenger side front axle. About 1hr of work.
2) Fill the front diff with gear lube.

3) Put together the rear diff. Move the elocker motor and rock shield.
4) plumb the gas lines, re-wire the fuel pump and sending unit.
5) plumb the brake lines.
6) fix the exhaust. I need to pull the whole thing to do this. Royal PITA. Going to take a few hours.
7) Install the coilovers and charge them.
8) install the rear taillights, and re-wire them.
9) fill the rear diff with oil.
10) install the rear drive shaft. (it's ready to go in!)
11) Bleed the brakes.
12) Look everything over and find any missing welds, loose nuts and what not..
13) Zip tie the license plate in place (Just to keep Brian somewhat happy..)
And that's it. All fab work is done, just need to assemble it all together.

BTW, no sick days for me - Tuesday I'm off to Salt Lake City for a quarterly review with a vendor, and I will not be back till late Wednesday night. I do have Thursday, Friday and Monday off for vacation.


Featured Content

Back
Top