Front Winch Bumper | Ford Explorer Forums

  • Register Today It's free!

Front Winch Bumper

Blee1099

Evil Asian
Elite Explorer
Moderator Emeritus
EF Vendor
Joined
March 3, 2002
Messages
13,738
Reaction score
56
City, State
Elkridge, MD
Year, Model & Trim Level
04 4Runner, 22 Silverado
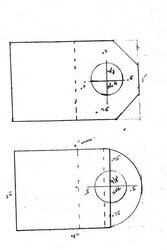
I've been pondering/designing a front winch bumper with a compartments for a optima battery and for accessories like tow straps, winch remotes. Does anyone know the recommended maximum weight the front torsion bar setup can hold or maybe what the weight of a ARB Bull bar is so I can compare.


Join the Elite Explorers for $20 each year or try it out for $5 a month.

Elite Explorer members see no advertisements, no banner ads, no double underlined links,.
Add an avatar, upload photo attachments, and more!
.


i dont know but ive always thought that the front bumper would be a good place ot put a second battery. so keep us posted on the work, i cant wait to see it


Came to a little whoops.. I didn't measure correctly.. So I have to now re-do the main beam.. I cut the main beam to 40" which didn't allow for the battery since the bumper mounts would be in the way.. I just have to make it 46" instead. Now for a good question, which do you guys prefer when it comes to D-ring/Shackle mounts.. I'm using 3/4" steel flat bar, 2.5" wide and 4" long
 

Attachments

  • d-ring copy.jpg
    d-ring copy.jpg
    25.3 KB · Views: 1,141


The squared one would look better with your FedEx bumper.


Oh yeah. There's a new expression out. Brand new. "Measure twice, cut once." :p :p


section525 said:
Oh yeah. There's a new expression out. Brand new. "Measure twice, cut once." :p :p

Bah.. I did measure.. I changed my mind halfway thru the build.. I originally said yes on the battery then I said no then I said yes again. :confused:


Just curious as to what your using to cut the 3/4" stock ?
I may need to do the same to make a pitman arm.


IZwack said:
Just curious as to what your using to cut the 3/4" stock ?
I may need to do the same to make a pitman arm.

circular saw with a abrasive wheel or my cut off saw or Wolf's plasma cutter :D


if you need some 3/4 stock let me know.. I have about 2' or so left.


Blee1099 said:
if you need some 3/4 stock let me know.. I have about 2' or so left.
Ouu I might take you up on that - no rush tho, I'm temporarily going to use the stock toyota pitman arm. Maybe on the next meet-n-greet.


Little teaser..
DCP_0440.JPG


DCP_0441.JPG


DCP_0442.JPG


More to come :D


That middle picture looks like you're trying to derail the next train through. ;)


RangerX said:
That middle picture looks like you're trying to derail the next train through. ;)

It probably could.. Its 7"x2" structural channel, its .366 thick at the channels at the thickest spot, .210 thick at the 7" height section. The winch plate is welded on both sides with first 6013 1/8" rods at 105 amps then 6013 5/32nd rods @ 150 amps with plug welds on the winch plate at every 6" or so..

I got the angles done today which was a big pain since you have to match up both sides to make it look even. Best way I found doing it is to use the floor with a straight level and chalk line. Took me no time after doing it except for the occassional breaks. Only thing left to do this week is to add the sides, the 3/16" plate on the bottom, the battery tray on the passenger side, the 1/8" plate for the top, add D-ring mounts, add frame mounts, and then cap off certain areas for strength in the bumper..

DCP_0454.JPG

DCP_0453.JPG


Had to do a slight modification today, I forgot to take into account the frame horns on 2nd gen. I can either cut the winch plate to 19.5" so it fits between the frame horns or chop the horns and keep it the 24" length.. I'm gonna re-drill the winch mounts, cause I noticed that the winch is not centered well not centered with the spool on the winch, I centered with the winch's overall length. Atleast the existing holes are there for drainage.. I saw someone's bumper the other day and noticed some pooling of water cause he only drilled the 4 holes for the winch plate and didn't add any drainage holes.

Now should I cut off the frame horns or try to work around them.. Screw it, I'm cutting em off.


Notched the bumper today so the winch fits as tight as possible.. The section where I notched it is probably 3/8-7/16 thick at the thickest part and 1/4" at the thinnest near the edge.. Had to use a 4" cut off wheel, only took 8 blades to cut it.. :eek: Unfortunately its been so freaking hot this week to work long hours on the bumper. It was atleast 95 everyday this week. Hopefully by Thursday or Friday it'll be cool enough so I can finish. I already cut the 3/16 for the battery tray and have 1/8" sheets for the top.. Picking up a fairlead tomorrow just have to cut the bumper for the access.

DCP_0455.jpg


loggingin for info


Little bit more progress today, I mounted the winch & fairlead, cleaned up my welds and put fresh bead on the inside of the bumper and on the top side of the bumper since the two channel pieces I got have about a 1/8" or so height difference and cut the holes for the d-ring tabs. Didn't get a chance to weld them unfortunately had issues today with the breaker for the welder tripping constantly.

DCP_0459.JPG

DCP_0460.JPG


Join the Elite Explorers for $20 each year or try it out for $5 a month.

Elite Explorer members see no advertisements, no banner ads, no double underlined links,.
Add an avatar, upload photo attachments, and more!
.


FROADER said:

None I'm slacking off due to lack of funds for the moment and I'm devoting my money & time into starting my business.


Featured Content

Back
Top