Ive had two of these kits sitting in my garage for quite some time now. Girlfriend got me the black housings for my X for Christmas, so I figured why not now.
I was running a set of DDM Tuning 55w 6000k HIDs in the stock housings for a month or so, great output, decent beam, not much glare at all. Threw them in the black housings, and the glare was terrible, so I wanted to get this done ASAP, but I was extremely intimidated by it.
A member did his own headlights just the other day, and his little write up gave me some confidence in it not being too bad. At about 2:00 I took the headlights off and began the process. Don't know if I can call this a write up per-say, but its a run down of my whole process.
1. Put them in the oven at 280 degrees for appx 8 minutes. I think 6 or 7 would've been plenty, as these literally pulled apart like nothing. The chrome/black portion is attached to the lens, at least on these aftermarket ones so when you pull it apart, you get this

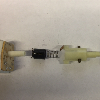
2. Our headlights use H13 bulbs, so the adapter plates the Mini's come with, dont work. That would make our job cake, save probably upwards of an hour. I dont have pictures of this process, but remove the bowl from the housing. You have to get a small socket, and twist the up/down adjuster screw all the way out, its attached to the reflector bowl. Then just firmly grasp the bowl and pull, mine popped right out. The "neck" we'll call it, is too long for the projectors threaded end to fit through, and get the nut on, so you have to sand/grind/cut that way down. I used a dremmel with a grinding wheel, and ground down probably 1/2" id say. Its easy to test, put the smaller rubber washer on the projector threads, which helps seal it, then stick it through, if it comes through enough to get the plate adapter and nut on, you're good. BUT, the nut has to be down far enough to clear the bulb holder. If you have the parts in front of you, you should know what I mean. This is probably the most work IMO, aligning them wasn't that bad like I had imagined. If you have a bench belt sander, this part shouldnt take you more than a few minutes.
4. I wanted flat black reflector bowls, and glossy red shrouds. Not a fan of it now, but it still looks good. Wish I would've went with black or maybe body color. I just washed both with dishsoap, rinsed and air dry. Cant say enough good things about that Krylon Colormaster. Extremely good coverage, no bad spots, and dries so fast


5. TEST YOUR PROJECTORS! TRS Reccomends you use a 9v battery if you dont have a 12v source, and test the solenoids in the Bi-Xenon projectors 30-40 times to ensure smooth operation. Some projectors do fail. Both of mine worked great, knock on wood.

Also, test everything else. HIDs, Halos, anything you're using. Would suck to seal the headlight back up and have to undo it to fix something!
xB LED Halos

6. Now you'll re attach the bowls into the headlight housing. Make sure your paint is dry enough to handle! Again, sorry didn't get a picture of this process, but its simple
7. Now you'll get the projectors ready to put in the housing, and snugged down. I used the little adapter plate that was like a washer, with a groove in it, not the one with 3 prongs sticking out. I also used the smaller washer, as it was thinner, and plenty of coverage to seal the hole.
If you have screw on shrouds like I did, screw them on now.
Stick the projectors threaded end through the hole in the headlight, slide the adapter plate on, and then hand tighten the big nut. This nut is very soft, so don't crank on it until you have the projectors aimed. It wont come back off, don't ask me how I know. Snug it up with your fingers, or a socket just enough to where the projector wont twist around easily.
Now you can put the bulb holder on with its 3 mini screws. Magnetic screw driver is a good idea here, don't want those falling in on the projectors lens. Put your bulb in, and use the little tensioner holder it comes with. (Should be self explanatory)
If you are using Bi-Xenon projectors, you'll have two tiny leads to fish through the reflector. I used the small hole left from the reflector cup we removed earlier. I cut the metal tips off mine as well, since I wasn't using the plugs for them.
8. Now the part I assumed was gonna be terrible, but wasn't bad at all. Take your ballasts and headlights out to your truck, and have it parked near a wall or some flat surface. Put the headlights on, no need to screw the housings down, just make sure they are sitting exactly how they will when they ARE screwed down. I made a little jumper harness with battery clamps. It had the ballast connector so I could just go from my battery to the ballasts to test/aim them. Turn them on, and then you are going to twist the projectors either way, to make sure they're both straight. *This is why I said make sure they aren't easy to twist, so you don't accidentally move them while bringing them back to your work area.

That cutoff is beautiful

9. Now if you are sure your aligned correctly, tighten them down. Be careful, because one of mine moved on me when I was tightening, so I had to repeat the process. I didn't have a socket big enough either, so that didn't help. I was using a pair of adjustable pliers.
You should be left with something like this

(See my note about halos down below if you are using them)
10. Now, you're ready to reheat the housings, and put them back together. I reheated mine at a lower temp, about 250 if I remember correctly, for only 6 minutes. I put the lens back on before putting them in the oven, and got it aligned best I could before heating to make it easier. Once it was heated, I pressed firmly on it, and got the little tabs to snap down and let it cool. All is well so far, but you can add some silicon or something around the seal, just to be safe. I didn't have any on hand, and was starting to get tired and rushing at this point.
Out of the oven, and cooled down

11. Now, Phase 2 begins, which took me just as long, if not longer than the actual retrofit! I had a Plug & Play HID kit before, so I had to remove that wiring, so that took me an extra few minutes. I cant help much with wiring, nor do I have any pictures, but the harnesses are straightforward. You connect one of the wires to your positive battery terminal, only use one of your stock headlight plugs to trigger the HID harness, so just tape up the passenger side and hide it. Then you mount the relays somewhere, and ground both wires from the ballast connectors, and you're essentially done.
*This is assuming, you bought the correct harness. I did not, since it was for a Silverado.
I had a single beam kit, which is just a standard harness. Our Explorers (Besides 3rd gens) use one bulb for both high and low beams, which is a problem when you do a retro. What happens is, when you flick your high beams, the solenoid will lift the cutoff shield up in the projector, but turn the low beams off. Not an issue if you buy the correct harness, it keeps the low beams on while you have the highs on.
I had to use a diode between the high beam wire on the stock headlight plug, to the low beam "trigger" wire on the harness. This sends power one way but not the other. So when I turn on my high beams, the low beam is still getting signal, which keeps the relays on. Sounds complicated, but it took me all of 5 minutes to add it in. RadioShack stocks them, part number 276-1141. "3 amps - 50PIV" They come in a pack of two for like $1.99, you only need one though.
Here is a link to the harness that does all this on its own. I didn't want to pay $35, and have to wait on it, which is why I went the diode route.
https://www.theretrofitsource.com/c...otocontrol-bi-xenon-harness.html#.Vo2JUJMrJsN
--Halos--------------------------------------------
Another thing that I was stumped by, was how I was going to attach the Halos to the shrouds. I didn't want them in the shrouds like some people, which gives the housing a glowing effect, I wanted them visible. Im not sure what these shrouds are called, but they had just enough of a lip for me to stick the halos on. I used some JB-Quik (The faster version of JB Weld) and put little dabs on the back of the halo ring, and then stuck it onto the shroud. Thats all I did, and they seem to be holding up very well. I was actually supporting the whole projector with the halos before I tightened it all down.
The more common way I see people do it, is to use some very fine wire strands, and poke holes in the shroud, and tie it with the wire. Im ****, and that would've bothered me, knowing if you looked closely, you'd see the wire.
I know this isn't the prettiest write up with pictures, but I hope it helps SOMEONE out. I've wanted todo a retrofit for the longest time, but was so intimidated by it that I kept pushing it off. Now that i've done it once, probably within a year or so ill be doing another set, fresh from scratch, with some LED strips and such.
(Yes, these will be for sale! PM me if you want first dibs when I do sell them)
I love the red, but i'm not a fan of the color on my X. Maybe its because its so out there for me, I usually stick with darker colors. Either way, it does look good. The halos pop like crazy as well, bright even in direct sunlight.


I was running a set of DDM Tuning 55w 6000k HIDs in the stock housings for a month or so, great output, decent beam, not much glare at all. Threw them in the black housings, and the glare was terrible, so I wanted to get this done ASAP, but I was extremely intimidated by it.
A member did his own headlights just the other day, and his little write up gave me some confidence in it not being too bad. At about 2:00 I took the headlights off and began the process. Don't know if I can call this a write up per-say, but its a run down of my whole process.
1. Put them in the oven at 280 degrees for appx 8 minutes. I think 6 or 7 would've been plenty, as these literally pulled apart like nothing. The chrome/black portion is attached to the lens, at least on these aftermarket ones so when you pull it apart, you get this
2. Our headlights use H13 bulbs, so the adapter plates the Mini's come with, dont work. That would make our job cake, save probably upwards of an hour. I dont have pictures of this process, but remove the bowl from the housing. You have to get a small socket, and twist the up/down adjuster screw all the way out, its attached to the reflector bowl. Then just firmly grasp the bowl and pull, mine popped right out. The "neck" we'll call it, is too long for the projectors threaded end to fit through, and get the nut on, so you have to sand/grind/cut that way down. I used a dremmel with a grinding wheel, and ground down probably 1/2" id say. Its easy to test, put the smaller rubber washer on the projector threads, which helps seal it, then stick it through, if it comes through enough to get the plate adapter and nut on, you're good. BUT, the nut has to be down far enough to clear the bulb holder. If you have the parts in front of you, you should know what I mean. This is probably the most work IMO, aligning them wasn't that bad like I had imagined. If you have a bench belt sander, this part shouldnt take you more than a few minutes.
4. I wanted flat black reflector bowls, and glossy red shrouds. Not a fan of it now, but it still looks good. Wish I would've went with black or maybe body color. I just washed both with dishsoap, rinsed and air dry. Cant say enough good things about that Krylon Colormaster. Extremely good coverage, no bad spots, and dries so fast
5. TEST YOUR PROJECTORS! TRS Reccomends you use a 9v battery if you dont have a 12v source, and test the solenoids in the Bi-Xenon projectors 30-40 times to ensure smooth operation. Some projectors do fail. Both of mine worked great, knock on wood.
Also, test everything else. HIDs, Halos, anything you're using. Would suck to seal the headlight back up and have to undo it to fix something!
xB LED Halos
6. Now you'll re attach the bowls into the headlight housing. Make sure your paint is dry enough to handle! Again, sorry didn't get a picture of this process, but its simple
7. Now you'll get the projectors ready to put in the housing, and snugged down. I used the little adapter plate that was like a washer, with a groove in it, not the one with 3 prongs sticking out. I also used the smaller washer, as it was thinner, and plenty of coverage to seal the hole.
If you have screw on shrouds like I did, screw them on now.
Stick the projectors threaded end through the hole in the headlight, slide the adapter plate on, and then hand tighten the big nut. This nut is very soft, so don't crank on it until you have the projectors aimed. It wont come back off, don't ask me how I know. Snug it up with your fingers, or a socket just enough to where the projector wont twist around easily.
Now you can put the bulb holder on with its 3 mini screws. Magnetic screw driver is a good idea here, don't want those falling in on the projectors lens. Put your bulb in, and use the little tensioner holder it comes with. (Should be self explanatory)
If you are using Bi-Xenon projectors, you'll have two tiny leads to fish through the reflector. I used the small hole left from the reflector cup we removed earlier. I cut the metal tips off mine as well, since I wasn't using the plugs for them.
8. Now the part I assumed was gonna be terrible, but wasn't bad at all. Take your ballasts and headlights out to your truck, and have it parked near a wall or some flat surface. Put the headlights on, no need to screw the housings down, just make sure they are sitting exactly how they will when they ARE screwed down. I made a little jumper harness with battery clamps. It had the ballast connector so I could just go from my battery to the ballasts to test/aim them. Turn them on, and then you are going to twist the projectors either way, to make sure they're both straight. *This is why I said make sure they aren't easy to twist, so you don't accidentally move them while bringing them back to your work area.
That cutoff is beautiful
9. Now if you are sure your aligned correctly, tighten them down. Be careful, because one of mine moved on me when I was tightening, so I had to repeat the process. I didn't have a socket big enough either, so that didn't help. I was using a pair of adjustable pliers.
You should be left with something like this
(See my note about halos down below if you are using them)
10. Now, you're ready to reheat the housings, and put them back together. I reheated mine at a lower temp, about 250 if I remember correctly, for only 6 minutes. I put the lens back on before putting them in the oven, and got it aligned best I could before heating to make it easier. Once it was heated, I pressed firmly on it, and got the little tabs to snap down and let it cool. All is well so far, but you can add some silicon or something around the seal, just to be safe. I didn't have any on hand, and was starting to get tired and rushing at this point.
Out of the oven, and cooled down
11. Now, Phase 2 begins, which took me just as long, if not longer than the actual retrofit! I had a Plug & Play HID kit before, so I had to remove that wiring, so that took me an extra few minutes. I cant help much with wiring, nor do I have any pictures, but the harnesses are straightforward. You connect one of the wires to your positive battery terminal, only use one of your stock headlight plugs to trigger the HID harness, so just tape up the passenger side and hide it. Then you mount the relays somewhere, and ground both wires from the ballast connectors, and you're essentially done.
*This is assuming, you bought the correct harness. I did not, since it was for a Silverado.
I had a single beam kit, which is just a standard harness. Our Explorers (Besides 3rd gens) use one bulb for both high and low beams, which is a problem when you do a retro. What happens is, when you flick your high beams, the solenoid will lift the cutoff shield up in the projector, but turn the low beams off. Not an issue if you buy the correct harness, it keeps the low beams on while you have the highs on.
I had to use a diode between the high beam wire on the stock headlight plug, to the low beam "trigger" wire on the harness. This sends power one way but not the other. So when I turn on my high beams, the low beam is still getting signal, which keeps the relays on. Sounds complicated, but it took me all of 5 minutes to add it in. RadioShack stocks them, part number 276-1141. "3 amps - 50PIV" They come in a pack of two for like $1.99, you only need one though.
Here is a link to the harness that does all this on its own. I didn't want to pay $35, and have to wait on it, which is why I went the diode route.
https://www.theretrofitsource.com/c...otocontrol-bi-xenon-harness.html#.Vo2JUJMrJsN
--Halos--------------------------------------------
Another thing that I was stumped by, was how I was going to attach the Halos to the shrouds. I didn't want them in the shrouds like some people, which gives the housing a glowing effect, I wanted them visible. Im not sure what these shrouds are called, but they had just enough of a lip for me to stick the halos on. I used some JB-Quik (The faster version of JB Weld) and put little dabs on the back of the halo ring, and then stuck it onto the shroud. Thats all I did, and they seem to be holding up very well. I was actually supporting the whole projector with the halos before I tightened it all down.
The more common way I see people do it, is to use some very fine wire strands, and poke holes in the shroud, and tie it with the wire. Im ****, and that would've bothered me, knowing if you looked closely, you'd see the wire.
I know this isn't the prettiest write up with pictures, but I hope it helps SOMEONE out. I've wanted todo a retrofit for the longest time, but was so intimidated by it that I kept pushing it off. Now that i've done it once, probably within a year or so ill be doing another set, fresh from scratch, with some LED strips and such.
(Yes, these will be for sale! PM me if you want first dibs when I do sell them)
I love the red, but i'm not a fan of the color on my X. Maybe its because its so out there for me, I usually stick with darker colors. Either way, it does look good. The halos pop like crazy as well, bright even in direct sunlight.