How to: - "My A4LD Rebuild Diary - Part 3, 2nd half - Reassembly | Page 2 | Ford Explorer Forums - Serious Explorations

  • Register Today It's free!

How to: "My A4LD Rebuild Diary - Part 3, 2nd half - Reassembly

Prefix for threads which are instructional.
Another thought: Ford might have changed the shape of those four channels so that they don't have the sharp corners. Maybe a look at one gear on top of another will reveal somthing that I couldn't see in the pictures (channels blended in to the inside radius, for example).


Join the Elite Explorers for $20 each year.
Elite Explorer members see no advertisements, no banner ads, no double underlined links,.
Add an avatar, upload photo attachments, and more!
.


Brain's computer images

The pump image

15286A4LD_PUMP-med.jpg


Gear image

15286A4LD_GEAR-med.jpg


Ok... some pics, finally.. lets start with Brain's issue about the OD Planetary....

Here is the bearing surface he is concerned with:

15286Dscn4869-med.jpg


and here is the "bushing" the manual says to make sure is facing UP into the sun gear:

15286Dscn4868-med.jpg


My new planetary had the bushing facing inwards.... as in the photos on the site.... he was worried that he needed the "innie" of the bushing/washer. I wrestled with that dragon and let it go. New design. "Nufsaid".

NOW the PUMP issue.. WAY bigger

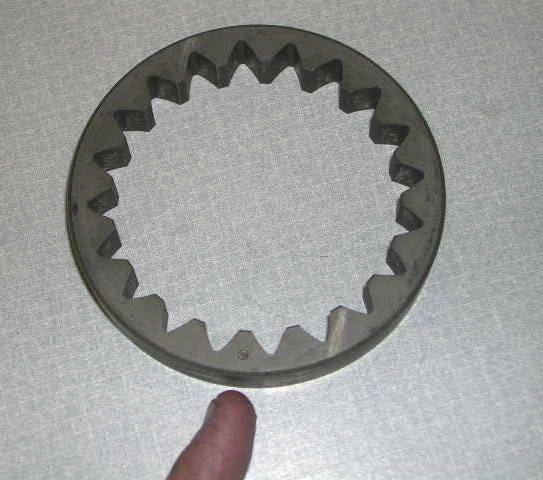
we have talked small pump gear... here is a side by side.. OLD A4LD on left

15286Dscn4865-med.jpg


closeup of old

15286Dscn4866-med.jpg


closeup of "new"

15286Dscn4867-med.jpg


I have a rebuilt TC... interestingly I could NOT get the "old" gear to fit on it.(??) but the new fit like a glove... no "blow by" front seal lube here!

First Pic

15286Dscn4870.jpg


Second <last> pic...

15286Dscn4875-med.jpg


I am thinking dremel tool oil channel... more to come, stay tuned.....


That IS really wierd about the old gear not fitting on the rebuilt TC. 24 teeth (old) vs. 16 (new) with abosolutely no lube channels??? I'm scratching scalp on this one...

My new 5R55E pump (the one with the OD bearing - part #XL2Z-7A103-AB) should be here on Friday, so I'll get a look at that gear then. I'm not sure when the bellhousing and separator plate from the 4R55E will be showing up (USPS), but it has already been sent so I'll get back to work on Frankentranny and see how the OD unit works.


Adding Oil Channels

It soon became obvious that I was not going to get a fast or easy answer to the issue about the front seal oiling and the pump gears (A4LD vs 4R). So, I decided to modify the new gear by adding oil channels using my dremel and diamond bits... here is the modified gear on the TC shaft, compare it to the last pic posted of it on the same shaft unmodified....a couple posts above

15286Dscn4877-med.jpg


Here is a pic, but here is the job looking inside the gear.... no points for pretty....

15286Dscn4882.jpg


another view

15286Dscn4883.jpg


and one more

15286Dscn4890.jpg


Looking down from on top

15286Dscn4884.jpg


It really wasn't a bad job all in all - and either way I'll sleep better.

STILL, I am wondering if this is a "mistake" and showing up in rebuilds in the form of early failing front seals on older A4LD's ? Or, were those channels unnecessary after all? Or? Or? Or? Anyway... problem solved. I think.

A HUGE "hat's off" to Brain, who picked up on this issue!


Nice job!!! Pretty doesn't matter as much as the function. If you look at the inside of the old gear you might be able to see where the pump snout actually drives that gear (I can on mine). The flat spots are where the torque is applied (it would just spin if it was just round), so not taking off much on the flats is the best idea. That gear is hardened steel (some of the hardest stuff), so using diamond impregnated grinding bits was a good idea (you probably could have gone through several of the other kinds).


Yeah it was pretty obvious where the wear points were. Initially I thought about only making 2 channels AWAY from the pressure/wear areas, in the end I just tried to use the space near the end of each flat, like the old one.

I immediately realized this was a heat treated part... so who says diamonds are a "girl's" best friend? Total time to grind, under 20 minutes. If you do not have a diamond point set for your dremel, invest - they are "cheap" and man do THEY work!

Better pics coming up.


PUMP Talk

Front pump is pretty straight forward.
Here is the empty pump.... the center area (square hole along the shaft) is where the front seal lube pressure originates.

15286Dscn4887.jpg

A few things to remember.... the outer gear ring has a dimple in it...

15286Dscn4886.jpg


That goes in dimple DOWN

15286Dscn4888.jpg


The inner gear has a beveled side, that goes in bevel UP!

15286Dscn4892.jpg


And don't forget this shaft end needs a seal !!!

15286Dscn4889.jpg


well, I am a little bummed. I dropped off the bellhousing a week ago and they said it would be ready in a week. Mind you they are charging me $40 extra to do MY bellhousing, because it's not being "batched" and will require it's own setup. Today they say it won;t be done til next week because the batch of bellhousings was late coming in (hmmm) setup for MY bellhousing????.... anyway.... I am taking next week off.... so no progress for the next 10 days now...... we WILL finish this when I get back.


Seems to be a common theme - hurry up and wait. Have fun on your time off!! Good thing come to those that wait, and wait, and are forced to wait some more ;)


My new pump showed up today -the 5R55E version w/ the roller bearings for the OD support instead of the bushing and shaft. I'm pretty impressed by the bearing setup. The small pump gear does indeed have an o-ring in the center, and I almost cut that o-ring on the sharp edges of the converter snout (where the flats are). I might cut a bevel on the converter snout just to be safe, but it looks like it will fit just fine. The body of the pump (inputs and outputs) looks just like the 4R55E drawing from the tech bulletin on pump interchangability, so I'm pretty excited about this modification. I still haven't recieved the bellhousing yet, though. I picked up that pump off of e-bay for ~$62 including shipping, so at about half price, I got the upgrade. The bellhousing and plate cost close to $40 (again from ebay) so I think I got the upgrades for about what I would have had to pay for a new pump anyways. I'm still planning on overboring the drainback hole in the pump body, separator plate, and bellhousing. Next up is getting the bearing supported OD basket (which I was going to have to get anyways).


Brain, I'm excited about the prospect of backward roller bearing pump/OD drum 5R capability. I have searched but cannot find the quote that says there is NOT backward compatability... and anyway... ingenuity is the key, no?

I'd be VERY curious to see side by sides on the A4/4R OD drum and the 5R.

IF you can establish that all I have to do is get the 5R OD drum, 5R pump and a 4R 4.0 bellhousing.. I MAY just put those into this "bulletproof" rebuild and save the existing modded one for rebuilding into the one coming out, which I hope to rebuild and sell. (Any interested buyers?<g>) Please keep us posted.

ps. DO the center support OD center shaft bushing MOD... it is a "biggie" in my humble opinion. I can share the tool to press it in with ya. Make sure you get the "full surround" snap ring spring retainer too.

Cheers... "I'm ON VACATION!!!!" (with puter access)


I recieved the 4R55E bell housing today and it still has the original seal and busing in it. The bushing isn't scarred up, but it does show more wear on one side than the other. I'm going to bolt it up to the motor with the TC to do the check outlined in this TSB:
http://www.alldatadiy.com/alldata/A.../56351048/34853741/34850750/42063452/42468823

I have checked that the bellhousing isn't warped, and it isn't. For those that need a bellhousing and separator plate check this vendor (sunshinebulldog). I'm satisfied with my purchase (it was cleaned, painted silver, and they included the plate for only $7). There's this one closing in less than a day:
http://cgi.ebay.com/ebaymotors/ws/eBayISAPI.dll?ViewItem&category=33727&item=7914266043

So now I've got the housing, plate, and pump. Next up is the OD unit. :thumbsup:


Well, the #1 trust washers listed for the 5R55E are made of PLASTIC!!! Since I'm using that pump and OD cage on my rebuild, I thought I'd use those parts. Now I know "they" say that the new plastics are OK to use in these thrust bearing locations, but I know that my metal #1 selective was absolutely ground down to the steel because of an OD failure. I can't think that the plastic would protect the other parts as well as that bronze washer did, so I was looking at putting in a new bronze #1 selective. I used my old #4 selective to make sure it fit over the bearing, and it just barely does, so metal it is. The 5R55E's pump snout that has the bearings for the OD cage already has some plastic on it, but it is just the needle bearing cage - which acts as a seperator/spacer for the actual load-bearing rods, so it isn't subject to thrust loads. I don't know what others are doing, but I'm keeping all of my thrust bearings non-plastic. I might have to dremel away a little of the inside diameter to make it sit totally flat (the pump has a small radius where the bearing sits that keeps it lifted a bit), but I think it will be worth it.


Brain... in the old C-3 there was a plastic washer in the make-up.... and some stuff I read said it was better than the replacement metal! I am still breathlessly awaiting the OD drum front pump story!

By the way I bought that 4R55 bellhousing on E-bay... will probably ship it to the fellow on North Carolina to do the bushing.... that way I will have used the two places I know of. He's a LOT cheaper. Keep us posted on the OD drum - by the way you going to do the 5R 2 friction or make it 3?


I was seeing at least a couple of differences in the 5R OD drum. One thing is that I suspect that it has the selective snap ring closer to the front (probably about one friction and one plate's width closer so that only two will fit). The other is that 20 piston return springs are used (according to Transstar) instead of 15 for the A4LD...maybe the springs are weaker, or maybe the piston is bigger. I'll find out pretty soon. If I have to put in a regular steel plate instead of the .2" pressure plate to make 3 frictions work, that's what I'll do. I'd really rather have three frictions in that clutch pack in case I end up towing in Drive instead of having it not activate in anything but reverse by driving mainly in the OD shifter position.


If it looks like that is what you will need to do, let me know and I can give you the thickness of the 3 friction and steel pack.... you can add the clearance and figure out what you need to make it all work. I am assuming also you are going to spiral groove frictions...

I am told the piston in the 5R was bigger.... probably the same place I read it wasn't reverse compatible though.....


If it is bigger, I'm also going to need different seals for the piston. I don't have a single original spring that survived the OD failure...the biggest part is a single flattened loop, so I can't compare the spring constants (how much force it takes to make it deflect a certain amount).

I took a couple of minutes to figure out what's what with the frictions and steels to make this work. The original 90-95 A4LD OD had three steels at 0.065", three frictions at 0.068", and a 0.200" pressure plate for a total of 0.599". The 5R55E had two steels at 0.065", two spiral frictions at 0.068" (I'll need your confirmation on this Glacier when you get back from vacation), and a 0.200" pressure plate for a total of 0.466". For three spiral frictions and four steels I get a total of 0.464", which is pretty close (2 thou under). If we say three spiral frictions and three normal steels and one steel from a 85-89 A4LD OD (at 0.071" thick), we get 0.470" total, which again is pretty close (4 thou over).

I would figure that the drum is manufactured close to the middle of the tolerance range (so that you would use either the .068 or the .082 snap ring to hit the proper clearance), but IF that is true then I could use the thinnest selective snap ring (0.054) and use three of the thicker (0.071" from a 85-89 A4LD) steels and one regular one (0.065") and still only be 0.002" over the other combination (assuming the drum could normally use the .068" one and hit the specificied clearance). I think that is the best idea because the extra thickness of the steel plates add to heat capacity (takes longer to get hot), and add stiffness, which would be the drawback of using a steel plate instead of the normal pressure plate. We are talking about some pretty cheap parts here so I might just get an assortment and see what works. :confused:


Glacier,

How close are you to finishing up on these threads and the rebuild?

Thanks,

Rob


Join the Elite Explorers for $20 each year.
Elite Explorer members see no advertisements, no banner ads, no double underlined links,.
Add an avatar, upload photo attachments, and more!
.


Robbie... will get the finished bellhousing this week and try and finish the thread this week. Sorry for the delay. I HAD toyed with doing the 4R55 bellhousing and pump mod... but decided to just go ahead with the one I have. Thanks for your patience my friend (and everyone else too).


Back
Top