no name B2 | Page 4 | Ford Explorer Forums - Serious Explorations

  • Register Today It's free!

no name B2

it pulls hard and i have had no problems with it other then the steel cable. But any manufacuterer on the cable wouldn't matter. Line speed is a little slow but for $299 i deal with it


Join the Elite Explorers for $20 each year.
Elite Explorer members see no advertisements, no banner ads, no double underlined links,.
Add an avatar, upload photo attachments, and more!
.


Got a question for you. You did a cab swap on the explorer fram with a ranger cab. How did that go for you? Does the whole cab section fit the explorer body mounts or was there some modification? What about the bed? I'm not so worried about the bed because thats much easier to modify.


the front four cab mounts line up perfect. But the last two cab mounts need to be fabbed up, they do not line up at all. As far as the bed, we are planing a tube bed with only using the bed sides being hung off the roll bars.


O ok. I was wondering about the bed. The frame on x's seem to go higher in the back so the bed wouldn't work, unless you did it that way. Thats for the help.


So would a 84 ranger cab fit the body mounts on the explorer frame like yours did? And if it did fit would I be able to swap the front clip of the explorer onto the ranger cab. along with the dash, seats, ect. Just wondering because I have this ranger and have nothing to do with it.


it wasn't my ranger, i helped holshotracer with it......

the front four cab mounts line up with all rbvs 83-94 as far as i know (94 rangers being an exception) as long as you use the core support for the headlight style you want it will fit, also the seats will fit but you have to change the seat tracks, those vary between years. The dash will fit but you have to use the steering column and column bracket from the explorer. Using that column and bracket require small mods to the firewall but is easy..


http://youtube.com/watch?v=pON-ofdnO-Y

got bored waiting for parts to arrive so i don't have much to do, thought i would throw together a slide show


been Busy, Heres an update

did this at a buddies house
Bronco1-9-2007001.jpg


I have decided to try a few different things. I have traded my Iroks for a set of 36x12.50 15 TSL's with some custom grooving. I have also decided to give leaf springs up front a try.....
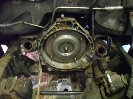
Tear Down
Bronco1-9-2007016.jpg

Bronco1-9-2007015.jpg


Picture of the wedge on my 77 F150 D44
4643bbe5e6fd.jpg

Wedge removed
f984cc03d285.jpg


Heres a shot of the TSL
00a8bcb4bc81.jpg


I got my PAss side of the axle cut down 6"s to EB width. The tight trails i run and being full width was just hell on my RF tire. Kept runing it into trees etc...

misc010.jpg


misc012.jpg


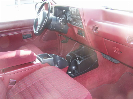
got the rear tires put on the B2, man i cannot wait to get this thing back on the trails

I picked up a set of 75' Chevy D44 Flat Top Knuckles. I am getting the pass side smoothed out and the three holes drilled and tapped. I have ordered a set of Hi-Steer Arms (waiting for delivery) and i have purchased all one ton chevy TRE's for my steering

3af59c3f63aa.jpg

bought some Chromo Shafts for the front

heres the axle and susp under load
misc015.jpg


shot of a front shackle under load
misc016.jpg


heres the tire bolted on, looks like i got some trimming to do. I intentionally pushed the axle forward for a more aggresive approach angle
misc017.jpg


Rear Mount secured to the frame, i'll probably add some side strength to it and go up the frame rail with a bracket
misc018.jpg


just a shot from the front
misc019.jpg


Waiting to buy a Aussie for the front and still waiting on the hi-steer arms. Then i need to buy the DOM and thread it for the tie rods. GEtting close to getting it back together though. Can't wait. I think i might move the rear spring bracket another inch or so forward to push the shackle further forward. I think its to vertical right now.


9092e9995585.jpg


another step closer, one knuckle down one more to go


Worked on my locking hubs today. Had to midifiy them to work with my spindle set-up. I am using 75 chevy Knuckles, chevy spindles, chevy caliper bracket and calipers. Ford Rotor and Ford Hubs. I am suppose to use the chevy stubs with this combo cause they are a touch longer then the fords. So when installing all above components and using the ford stub, the stub doesn't stick through the spindle far enough to get the retaining clip on it. Well i ordered ford Chromo shafts, so i modified each of my four locking hubs to work with the Ford stubs. I have two of the stock cast type lock-outs (weaker ones) and then modified my Ford Lockouts that are pretty much indestructable (made from all metal except the dial). So now i have got all four Lockouts to work with the Knuckle set-up. I fi am feeling motivated tomorrow (day-off) i met just get medevil on the B2 with the plasma/sawzall


B2choptop001.jpg


B2choptop002.jpg


B2choptop003.jpg


Well major changes there. Tuning in to see how it turns out


Awesome clearancing on those front fenders. How about a pic from a few feet back, so we can see the whole arch in one pic.


dang dude, you don't F around. just scrap everything and try out a whole different setup, and pretty quick too.

Bill, I was already saving the pics he had of the coils mounting up on the full width axle to show you. my mind is already spinning.


dang dude, you don't F around. just scrap everything and try out a whole different setup, and pretty quick too.

Bill, I was already saving the pics he had of the coils mounting up on the full width axle to show you. my mind is already spinning.

that was a pretty hack set-up i did, i knew at the time when i did it, it was going to be a very short lifespan that way. I was trying to get the truck from a bare frame to wheelable in two months (which i did)

Awesome clearancing on those front fenders. How about a pic from a few feet back, so we can see the whole arch in one pic.


i can't stand back any further right now, my garage is small and the truck isn't rollable. Still waiting on getting the pass knuckle back from the machine shop.

Thanks for the kind words fella's. But that wasn't the only thing i did today,
i was naughty
B2choptop005.jpg

B2choptop006.jpg

B2choptop007.jpg

B2choptop008.jpg

B2choptop009.jpg

B2choptop010.jpg

B2choptop011.jpg


i also saved the qaurter glass from breaking at removal


got a small amount done today, was feeling a little rough after last nite. Small hang over

B2choptop003-1.jpg

pass side knuckle finished and assm and on the truck

B2choptop004-1.jpg

got the tie rods sitting on the arms. Had to measure the length of the tubes to buy and thread.

B2choptop002-1.jpg

width turned out almost dead on with the 8.8 and adapters.

B2choptop001-1.jpg

just a shot from the front

also played with a buddies harbor frieght bender and was able to bend some 1 1/4 into 90s without any type of kinking so next weekend i'll probably start building the cage in it.


okay having never built a cage nor have helped with building a cage and using a harbor freight bender i have to admit building a cage SUCKS.......oh and not having an actual tube notcher doesn't help either.....

heres my progress thus far
rollcage001.jpg

rollcage002.jpg

got everything tacked all good and nice then start welding and the stupid things warps and becomes a PITA.....pretty much all my plans backfired. Go at it again tomorrow and hopefully get it close to finished up.

FLAME ON


well today i got all the imterior plates drilled and bolted to the floor and wrapped up the B-Pillar and forward. So all that is done. Still have to put the harness bar and cross brace the b-pillar. But i started on the back half of the cage and got both hoops bent and a couple top bars installed but the chop saw wheel wore out so that ended my day. Heres a couple shots.

rollcage004.jpg


rollcage005.jpg


Spent the rest of the afternnon doing clean-up in the garage, it was in desperate need of it. Wife came out to see progress and wanted to know why i can't help keep the house as clean and picked up as i do the garage lol.


Looks good for a first cage, but I have two suggestions that would be an easy fix and give you a much stronger cage. You need "triagulation" so here is what I think you should do. This thing is looking mean! :thumbsup:

Top of B pillar on driver side to bottom of B pillar on pass. side.

Then move one of the middle bars to the middle and put two triangle pieces in there like this.
 

Attachments

  • rollcage001.jpg
    rollcage001.jpg
    115.5 KB · Views: 925


rollcage001.jpg


this what i had in mind


Join the Elite Explorers for $20 each year.
Elite Explorer members see no advertisements, no banner ads, no double underlined links,.
Add an avatar, upload photo attachments, and more!
.


Wow i quit reading for just a while and you get a monster build. Looking good.


Back
Top