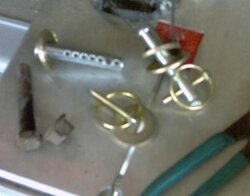
Parts used:

2 3/16" Lynch Pins
Dia (A) (B)
3/16" 1 9/16" 1 1/4"
2 3/8-16 1/2" Dia Shoulder Screws
4 1/2" Stainless Steel Washers .132" thick

I just made some Quick Disconnects for my rear sway bar. They were easy to make. I found
at my work some Shoulder screws, they just happen to have a 1/2" diamerter should and be
about 2.5" long, and on the end they had about 1/2 more of 3/8" thread.
Here is what I did:
1) I took out the stock bolts. (some force will be needed.)
2) Drilled out the sway bar holes with a 1/2" drill bit.(the hole is not a perfect hole,
almost like they made the hole when they cast the sway bar.)
3) Test fitted the bolts, with a little grease they went thru the sway bar and bushing with
no problem. You should have 1 washer on the bolt before you put it thru the sway bar, and
then put the 2nd washer on the bolt after it is thru the sway bar.
4) Next, I had to drill a hole in the bolt so that I could put the Lynch Pinn in it. Mark
the bolt with a marker of a pencil where the Lynch pin would go thru the bolt while it
is up against the washer. I used a 3/16" Drill bit, making sure to go Straight thru the
bolt.
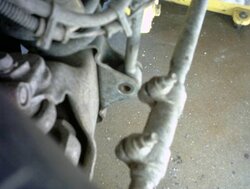
5) Now you can stop here or if you want you can round over the end of the shoulder screw so
that it helps to line everything up as it is inserted in the hole. You also might want to
do this to the Lynch Pins too.

Rounded End Pin


The First picture had a pointed end, the second picture has a square end, this is how they come when you purchase them.

Threaded End Pin

Here is the Quick Disconnect with all its parts put together. (Shown is the Pin with Threaded on the end)

In this picture you see a Wing Nut and a Plate on the Threaded portion of the pin, If Some wanted a "Back-up" for the Lynch Pin, This is what you could do.

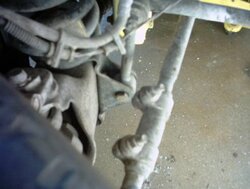
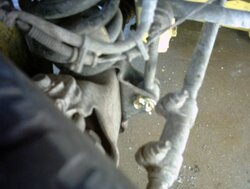
Here is The Driver's Side Quick Disconnect Pin before I rounded the end off, The Pass. Side is Identical, with the obvious exception that everything is mirrored.
I Noticed that when I go to put the quick disconnects back in, it is easier to insert the
Pass Side before the Drivers Side.
Any Questions, just e-mail me or post here.
2 3/16" Lynch Pins
Dia (A) (B)
3/16" 1 9/16" 1 1/4"
2 3/8-16 1/2" Dia Shoulder Screws
4 1/2" Stainless Steel Washers .132" thick
I just made some Quick Disconnects for my rear sway bar. They were easy to make. I found
at my work some Shoulder screws, they just happen to have a 1/2" diamerter should and be
about 2.5" long, and on the end they had about 1/2 more of 3/8" thread.
Here is what I did:
1) I took out the stock bolts. (some force will be needed.)
2) Drilled out the sway bar holes with a 1/2" drill bit.(the hole is not a perfect hole,
almost like they made the hole when they cast the sway bar.)
3) Test fitted the bolts, with a little grease they went thru the sway bar and bushing with
no problem. You should have 1 washer on the bolt before you put it thru the sway bar, and
then put the 2nd washer on the bolt after it is thru the sway bar.
4) Next, I had to drill a hole in the bolt so that I could put the Lynch Pinn in it. Mark
the bolt with a marker of a pencil where the Lynch pin would go thru the bolt while it
is up against the washer. I used a 3/16" Drill bit, making sure to go Straight thru the
bolt.
5) Now you can stop here or if you want you can round over the end of the shoulder screw so
that it helps to line everything up as it is inserted in the hole. You also might want to
do this to the Lynch Pins too.
Rounded End Pin
The First picture had a pointed end, the second picture has a square end, this is how they come when you purchase them.
Threaded End Pin
Here is the Quick Disconnect with all its parts put together. (Shown is the Pin with Threaded on the end)
In this picture you see a Wing Nut and a Plate on the Threaded portion of the pin, If Some wanted a "Back-up" for the Lynch Pin, This is what you could do.
Here is The Driver's Side Quick Disconnect Pin before I rounded the end off, The Pass. Side is Identical, with the obvious exception that everything is mirrored.
I Noticed that when I go to put the quick disconnects back in, it is easier to insert the
Pass Side before the Drivers Side.
Any Questions, just e-mail me or post here.
")