So seeing as spring is just around the corner, I thought I'd start a thread on the future undertaking of swapping in the Dana 60.
The axle is from a 1986 "Fawwd" F-threee "fitty", sporting some kingpins and a whole lot of rust. I took this axle apart a few months ago (except stupid me didnt remove the pinion nut before breakdown ) and had it hot tanked. I wanted it sandblasted, but the machine shop owner smirked and said "naaah yo, that junx is too big for my blasting cabinet" .. okay except he didn't really say that cauz he's old and a really cool guy. ANyways *twirls blonde hair*, this is my plaannn:
- WMS-WMS this axle is just a bit over 69" wide so I'm going to cut the passenger's side down a few inches to match 'ye ol General Motors 14-bolt axle. So this is going to require custom axle shafts and I think I'm going to go Chromos and 35-spline outers off the bat from the most awesome guys at Complete Off Road.
- Drive flange or lockouts? They are about the same in price and its a dedicated trail rig so I'm leaning towards the drive flanges. Right now, the cheapest flanges I found are the Teraflexes at $180 for a pair. If anyone knows of a better deal, please let me know !!
- High-steer arms and a double-ended hydroponics goodness ("cylinder").
- Opposite-ended panhard bar! The idea is to mount the chassis end of the panhard on the passenger's side frame rail and the axle end on the driver's side. Doing so should allow a more simple and cleaner design since the axle-mount can be mounted on top of or near the differential housing, instead of a tower on the passenger's side (like in my current D44 setup). I also plan to boost the panhard as far up as possible to increase the roll center of the front suspension. Yeah the concept is a little strange but I'm hoping it'll work and won't have any issues (no drag-link to factor into the design). But if anyone knows of any problem running this config, please chime in!
*EDIT*
- Detoit Locker for the carrier. I'm please with how the Detroit in the 14-bolt has performed so I figured I'd run the same in the front. Of course 5.13s to match the 14-bolt.
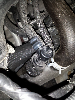
So here's the little guy, he's been in this position for the past few months just collecting dust:

The axle is from a 1986 "Fawwd" F-threee "fitty", sporting some kingpins and a whole lot of rust. I took this axle apart a few months ago (except stupid me didnt remove the pinion nut before breakdown
) and had it hot tanked. I wanted it sandblasted, but the machine shop owner smirked and said "naaah yo, that junx is too big for my blasting cabinet" .. okay except he didn't really say that cauz he's old and a really cool guy. ANyways *twirls blonde hair*, this is my plaannn: - WMS-WMS this axle is just a bit over 69" wide so I'm going to cut the passenger's side down a few inches to match 'ye ol General Motors 14-bolt axle. So this is going to require custom axle shafts and I think I'm going to go Chromos and 35-spline outers off the bat from the most awesome guys at Complete Off Road.
- Drive flange or lockouts? They are about the same in price and its a dedicated trail rig so I'm leaning towards the drive flanges. Right now, the cheapest flanges I found are the Teraflexes at $180 for a pair. If anyone knows of a better deal, please let me know
!!- High-steer arms and a double-ended hydroponics goodness ("cylinder").
- Opposite-ended panhard bar! The idea is to mount the chassis end of the panhard on the passenger's side frame rail and the axle end on the driver's side. Doing so should allow a more simple and cleaner design since the axle-mount can be mounted on top of or near the differential housing, instead of a tower on the passenger's side (like in my current D44 setup). I also plan to boost the panhard as far up as possible to increase the roll center of the front suspension. Yeah the concept is a little strange but I'm hoping it'll work and won't have any issues (no drag-link to factor into the design). But if anyone knows of any problem running this config, please chime in!
*EDIT*
- Detoit Locker for the carrier. I'm please with how the Detroit in the 14-bolt has performed so I figured I'd run the same in the front. Of course 5.13s to match the 14-bolt.
So here's the little guy, he's been in this position for the past few months just collecting dust: