The Black Hole | Page 21 | Ford Explorer Forums

  • Register Today It's free!
Post number 3327 has been selected as best answered.

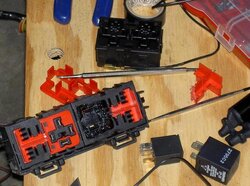
That's a plan Gregg, do you know how many relays you need yet? The small remote relay boxes scattered in the trucks are 2-6 relays in size. But if that smaller size might get the job done, you can find enough of them to accumulate the inner guts for the small relays, to place eight in one of those. The small relays are half the size of the big ones, but those relay receptacles are harder to find.

Look closer at those remote relay boxes, they are actually modular. You can take them apart and reassemble them with different receptacles. They are very hard to take apart usually, so be patient if you do that. They fit together very very tightly, I cracked a few tabs etc, working with mine.

Example, my LR relay box in the quarter panel, I added a relay back there. That one had an empty hole and I wanted a relay there for my power outlet at the hatch. I used extra OEM relay wires to plug into that box, then a new relay plugs right in.
 

Attachments

  • Projectthread091.JPG
    Projectthread091.JPG
    75.3 KB · Views: 753


Join the Elite Explorers for $20 each year or try it out for $5 a month.

Elite Explorer members see no advertisements, no banner ads, no double underlined links,.
Add an avatar, upload photo attachments, and more!
.


6 relays will do me just fine. The low watt led, fluorescent, & CAD don't need any.

The 80w PIAA fogs, 100w off roads, 55w drivers, 55w back ups, 55w rock (4) need the relays.

The Rock lights need to share a switch, I will tie tab 85 from 2 relays to a shared switch for these.

The rest will get their own respective relays. A small PDB should work, if not, I will get another from an EX, and mount it somewhere under the hood. I just need to get out to the JY and see what they have available.


Very good, you can do that with little trouble. I posted that picture to show the common "square" size that is easy to find. You can get six relays in those. The other rather common shape is longer, a rectangle that four large relays are usually in. You have that size under your air cleaner like all 95-01's. Which size would work best, you can do either one. Just decide which will fit where you want it better.

Then the hard part is finding the internal modular sections that hold at least two of the small relays. Those are all rectangular modular sections. It's not hard to find them with one large and two small relay receptacles. Use either a pair of those or find the hard one which holds four small relays. You should practice taking them apart, by starting with one that you don't necessarily need. The first of those that you take apart will be harder than the rest. It takes a small screwdriver tip to get the side clips to let go. Do it carefully and don't jab yourself.

Below see the long relay box I hung under my master cylinder. It can have four big relays in it, or up to eight small relays. I used a pair of sections that had two small and one large, plus gutted part for a flasher. Meaning you can build yours to hold six as you want, in that size. The bottom shows half of one section, I cut it apart to hold two small relays behind each of my door panels. You will need all of those connectors to splice or crimp in the new wires.

You can use very small wires for the trigger wires, but be sure the two main wires to each relay are big enough for the load. Plus make those connections very good. I like to crimp an uninsulated butt connector on them and solder through the seam.
 

Attachments

  • Projectthread080.JPG
    Projectthread080.JPG
    96.9 KB · Views: 746
  • Projectthread083.JPG
    Projectthread083.JPG
    110.2 KB · Views: 752
  • Projectthread079.JPG
    Projectthread079.JPG
    72.3 KB · Views: 757


I appreciate all the help Don. I might have some questions when I start doing this, but hopefully I won't. The weather here is "just plain nasty" (snake farm song..lol)

When it does clear up, and the flooding is down, I will make a trek through a JY for a box. I also want to try to find a box full of relays :)

Speaking of that, the large stock relays...30 or 40 amp?


That is a good question, I've never run across someone looking for the limit. I did ask about their reliability before doing my windows, which may be the highest load stock. I was told by a shop foreman that they were equal for lifespan and likelihood to fail. I would have to use the window motors as a guess, at least 30 amps. Do you need a constant load of 85 was it, or turn on amps?

I'm not sure if any aftermarket relays will plug into the OEM receptacle, I've never tried that. That would be a good option.

Try to see what the Mark VIII uses for its engine fan, that is supposed to need over 50 amps a turn on. I wonder if it uses one or two?


After searching the relays, I can only find that a 40 amp is the largest stock. There is only one relay with a "P" on it (5 pin), used for the wiper intermittent relay switch. There are 20 amp, 30/40 amp relays used in our rigs. So, just guessing, the smaller are the 20, and the larger are the 30/40 amp.

Anything needing more than 40 takes multiple relays.

So I guess I will use the 30/40 amp relays.


Well almost every one of these later Ford black relays has five pins. I have four of the smaller relays powering my rear window motors in my 99. I used a pair of the big ones for each front window in case they were better.

So the smaller relay has to be better than 20 amps, or I would have blown or killed a few. I would say the smaller one is worth a good 30 amps, but of course a long constant power is harder on a relay. Here's a close view of that box I built and hung under the master cylinder.
 

Attachments

  • Relay box w flasher.JPG
    Relay box w flasher.JPG
    82.6 KB · Views: 743


Sorry, I simply stated that the one "P" marked relay had 5 pins, not meaning to imply that it was the only one that had 5 pins.

I looked at some of mine in both the 94 & 95, they are a mix of the smaller & larger. The small box under the dash has some of both in it as well.

Will it matter if I use a larger than needed relay? Does it take that much more power to turn it on, or that it can handle that much more power running to it? I'm still a little sketchy there.


You are doing great, I think either will work for most things you mentioned. The big stuff is all I would worry about, I agree I'd try to find the best relay possible. Try to see if the common Bosch relays or other high powered choices will plug into the OEM boxes. If one of those fit you could have another choice.

I think you could run a pair of the smaller relays for up to at least 50 amps, which do fit in the same space as one big Ford relay. For things over that you might be best to use something special like we read about here once in a while, those 75+ amp relays. Anything for that is going to have a short lifespan. I installed a large solenoid in my inner fender for my 30 amp compressor, and that is very large. That may be the best long term answer for big loads. Se the gray solenoid below that looks like a starter solenoid. It's the same type of part, they are not hard to find online.
 

Attachments

  • Projectthread086.JPG
    Projectthread086.JPG
    100.9 KB · Views: 729


Managed to get a little work done tonight, Removed the T-bars, stripped drivers side of everything and cleaned the frame and shock tower for welding the gussets on. Looks like I need a new DR side upper ball joint too :(
I do think I have a spare UBJ & arm here though..phew!

It started getting dark out, so I had to call it quits. I soaked everything down with de-greaser for the night, so I just have to hose it off in the AM.

Anyone want to buy a nice set of chrome powder coated Sport Trac T-bars?


Finished up the front tear down in between rain storms today. Found out that the pass side upper ball joint was no good either :(

Had to go get another. Got the replacement 2 pc design, with a lifetime warranty, that will help out, I know it will be tore up again some day.

Some prep for welding and some new paint:
coiloverprepdrside.jpg


Trimming of the bump stop mount:
bumpstoptrimdrside.jpg


Are you sure there will be enough space for the coilover to fit with the 2 piece arm? I've never checked but I always assumed there wouldnt be...


my setup is on there with the 2 piece arm,


Are you sure there will be enough space for the coilover to fit with the 2 piece arm? I've never checked but I always assumed there wouldnt be...

I checked before I went with the 2 pc design. I had the same question myself. Since the 2 pc arm allows for a better alignment (more adjusters), I opted for it.


Monsoon season has been upon this area. I have only been able to do so much in between storm cells that have wreaked havoc around here.

So far all I have done is the mock up, install limit straps, and bump stops.

I might be doing this a little different then others, but this way seems to make sense to me. I wanted to get my full droop of the CV axles measured out before anything. I then attached the 12" limit straps. I did a budget build on these. The clevis pins were going to run me close to $60 to the door. My mounts cost a mere $12. I used the Dorman shock rebuild kit to mount to the LCA, and used a bolt and a threaded C-clip for the uppers. Using one of the stock frame slots, I simply drilled a 1/2" hole above and slipped the C-clips in.

I put most of it back together to check for clearance of everything. I left the coils completely loose (nuts backed out all the way) so I can tighten after I see the ride height first, THEN adjust them to my liking.

When the lakes & rivers that are now my property, recede, I can weld the gussets on, and finish it all up.


passsidemockup2.jpg


passmockup1.jpg


12inchlimitstrap1.jpg


Buh-ling!!


That's nice, very clean.


Join the Elite Explorers for $20 each year or try it out for $5 a month.

Elite Explorer members see no advertisements, no banner ads, no double underlined links,.
Add an avatar, upload photo attachments, and more!
.


Back
Top