-
Performance Upgrades - Maintenance - Modifications - Problem Solving - Off-Road - Street Trucks.
Covering the Explorer, ST, Sport, Lincoln Aviator, Sport Trac,
Mercury Mountaineer, Mazda Navajo, Ford Ranger, Mazda Pickups, and the Aerostar.
Featuring H.I. - Human Intelligence.
Register Today It's free!
- Forums
- Ford Ranger - Mazda B-Series Forum
- Ford Ranger - Mazda B-Series Forum
- Ranger / Mazda Registry
You are using an out of date browser. It may not display this or other websites correctly.
You should upgrade or use an alternative browser.
You should upgrade or use an alternative browser.
Scott B's 93 Ranger XLT V8
- Thread starter Scott B.
- Start date

Elite Explorer members see no advertisements, no banner ads, no double underlined links,.
Add an avatar, upload photo attachments, and more!.
Scott B.
Explorer Addict
- Joined
- February 15, 1999
- Messages
- 2,822
- Reaction score
- 28
- City, State
- GA
- Year, Model & Trim Level
- '93 Ranger XLT
Update
It's been a busy week. I made some good progress, and ran into a few "issues."
Issue 1 - headers.
The BBK Mustang headers (what I swapped the JBA Mustang headers for) fit perfectly on the passenger side (not counting the frame rail that needs clearancing.) The driver's side, however, is a different story. The #2 tube and steering shaft want to occupy the same space. (Only minor frame clearancing is required here.)
I have decided to swap these for a set from L&L. The L&L's are designed for this specific swap. I called yesterday to ask some questions before ordering the headers - I am waiting for a callback. Assuming I get the answers I am expecting, I will be using these headers. Let's hope they fit.
Issue 2 - Advance Adapters AOD-to-1354 adapter.
I spent a good part of the day on Saturday making this overpriced adapter fit as it was supposed to. Had the trans and xfer case not been under the truck, I probably could have done the required mods in about an hour. Had AA built it properly, I wouldn't have had to modify anything.
Needless to say, I am very unhappy with the sloppy workmanship of the AA adapter. But, they are the only ones making one. I expected a better fit, given their reputation.
On to the good -
Transfer case completely installed, as is the rear driveshaft. (Leaving the front out until the transmission shifting is taken care of.)
External oil filter installed and plumbed. AN-10 steel braided hose is interesting to work with.
Trans cooler hard lines installed.
Fan controller wired.
Radiator mount complete.
Fuel rails installed. (Plumbing tonight.)
The bracket holding the trans shift cable on the A4LD fits on the AOD! (One less part to buy...) However, part of it mounts to the part of the adapter that I had to modify, and it positions the cable too far away from the shift lever. So, I need to fab a new mount, and weld the bracket to that.
To be fabricated -
Shroud/fan mount
Trans external oil filter mount
Trans shift cable mount
Now that I read this, it looks like a really short list, given all the hours I have spent with the truck.
It's been a busy week. I made some good progress, and ran into a few "issues."
Issue 1 - headers.
The BBK Mustang headers (what I swapped the JBA Mustang headers for) fit perfectly on the passenger side (not counting the frame rail that needs clearancing.) The driver's side, however, is a different story. The #2 tube and steering shaft want to occupy the same space.
(Only minor frame clearancing is required here.)I have decided to swap these for a set from L&L. The L&L's are designed for this specific swap. I called yesterday to ask some questions before ordering the headers - I am waiting for a callback. Assuming I get the answers I am expecting, I will be using these headers. Let's hope they fit.
Issue 2 - Advance Adapters AOD-to-1354 adapter.
I spent a good part of the day on Saturday making this overpriced adapter fit as it was supposed to. Had the trans and xfer case not been under the truck, I probably could have done the required mods in about an hour. Had AA built it properly, I wouldn't have had to modify anything.
Needless to say, I am very unhappy with the sloppy workmanship of the AA adapter. But, they are the only ones making one. I expected a better fit, given their reputation.
On to the good -
Transfer case completely installed, as is the rear driveshaft. (Leaving the front out until the transmission shifting is taken care of.)
External oil filter installed and plumbed. AN-10 steel braided hose is interesting to work with.
Trans cooler hard lines installed.
Fan controller wired.
Radiator mount complete.
Fuel rails installed. (Plumbing tonight.)
The bracket holding the trans shift cable on the A4LD fits on the AOD! (One less part to buy...) However, part of it mounts to the part of the adapter that I had to modify, and it positions the cable too far away from the shift lever. So, I need to fab a new mount, and weld the bracket to that.
To be fabricated -
Shroud/fan mount
Trans external oil filter mount
Trans shift cable mount
Now that I read this, it looks like a really short list, given all the hours I have spent with the truck.
Scott B.
Explorer Addict
- Joined
- February 15, 1999
- Messages
- 2,822
- Reaction score
- 28
- City, State
- GA
- Year, Model & Trim Level
- '93 Ranger XLT
More Pictures
Here are some pictures of the previous few day's work:
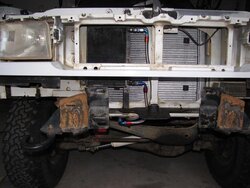
The A/C box with the bigger relief plate, covered with 2 layers of foil tape.
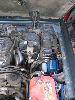
The engine with fuel rails and fuel return line plumbing.
EDIT: You can see the custom oil fill tube in the second picture.
Here are some pictures of the previous few day's work:
The A/C box with the bigger relief plate, covered with 2 layers of foil tape.
The engine with fuel rails and fuel return line plumbing.
EDIT: You can see the custom oil fill tube in the second picture.
Attachments


Scott B.
Explorer Addict
- Joined
- February 15, 1999
- Messages
- 2,822
- Reaction score
- 28
- City, State
- GA
- Year, Model & Trim Level
- '93 Ranger XLT
The seal at the transfer case output shaft has been leaking for a while. Not a bad leak, but the case had oil stains.
I pulled the yoke out, replaced the seal and sleeved the shaft of the yoke. As you can see, a big difference in sealing surface. The case should stay dry now.
The yoke.
The parts.
The sleeved yoke.
I pulled the yoke out, replaced the seal and sleeved the shaft of the yoke. As you can see, a big difference in sealing surface. The case should stay dry now.
The yoke.
The parts.
The sleeved yoke.
Attachments


Scott B.
Explorer Addict
- Joined
- February 15, 1999
- Messages
- 2,822
- Reaction score
- 28
- City, State
- GA
- Year, Model & Trim Level
- '93 Ranger XLT
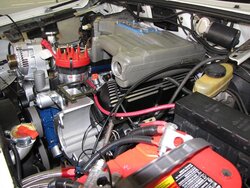
Remote Oil Filter
As you can see from the picture, the steering box is in the way of the oil filter. The solution is to remote mount the oil filter.
I made a plate to hold the filter mount next to the battery, and plumbed the filter to the adapter on the block. The fittings are close to the P/S pump - but they do not hit! This was plumbed with AN-10 line (5/8" diameter.)
EDIT: You can see the custom oil fill tube in the second picture.
Attachments


Scott B.
Explorer Addict
- Joined
- February 15, 1999
- Messages
- 2,822
- Reaction score
- 28
- City, State
- GA
- Year, Model & Trim Level
- '93 Ranger XLT
Apparently, on the '94/'95 Mustangs, Ford did not use a real oil pressure gauge. The engine had the same 3-state sender that this truck had from the factory.
Some years ago, I did the oil gauge mod, converting my oil pressure gauge to a "real" gauge. Wanting to keep that feature, I wanted to mount the real sender.
Fortunately, there was some room under the SN95 bracketry for the sender to fit. I wanted to use the extension piece Ford used on these engines for years, but it is too long to fit. So, I picked up a couple of brass fittings at the hardware store.
Attachments


Scott B.
Explorer Addict
- Joined
- February 15, 1999
- Messages
- 2,822
- Reaction score
- 28
- City, State
- GA
- Year, Model & Trim Level
- '93 Ranger XLT
Sexy is right. How does the color on the brackets look now, that you have the parts together?
Looks great! I like the blue and gray. It's a subtle flashy (unlike the "Lego" motors someone around here builds! LOL
I have to keep reminding myself that this is truck, that will get dirty - not a showcar.
- Joined
- February 8, 1999
- Messages
- 35,785
- Reaction score
- 3,924
- City, State
- Wayoutin, Aridzona
- Year, Model & Trim Level
- '93 XL '20 ST
- Callsign
- AB7FH
I have to keep reminding myself that this is truck, that will get dirty - not a showcar.
That's why you need to take all the pics while it's still purdy
Scott B.
Explorer Addict
- Joined
- February 15, 1999
- Messages
- 2,822
- Reaction score
- 28
- City, State
- GA
- Year, Model & Trim Level
- '93 Ranger XLT
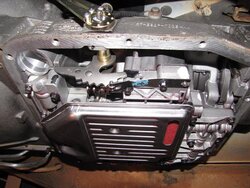
Trans Cooling System
I fabricated a bracket to mount a remote filter for the transmission. Once mounted, I plumbed the trans cooling system.
I decided to, for the moment, use my factory auxiliary cooler. Being that it is a plate style cooler, I think (hope) it will be enough for this engine/transmission package. I did have it ultrasoncially cleaned.
Attachments

Scott B.
Explorer Addict
- Joined
- February 15, 1999
- Messages
- 2,822
- Reaction score
- 28
- City, State
- GA
- Year, Model & Trim Level
- '93 Ranger XLT
Trans Shift Cable Bracket
In my quest to attach the Ranger shift cable to the AOD transmission, I found out that the shift cable bracket used on the A4LD is the same as the one used on the AOD. Good news, right?
No - for 2 reasons. First, the upper mounting bolt used by the bracket is the one I had to modify on the Advanced Adapters adapter. Second, the position the bracket ends up in is 2 inches farther back than the cable needs.
I started designing a bracket to weld the factory bracket to, and locate it in the correct place. (Picture 1) In the course of figuring this out, it dawned on me that it might be easier to build an entirely new bracket. It was. (Picture 2)
I cut the bracket out of a piece of 10 gauge steel (overkill, I know.) It looked great until I heated it and bent it. But it fits, and that's all that matters.
Attachments


Scott B.
Explorer Addict
- Joined
- February 15, 1999
- Messages
- 2,822
- Reaction score
- 28
- City, State
- GA
- Year, Model & Trim Level
- '93 Ranger XLT
I replaced the transmission shift lever with an aftermarket one made by Lokar. This one is adjustable. (It is the gold colored piece in the picture.)
I want the lever pointing straight down, to mimic the A4LD.
I had to pull the pan and filter to change this - I saw the filter was made overseas. I replaced it with a USA made WIX.
I want the lever pointing straight down, to mimic the A4LD.
I had to pull the pan and filter to change this - I saw the filter was made overseas.
I replaced it with a USA made WIX. Attachments

Scott B.
Explorer Addict
- Joined
- February 15, 1999
- Messages
- 2,822
- Reaction score
- 28
- City, State
- GA
- Year, Model & Trim Level
- '93 Ranger XLT
While the pan was off, I installed a drain plug.
Instead of buying a bolt-in plug, I made one. I welded a castle nut upside down to the inside of the pan, and use a 1/2" standard drain plug with washer to seal the hole.
Very simple to do. A big advantage of this style over the bolt-in one is the ability to drain all the fluid, since there is no lip inside the pan blocking some of the fluid.
Attachments


Scott B.
Explorer Addict
- Joined
- February 15, 1999
- Messages
- 2,822
- Reaction score
- 28
- City, State
- GA
- Year, Model & Trim Level
- '93 Ranger XLT
The 3rd set of headers has arrived - we'll see if 3rd time is a charm...
These are very nice headers - electroless nickel plated, made in USA. They include 2 1/2" collectors.
The bad news is the driver's side header hits the motor mount - but it clears the steering!
I am going to replace the motor mounts (so much for doing it myself to save some money...)
There is a 5 week backorder on the L & L mounts...
Attachments

Scott B.
Explorer Addict
- Joined
- February 15, 1999
- Messages
- 2,822
- Reaction score
- 28
- City, State
- GA
- Year, Model & Trim Level
- '93 Ranger XLT
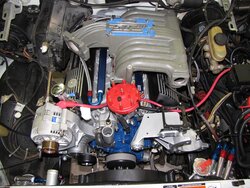
I mocked up the assembly, to see what else didn't want to fit.
The upper intake sits on a 1" spacer - it clears the firewall and throttle and kickdown cables!
Since these pictures were taken, the plate on top of the intake has been detailed, and the upper intake has been powder coated.
The upper intake sits on a 1" spacer - it clears the firewall and throttle and kickdown cables!
Since these pictures were taken, the plate on top of the intake has been detailed, and the upper intake has been powder coated.
Attachments


Elite Explorer members see no advertisements, no banner ads, no double underlined links,.
Add an avatar, upload photo attachments, and more!.

Featured images


Featured images
Similar Threads
- Replies
- 12
- Views
- 9,143
- Replies
- 137
- Views
- 87,595