Completed Project - TTB Terror build | Page 7 | Ford Explorer Forums - Serious Explorations

  • Register Today It's free!

Completed Project TTB Terror build

Use this prefix for completed projects that are not "How to" articles or threads asking for help.
311C3F2C-9623-4DC7-A658-C88A6A018BC1.jpeg
BB3D0398-BAD6-4976-9DEC-BE267C253BF3.jpeg
91C6D397-6283-4E09-A118-F76FC8556AD6.jpeg


Join the Elite Explorers for $20 each year.
Elite Explorer members see no advertisements, no banner ads, no double underlined links,.
Add an avatar, upload photo attachments, and more!
.


Fully painted engine bay.
9D1A5523-AFAB-4999-B9F0-2F2D29D1DB42.jpeg


I started to paint the dash.
268A8DDF-219E-463C-9839-52AFFDD7E7E0.jpeg


I left out a whole bunch of the fun steering stuff apparently. I pulled the factory box out and replaced it. While doing so I damaged the factory steering shaft. There were 2 things I said I would never do on this build, pull the dash, and pull the steering column. Well, I had to pull the column and since most junkyards in my area don’t stock anything older than 2000 I had to find one off a used auto parts supplier website. The kicker was they had 4 available. I picked the one that I thought would be least rusty and they shipped it. Problem was that it got lost halfway through shipping. So I had to go with a different one. When it showed up it was ok but the bearing in the lower portion of the shaft was still a bit crunchy. I just greased it and threw it back together.

I also bought a quick disconnect and got it welded to my steering shaft. In the process of replacing steering components I replaced the factory rag joints with replaceable U joints from a custom hot rod steering supplier (forget who). This completely replaced/rebuilt everything from the steering wheel to the knuckle.
66202CEA-B702-4FC8-8B52-13F03002A7F9.jpeg


That’s it for the updates tonight but there will be pleantly more to come tomorrow. :feedback:


Good job on keeping up with most of the pictures, I have a hard time doing that myself. You've done a ton of hard work, good job at keeping at it! I look forward to seeing what else you have done.


Looking good. Keep up the work.


Apparently nothing big happened over the next few months since pictures are scarce but I spent most of this time doing the odds and ends things while waiting to get the engine back.
As you can see I wrapped all the wiring in blue silicone tape for looks and to try and clean up the engine bay a little, it may or may not have worked but I still kinda like the look.
A7F177FC-4353-4A8B-B348-3111B9EFDE31.jpeg


I also too the time to fill this gaping hole in the cargo area. The original plan was to build a sunken battery compartment I could also maybe keep the winch in. When I decided to 3 link the rear suspension that idea had to go and instead a gas tank is going back there.
D5CD17C4-C7AC-4276-93D1-FC4166BAFFDB.jpeg


Also got the coilover hoops burnt in.
82F2D6B8-95F2-468C-ABAC-EF7DBC9D83D0.jpeg


And here I am posing on the cage. This thing sat in the yard for a while.
AEC9EC2D-B832-48BE-8F2C-874BEA8AC901.jpeg


I missed pictures of the install but before I got the truck back out of the garage I had to tear apart the front suspension because my custom pivot brackets still weren’t perfect. I ended up going with the giant motor sports brackets. Very high quality and the passenger pivot has a built in brace so there are no worries about cracking the engine crossmember.
A92ED64E-AC79-4CFA-990C-1872424CBEE0.jpeg


I also repainted the cage AGAIN I finally settled on silver.
2B62D9E1-F817-4048-B20B-638EFB77E87D.jpeg
4960775D-A967-4329-BD68-076074D5DA78.jpeg


And got the entire floor painted.
2879A3D1-A44B-4007-B533-A567040A537C.jpeg


For my seat mounts I had to cut into the factory trans tunnel and wasn’t sure how I was going to cover it. I finally settled on this rubber matting from Home Depot. Initially I was concerned with flammability but after taking a MAP gas torch to it the stuff will not stay lit and in direct flame I couldn’t even get it to burn a hole. So even if something does catch fire under the hood, smoke would be my only worry. I don’t think I have pictures but I cut a piece for the other side and a large piece to cover the middle. I haven’t got around to installing it yet but the plan is to rob nut the middle piece to the floor so it’ll be removable.
B71A303F-02A4-4930-A5C8-53825CCC6533.jpeg


These are the beginnings of battery box and winch mounting locations. I wanted to balance the weight as best I could.
5AE34A09-C155-4B8B-B149-14A905330C58.jpeg


I spent the big bucks on a proper seat cover for the rear. I was trying to get the original tan seats to match the front Corbeaus as best I could. I also sprang for blue replacement seatbelts to match the harnesses.
32C9C73E-2CF4-4D51-89C4-07D7F321A680.jpeg


I also painted the dash as well. I used the Rustoleum 2x cover and was really surprised. No chipping or cracking 2 years later.
BC312117-0023-4F04-BF2E-F6127CD8FA28.jpeg


Still no engine so I decided to make a piñata out of my cage.
4894E665-6F3A-4B63-8079-18C1FE371405.jpeg


EB29ED6D-C89A-4B26-897F-3D85E5364A5D.jpeg


A few hours later it found its way back in the truck. I absolutly love this picture because it looks like some sort of low slung go fast mobile. (And yes that totally sounds like something a suburban housewife would call a dragster haha)
858519CD-9F8A-4934-B62A-1D443E606D3C.jpeg


I haven’t had a good full droop picture of the rear yet so, here it is.
6CF3C712-D532-41B6-9831-1E3BF94D3B5E.jpeg


This is the “finished” portable winch mount.
53FE68EA-BC6B-401D-86A8-801FF630838C.jpeg


I went back over the welds for anybody wondering.
119C4845-7314-416A-AF28-81E2C1E5299C.jpeg


I’m surprised I didn’t have any pictures of the seat mounting process. I ended up raising them by 1” to help my girlfriend see better if she ever needs to drive. It was as simple as buying 2” aluminum stock, drilling it and using that to raise my sliders. Looking back there was no need to get my seat mount tubes so low on the floor but you live and learn. Plus if I need it the head room is there.
F03D5E80-1D7B-4590-BBB2-E2347A4DDFFC.jpeg


My buddy who had been doing my larger welding projects for me up this point decided it was a good idea to go halfsies on a tough truck. He was an ex dirt track racer and it’s something I had always wanted to do. He found a 93 Toyota pickup that was too good a deal to pass up. The catch was the frame was nearly rusted in 2. On top of that we had both been so busy we didn’t get to “build” it until day of.

He had moved and lost all welding capabilities so I had to load my generator and basically every fabrication tool I had into my little Toyota and drive it a half hour to his place the next morning.
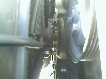
998433D6-B32F-4C37-8680-5AA933FB907F.jpeg


The victim.
AF0617AD-4259-4324-A795-0B44C37A1310.jpeg


I got to his place about 8:30 and it was go go go all day so I didn’t get many pictures. The bed pretty much just fell off once we loosened a bolt or 2. This is a picture of the gram we were dealing with. It’s hard to tell but there’s no frame between the front of the leaf spring and the back of the cab. The driver side had been solidly repaired at one point.

We got a game plan together of how we would fix the frame with the material on hand and then how we would attach the roll bar I bent the night prior. Other than that the truck was ready to go. After a few hours he had to duck out to take care of errands. And if memory serves. He didn’t get back until that afternoon.
B203C307-C8E8-4378-ADCA-99B0FD950156.jpeg


To make matters worse he painted his old racing number on the driver door. I thought he might try to play that game so I came prepared with my own paint.

After our top gear like shenanigans we headed out to the gas station, got 5 gal in it and headed 5 min down the road to the fairgrounds.

E2A65C37-B6EE-4781-BB7C-F0C870745184.jpeg
4439E104-492C-47EF-96C1-E9A12F7A0FE1.jpeg


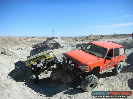
Thankfully my hard work paid off and he let me drive first. The deal was whatever happens happens. They let sidexsides run the course first and frankly it was nothing spectacular. The course was tame compared to some I’ve seen and a lot of the sidexside guys you could tell didn’t want to break their vehicles. Next up was a stock Jeep who’s run I missed because... I was next.

I pulled to the line in 4 low, tapped the brakes and could feel the rear come off the ground. There was nothing back there for counterbalance at all. Here I am in a truck that was practically 2 halves a few hours ago, about to give it my all and just pray that 4 out of 6 bolts is enough to hold this rusty body to the frame. When the light turned green I let er rip 2nd gear 4 low, a quick shift to 3rd and then the bumps came.

I didn’t care at all about throttle timing or anything for that matter. I knew about halfway down the first stretch things were about to get real. There were several stutter bumps followed by larger small jumps. Once I hit the first small jump I had a second to think “Ok I’m in the air this isn’t bad”. The landing didn’t hurt it was ok...
C731DAF1-1A9A-4F8A-9E7B-CF590C6AE014.png


Then came the spring rebound to end all rebounds. The impact broke our hasty rear shock repair and the preloaded suspension launched me into/off of the next jump face. My head probably hit the dash during all this because the next thing I saw when I looked up (looking to my right) I could see over the K rails. It felt like was 10 feet up and I just asked myself “how did I get up here” and then “well this will hurt”. Thankfully it didn’t it went smooth, too smooth. I thought for sure the cab was about to be dragging and I was going to have to get the tow of shame but no, I finished the run.

767AD47E-9CE6-4F27-A0A4-C12090E2DB6B.png


CF854B64-8605-4121-B2BC-7BA41975D094.png


It was about halfway through that I realized something wasn’t right in the shocks. The rear was bouncing all over and I couldn’t keep speed after that. I finished the course came to my complete stop per the rules gave the event official a big smile and a thumbs up and back to the pits I went. Unfortunately for my buddy we didn’t get a second run because the truck would not fire after that run. To this day we still have no idea why.

When it got loaded on the trailer that’s when we realized just how bad the frame and suspension was. The driver side shock was bent, passenger not attached to anything on the frame side, there were more holes in the frame than when we started and the kicker... The reason my run was so smooth was because the tube used as a frame rail had failed and bent and taken a lot of integrity with it. Essentially the frame acted as one big leaf spring and that’s why the only way for me to describe it was like sitting on a trampoline. Literally I felt the hits but nothing ever jarring. It couldn’t have gone better.

86BB77E0-5721-4FC6-9AE4-8E37A51A0A78.jpeg


With all that excitement out of the way it got me really wanting to get back into action building the ex. A few weeks prior I got my fiberglass fenders so I was curious to see how they looked. Even if they were only getting held on with masking tape and I was missing a roof.
4AAC3E8E-1DDB-4192-BCB3-A95B4E98211D.jpeg
4E441B15-707D-4713-B954-E7C543C69735.jpeg
F8BC6690-D5E3-464B-9FEC-93B236CA6C91.jpeg


Speaking of missing a roof I turned my attention to getting that painted.
C84C2E22-2D2B-41AE-B55B-D527C49461BB.jpeg


B4D8AF95-3AB8-4525-89DC-B8ABCD0A60B8.jpeg
1ACD5420-9F27-4B85-AB04-1ECD861CA99B.jpeg


If I recall I took a day off work to get it attached. It took a little bit of creativity with a ratchet strap to get it lined back up but really it wasn’t bad considering how many times I had to turtle shell it around the yard and consequently dropped it.
74235FE7-3D4F-45FA-9C18-758CB19330DB.jpeg


With the roof on it was time to shave the door handles. I wanted to keep all the fiberglass easily removable and that’s hard to do when you have a door handle poking through. Since I was shaving the rear I also did the front. The pictures may be a bit mismatched but you’ll get the idea.

I started with the fiberglass and this was my first time working with it but there’s no better way to learn than on a brand new piece you just paid good money for... right?

Cut out the handle “cup”
E8E8077E-0400-4DF9-9FDA-43235B10423A.jpeg


Filled from the back side with fiberglass mat and filled any air bubbles with bondo until...
155B867A-A004-4AA3-854A-4F780152CE5C.jpeg


It looked like this.
237F559F-620E-4803-AF2D-521DE3550B47.jpeg


The steel doors were a bit more difficult but same idea. I used masking tape to get an outline of the handle indent. Then transferred that to steel. Tacked the steel in place...
A034FECE-DCB9-49B7-97C6-0C4B83C2F43B.jpeg


Used some bondo glass and filler
198BC336-D4EA-40B7-9267-3F55EBD52045.jpeg


Then wash rinse repeat.
2D917F0F-F350-4012-8FBE-19B578F0C2E3.jpeg

77359030-D587-45DD-9D0B-E68B183D662D.jpeg


And now... Finally... the engine arrived. 8 months later....

It may have been my own fault for telling him I wasn’t in a hurry but it was a little annoying not to get any updates from him. Most the time it was me asking what had been done. In his defense it probably was not his biggest money maker if he was building race engines.
0A9F57D5-B2A0-45D6-B241-EFAE06292A36.jpeg
7729DEBF-5DCA-461F-965F-9691F97F5E49.jpeg
84D35A76-1F31-4969-BEFE-B6053057CBE3.jpeg


Trans and Tcase attached, Tcase got a “Rustoleum Rebuild” everything else got the full treatment.
B4003B44-C14B-4E3B-93E4-A8CBADE33EFC.jpeg


I also finished the radius arms and mounts at this point. I hadn’t finalized the caster in the arms that’s why the holes are extremely large.
FAD8F2C6-5DC5-4653-82A3-B7D448F24BA1.jpeg


32F459C6-70AB-4927-8344-A20B56091EB9.jpeg


Engine installed but not fully seated on the trans mounts. It was nice to finally get to install the solid motor mounts that had been in the garage for about 4 years. This picture makes the 4.0 look tiny in that engine bay.
88B3AA35-41A8-4131-A0E7-9DA95CE158CE.jpeg


89258CB2-AC36-4535-995E-5BDCB92504E7.jpeg


Don’t mind the Vaseline... just lubing injectors. :shifty:
6A721126-B589-4C9F-A532-80F93232A4B2.jpeg


Also got a fancy 3 core fully aluminum radiator.
EECFD5C8-49DA-4654-9D0C-E582D658B546.jpeg


And I forget why I took this last picture but I think it was my driver door being oficially primed.
301DC141-645E-46A7-A8F5-1DDBAE04FC2F.jpeg
AFB68577-0FE5-474D-BAF1-F84E5D6A4BE4.jpeg


Core support back in!
CEF66F61-771A-4559-AF36-8BDAA898E313.jpeg


There’s A LOT of smoke and mirrors here but I was excited to see it come together.
4850FB14-969A-4D73-AEE8-19F71A584D2A.jpeg


Driver door primed.
97E46855-6B9A-4530-B855-BE6F3C302B6C.jpeg


I’m now caught up to last year. I moved away from the garage at this point and got a place about an hour away. This put a sever strain on explorer time, it was able to stay at the garage however so it’s not like I had to close up shop, I just had a heck of a drive to get to it.

To make up for this strain I had to find something to occupy my time. I decided to build my own electronic shifter conversion for the Tcase.

I started with a 90 degree drill attachment from harbor freight. Then I used a nut that matched the thread on the chuck of the drill and the end of the socket that fits over the selector. I welded them together and threaded them to the drill adapter.
5E7AFC1B-E6A2-4A8C-A458-A405CD8A565D.jpeg
C6F14A56-B7E7-4469-A5A7-914596BE4793.jpeg


Unfortunately the drill adapter had a slight gear reduction but in order to get the proper 90 degree or less throw I needed about a 4:1 ratio. I ordered these gears from McMaster Carr and had to build my own housing. As you can see in the picture below the plan was to put the angle drill in a housing attached to the t case. Then use a socket on the input of the angle drill, that uses 1/4” socket parts (u joint, extension, u joint) that terminated into a shaft with a set screw in the tiny gear, lastly that drives the big gear which would connect to a lever/linkage in the cab.

The only way I could think to have it work was to run it as you see by drilling a hole in the frame and attaching my custom gear box to the body and run the lever up near the driver door.
83B7E755-BD17-4B44-A1E5-E7C4C02D627F.jpeg


This was my first attempt at a gear box, I ended up making the final version out of lexan and it came out really clean.
DA5E20FF-A9D3-4F6C-B501-B47F6FE7E0A1.jpeg


I don’t have pictures but ultimately I decided to nix either the drill adapter or the gearbox for an angle grinder box. This would give me about a 5:1 ratio in a much more compact package. This is still a work in progress to this day and... it’s all null and void as of a few days ago when I found out Behemoth Drivetrian is making cable shifters for the 1354.


Join the Elite Explorers for $20 each year.
Elite Explorer members see no advertisements, no banner ads, no double underlined links,.
Add an avatar, upload photo attachments, and more!
.


Now, in the timeline this brings us to last spring, engine in let’s get it running, doors on, let’s seal them up, goal was to get it going by September at the latest.

First step was mounting the bronco tank.
767DC554-CC1E-4566-8C40-F89C4312C022.jpeg


Back
Top