ExplorerEB96's X under the knife | Ford Explorer Forums - Serious Explorations

  • Register Today It's free!

ExplorerEB96's X under the knife

JDraper

Somewhat Functional
Moderator Emeritus
Joined
January 11, 2001
Messages
15,251
Reaction score
66
City, State
McVeytown, PA
Year, Model & Trim Level
'18 XLT
Well, today I started putting the Superlift 4" lift into Karol's truck. Took me about 2 to 2.5 hours to completely gut the front suspension and drivetrain. Here are a few pix :)

Here's the front left side gutted
 

Attachments

  • frt lft.jpg
    frt lft.jpg
    33.1 KB · Views: 1,976


Join the Elite Explorers for $20 each year.
Elite Explorer members see no advertisements, no banner ads, no double underlined links,.
Add an avatar, upload photo attachments, and more!
.


Front right side:
 

Attachments

  • frtright.jpg
    frtright.jpg
    27.6 KB · Views: 1,987


Front axle. Now I know why everyone hates the stock axle....It's lighter than the front axle in my Zuk fer cryin out loud!!!:eek: :eek:
 

Attachments

  • frt xl.jpg
    frt xl.jpg
    24.3 KB · Views: 27,109


Gotta love that under truck storage :D
 

Attachments

  • storage.jpg
    storage.jpg
    27.8 KB · Views: 1,947


Aaaaahhhh, relaxing after the work is done :D :D
 

Attachments

  • beer.jpg
    beer.jpg
    22.9 KB · Views: 1,939


Jeff, I'll give you $50.00 for the doors off that firebird:p

Nice work, but you need to finish the day with a cold Guinness:D


No no no... One can NEVER go wrong with AmberBock! Are you going to get longer driveshafts or just reuse the stock ones? And are you doing SOA or lift springs in the rear? Definately keep up the good documenting! Also, does anyone know if the Superlift kit is reversible? (Not that I would want to take it out, but its always a nice to know you could if you had to)


1. Me no do Guiness :p
2. U toucha Sue's Firebird, U answer to Sue. GOOD LUCK!!! :D
3. Stock rear driveshaft. Longer front driveshaft
4. Lift springs......for now.
5. It would be easily reversible. Everything is bolt up.


Got the 1 Rated torsion bars finally!

Will be shipping them to you either today or tomorrow...!! hey you make tearing my explorer apart look like fun!!

Karol:D

btw.....if anyone wants to buy my B rated bars ....just ask Jeff.....well lesse how the rated 1 bars fit before you make a final deal.....


hehe, just bustin Jeff:p


Well, more progress today. Spent about 4 hours working on it and got the axle back in and all the right side suspension except the tbars and the shocks :mad: 
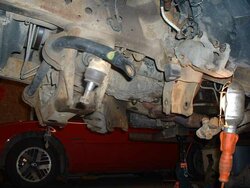
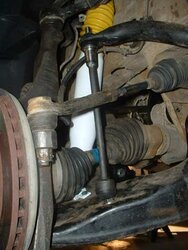
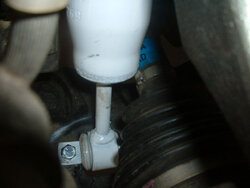
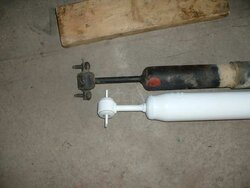
. Superlift screwed up on the shock choice and they don't fit
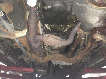
:shoot:.

A couple of tips for those thinking about doing the install. The bolts that come to hold the new axle brackets to the frame are ok for the driver's side, but too short for the passenger's side. I had to buy a bolt about a 1/2" longer from the local hardware. Make sure you get a grade 5 bolt. Second item is the sway bar end links. There is a spacer that goes into the lower control arm that comes with the kit. It's too thick. You'll have to grind it down to about half thickness so that the end link does not rattle.

Now for some more pix. :) Here's the rear crossmember installed:

Pic #1
 

Attachments

  • xmember.jpg
    xmember.jpg
    21.6 KB · Views: 1,866


Front Crossmember installed:
 

Attachments

  • xmember2.jpg
    xmember2.jpg
    24.1 KB · Views: 1,868


Here's the right side hub, knuckle and LCA installed.
 

Attachments

  • hub rt side.jpg
    hub rt side.jpg
    29.2 KB · Views: 1,825


Here's the swaybar end link installed:
 

Attachments

  • swaybarlink.jpg
    swaybarlink.jpg
    24.7 KB · Views: 1,808


I had to relocate the vacuum control module for the front axle since the vacuum tubes weren't long enough to reach the new axle position. This is mounted on the right side of the radiator cross member. You can see in the shot that I only had to move it about 4" to the center of the truck.
 

Attachments

  • vaccum reloc.jpg
    vaccum reloc.jpg
    28.2 KB · Views: 1,835


Now the problems. Here is the shock rubbing the axle.
 

Attachments

  • shockrub.jpg
    shockrub.jpg
    28.9 KB · Views: 1,825


Rub #2
 

Attachments

  • shockrub1.jpg
    shockrub1.jpg
    20.8 KB · Views: 1,866


Now, here's why the shocks rub. This is a pix of the stock shock and the Superlift shock. You can see that the stem on the stock shock is considerably longer, allowing for axle clearance.
 

Attachments

  • shocklength.jpg
    shocklength.jpg
    24.5 KB · Views: 1,793


Join the Elite Explorers for $20 each year.
Elite Explorer members see no advertisements, no banner ads, no double underlined links,.
Add an avatar, upload photo attachments, and more!
.


Originally posted by HokieBert
Only grade 5? I would think everything should be grade 8 (or 10.9 Metric)


Nope. Grade 5. Grade 5 may have a lower tensile strength than grade 8, but it's elastic yield point is higher, meaning that it's not as strong in pure tension, but under shock load, it won't snap off as readily


Back
Top