aldive
Elite In Memoriam
- Joined
- January 17, 2001
- Messages
- 24,667
- Reaction score
- 28
- Year, Model & Trim Level
- 1999 XLT
I have been running a Flex-a-Lite Black Magic 150 electric fan ( Dead Link Removed ) on my ’99 SOHC for 2 and a quarter years in the hot Florida weather without one single difficulty, even while towing a Jeep on a tandem trailer. Its installation is featured at http://www.explorerforum.com/forums/showthread.php?t=75371&highlight=electric+fan . This fan had always served me well.
If it ain’t broke, why fix it?
I am for ever and a day on the look out for a better product or procedure and always keep an open mind. The Flex-a-Lite Black Magic Extreme 180 (http://www.flex-a-lite.com/auto/html/180_black_magic_x-treme.html ), a new 16” shrouded s-blade electric fan was not on the market when I installed the 150. Based on its specs, the 180 ought to do a better job ( since it is the most powerful single electric fan available ) than the already sufficient 150; therefore, I just had to have one.
Fan Diameter Airflow CFM Amp draw
150 15” 2800 13.9
180 16” 3300 18
I ordered the fan from Jegs (http://www.jegs.com/cgi-bin/ncommerce3/ProductDisplay?prrfnbr=386867&prmenbr=361 ). The cost was $289.98 to my door.
All of the wire, connectors and nuts/bolts needed for the installation were included with the fan; very complete. Even an Allen wrench to tighten the included bolts was provided.
A substantial amount of installation time was saved in view of the fact that the factory fan and shroud did not need to be removed and wires and switch were already in place ( for the 150 ).
Removing the existing 150 was undemanding; took about 2 minutes with the air ratchet. Each of the wires was detached from the control module after carefully marking them for later use. Then the temperature probe was removed from the radiator core. Next, the nuts were removed from the fan’s top and bottom brackets and the fan assembly pulled out and set aside.
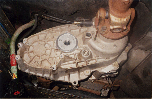
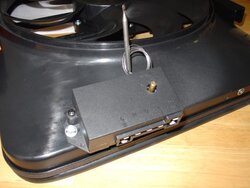
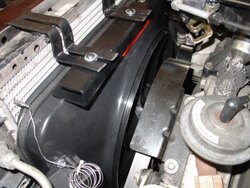
The electrical control box for the 180 was mounted to the fan shroud by drilling 2 x 3/16" holes and using self-tapping bolts ( provided with fan ) to mount the module as shown in the photograph. The 12 v power ( + ) and ground ( - ) wires from the fan motor were run through two small holes drilled in the shroud and attached to the control box’s M+ and M- terminals. The holes were sealed with black RTV.
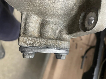
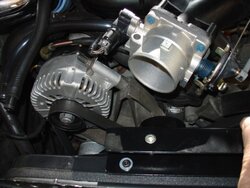
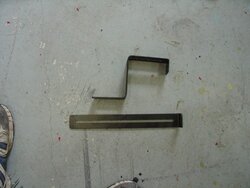
The way the top bracket it designed to mount will not work on my truck the Mac intake tube is in the way ( see photograph ). To remedy this problem, the top bracket was moved as far to the driver’s side as it will go and bolted to the shroud through new holes. The brackets were attached to the fan/shroud as shown in the photograph. Next, the 180 was fit into place making sure that the rubber seal was contacting the core of the radiator and compressed about 50%. The horizontal brackets ( after bending and cutting to fit [ picture ] ) were attached to the bracket on the fan as well as the top and bottom of the radiator and then tightened in place. I used Loc Tite on all attachments.
The electrical connections; the 12 volt to the battery ( + ), the ground ( - ), the manual switch, the ignition switched 12 volt ( + ), the AC clutch lead, were attached to the 180’s control box. I used the existing wires from the 150 install. All the wires were enclosed in new split loom tubing and securely routed. The temperature probe was inserted between the fins of the radiator core.
To set the thermostat, I hooked up my OBD II scanner (http://www.autoxray.com/products.aspx?sub=scanners&id=2 ) and set it to display engine coolant temperature. Next the thermostat control was turned clockwise completely. The truck was started and was run until the scanner shows the temperature as 195 F; the control was turned counterclockwise until the fan turns on. The temperature display returned to 190 F promptly, and remained there. With the factory fan as well as the 150, the normal operating temperature of my Explorer was 190 F. I tweaked the procedure to produce a stable 190 F operating temperature.
When the fan turned on, I straight away observed a notable decrease in fan noise. Evolution indeed; a more powerful fan that is quieter; imagine that!
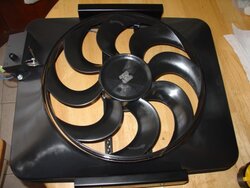
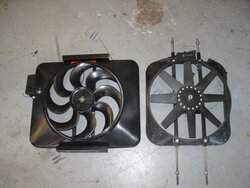
The shroud, made of glass reinforced nylon, of the 180 does a good job of covering the radiator; much better than the 150’s did. See the photograph of the fans side by side.
Total time for this installation was about 3 hours; considerable time was spent fabricating the brackets ti fit.
A road test established this fan to be at least as good as the 150, only considerably quieter. Further evaluation in bumper to bumper traffic in the heat of summer while towing the Jeep will tell the tale.
This is a worthy mod and I would unquestionably recommend it to anyone with a stock fan; you can save some money by going with the Black Magic 150. The only downside of an electric fan is its cost.
Did I need it?, naw, did I want it?, yes. I got it …. and I like it.
If it ain’t broke, why fix it?
I am for ever and a day on the look out for a better product or procedure and always keep an open mind. The Flex-a-Lite Black Magic Extreme 180 (http://www.flex-a-lite.com/auto/html/180_black_magic_x-treme.html ), a new 16” shrouded s-blade electric fan was not on the market when I installed the 150. Based on its specs, the 180 ought to do a better job ( since it is the most powerful single electric fan available ) than the already sufficient 150; therefore, I just had to have one.
Fan Diameter Airflow CFM Amp draw
150 15” 2800 13.9
180 16” 3300 18
I ordered the fan from Jegs (http://www.jegs.com/cgi-bin/ncommerce3/ProductDisplay?prrfnbr=386867&prmenbr=361 ). The cost was $289.98 to my door.
All of the wire, connectors and nuts/bolts needed for the installation were included with the fan; very complete. Even an Allen wrench to tighten the included bolts was provided.
A substantial amount of installation time was saved in view of the fact that the factory fan and shroud did not need to be removed and wires and switch were already in place ( for the 150 ).
Removing the existing 150 was undemanding; took about 2 minutes with the air ratchet. Each of the wires was detached from the control module after carefully marking them for later use. Then the temperature probe was removed from the radiator core. Next, the nuts were removed from the fan’s top and bottom brackets and the fan assembly pulled out and set aside.
The electrical control box for the 180 was mounted to the fan shroud by drilling 2 x 3/16" holes and using self-tapping bolts ( provided with fan ) to mount the module as shown in the photograph. The 12 v power ( + ) and ground ( - ) wires from the fan motor were run through two small holes drilled in the shroud and attached to the control box’s M+ and M- terminals. The holes were sealed with black RTV.
The way the top bracket it designed to mount will not work on my truck the Mac intake tube is in the way ( see photograph ). To remedy this problem, the top bracket was moved as far to the driver’s side as it will go and bolted to the shroud through new holes. The brackets were attached to the fan/shroud as shown in the photograph. Next, the 180 was fit into place making sure that the rubber seal was contacting the core of the radiator and compressed about 50%. The horizontal brackets ( after bending and cutting to fit [ picture ] ) were attached to the bracket on the fan as well as the top and bottom of the radiator and then tightened in place. I used Loc Tite on all attachments.
The electrical connections; the 12 volt to the battery ( + ), the ground ( - ), the manual switch, the ignition switched 12 volt ( + ), the AC clutch lead, were attached to the 180’s control box. I used the existing wires from the 150 install. All the wires were enclosed in new split loom tubing and securely routed. The temperature probe was inserted between the fins of the radiator core.
To set the thermostat, I hooked up my OBD II scanner (http://www.autoxray.com/products.aspx?sub=scanners&id=2 ) and set it to display engine coolant temperature. Next the thermostat control was turned clockwise completely. The truck was started and was run until the scanner shows the temperature as 195 F; the control was turned counterclockwise until the fan turns on. The temperature display returned to 190 F promptly, and remained there. With the factory fan as well as the 150, the normal operating temperature of my Explorer was 190 F. I tweaked the procedure to produce a stable 190 F operating temperature.
When the fan turned on, I straight away observed a notable decrease in fan noise. Evolution indeed; a more powerful fan that is quieter; imagine that!
The shroud, made of glass reinforced nylon, of the 180 does a good job of covering the radiator; much better than the 150’s did. See the photograph of the fans side by side.
Total time for this installation was about 3 hours; considerable time was spent fabricating the brackets ti fit.
A road test established this fan to be at least as good as the 150, only considerably quieter. Further evaluation in bumper to bumper traffic in the heat of summer while towing the Jeep will tell the tale.
This is a worthy mod and I would unquestionably recommend it to anyone with a stock fan; you can save some money by going with the Black Magic 150. The only downside of an electric fan is its cost.
Did I need it?, naw, did I want it?, yes. I got it …. and I like it.
 I hope to have one of these one day.
 ")