Cold Air Intake for 5.0 Explorer | Page 8 | Ford Explorer Forums - Serious Explorations

  • Register Today It's free!

Cold Air Intake for 5.0 Explorer

Is there anything josh does not dabble in?

What a team!!!


Join the Elite Explorers for $20 each year.
Elite Explorer members see no advertisements, no banner ads, no double underlined links,.
Add an avatar, upload photo attachments, and more!
.


Is there anything josh does not dabble in?

What a team!!!
It would be arrogant of me to say if I can't do it, it can't be done. It would also be untrue cause I learn something new everyday. Sometimes I have to learn from my own mistakes.


Yes, I agree Josh. We should definitely avoid being arrogant. Also I also hope to never stop learning. Must of us learn the hard way. That's part of the reason, I started my youtube channel. "Sweet Bailey". To help others avoid learning some things the hard way. On that note, Intake is ALL DONE! NO ISSUES! Also I have posted my video on my youtube about it. I know it's not perfect, but I just do what I can with what I got. Think I'm done with major upgrades for now.

Next Big Project is Swapping front end parts out. It's got bad ball joints and I purchased that TRQ A-arm, ball joint, tie rod, antisway bar kit online. It was only $365.95.
Screenshot_20230103-121915_Samsung Internet.jpg
Way better deal then having les schwab change 4 ball joints for $700.

Thanks again guys for all the help! Take care. Later, PEACE! 🙂


Yes, I agree Josh. We should definitely avoid being arrogant. Also I also hope to never stop learning. Must of us learn the hard way. That's part of the reason, I started my youtube channel. "Sweet Bailey". To help others avoid learning some things the hard way. On that note, Intake is ALL DONE! NO ISSUES! Also I have posted my video on my youtube about it. I know it's not perfect, but I just do what I can with what I got. Think I'm done with major upgrades for now.

Next Big Project is Swapping front end parts out. It's got bad ball joints and I purchased that TRQ A-arm, ball joint, tie rod, antisway bar kit online. It was only $365.95. View attachment 439269Way better deal then having les schwab change 4 ball joints for $700.

Thanks again guys for all the help! Take care. Later, PEACE! 🙂
nice vid btw on the intake! need an exhaust clip sometime


You want me to do a video on the exhaust? I dont have clip of when it was stock. But I could explain about O2 Sensors, Cats and entire system. So am I correct? That these have 4 Cats and Three 02 sensors?

So manifolds, two 02 sensors before, the first 2 cats, One 02 sensor on passenger side i believe, then 2 more cats, muffler, resonator, tail pipe. In that order? If that's correct, then in states with NOT A TON of EMISSIONS REGULATIONS. You can technically remove the last 2 cats without tripping a CHECK ENGINE CODE. Correct or am I wrong?
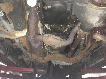
in general, just an overview of your exhaust, but most importantly... sound!!!!!!!

i do believe v8 has that, ye. sounds right just not 100% sure about the placement of the downstream sensor. i thought it ws after the y pie but not sure


You want me to do a video on the exhaust? I dont have clip of when it was stock. But I could explain about O2 Sensors, Cats and entire system. So am I correct? That these have 4 Cats and Three 02 sensors?

So manifolds, two 02 sensors before, the first 2 cats, One 02 sensor on passenger side i believe, then 2 more cats, muffler, resonator, tail pipe. In that order? If that's correct, then in states with NOT A TON of EMISSIONS REGULATIONS. You can technically remove the last 2 cats without tripping a CHECK ENGINE CODE. Correct or am I wrong?
A spark plug anti fouler on the post cat O2 sensors works wonders.


Oh okay. I will do that. But first I'm get it on ramps and make sure I know how many 02 sensors there are and where. Before I make a video.

So I'm gonna delete the Air conditioner since it don't work. Also question is, So the 97 explorer motor and the 94/95 mustang motor are technically the same motor? But obviously, different upper and lower intake manifolds, different heads and cam. But besides that, it's the same motor? Which means it uses the same accessories? Alternator, starter, water pump, etc.?

Which means UNDERDRIVE PULLEYS for a 94/95 mustang 5.0 would work on a 97 explorer 5.0?


Not necessarily. The front dress is completely different on the Explorer since it’s tighter to the radiator.


There are 4ea 02 sensors on a 5.0, 2 per bank
3 of them connect on top of the transmission
1 connects on the drivers side above the primary cat

explorer serpentine front dress is unique to explorer 5.0, has the shortest front timing cover and no oil slinger on the timing gear
135 amp alternator
METAL power steering pump (thank goodness)


Okay, thanks guys. So all that stuff is different. But is there any underdrive pulleys for the explorer or any that work on it? Has any done underdrive pulleys? Just trying to find out if there is any or anything that works. I can't find any for the explorer.


Hello Guys!

So Intake is DONE and working PERFECT!

But I'm not done yet. There are 2 more things I'm gonna add to this.

So FIRST is a AIR BOX/barrier for the air filter. I got a big piece of sheet metal which I'm gonna cut into a specific design I came up with. 90% will be one solid piece and there may be a small piece I'll bolt in after all said and done. So the reason for a box on a CAI system is to separate hot air from the cold. My setup is placing the filter pretty far from the engine, but still in the engine bay and exposed to hot air. The metal was FREE! It will have only cost me about $10. I bought a fuel line, which will be used on top of the box to separate the metal of the box from the hood. Also doubles as a safety feature, so there isn't any sharp metal. Plus it will pull it all together and make it look a bit better.

The SECOND thing I'm adding to this setup is a OIL CATCH CAN. I'm not particularly fond of the design of the oil breather tube on these trucks. So eventually I'm gonna get about a $100 catch can to complete this Intake setup. I did some research and I believe a catch can is a good thing to reduce stuff from getting into the engine. The Catch can captures any and ALL contaminants going through the valve cover oil breather tube. The breather tube is designed to release excess oil pressure from the engine and redirect it to the air intake system. So it's a GREAT feature to add to your build to extend the life of your engine. Aswell as reduce maintenance costs in the future. Less contaminants in the engine the better.

Here is a few pics of my air box design so far. I will update as I go.


you should consider including the fresh air feed either from next tot headlight or from the inner fender to your heat shield design!


Yes, 410Fortune. I want to somehow add or modify the fresh cold air feed into that boxed area.

Only the engine side of the bottom is blocked, mostly for mounting. The 2 sides closest to the engine will be blocked.

But the Fender side and behind the headlight is almost completely OPEN. So that gives me opportunity to figure out some kind of feed tube. I agree, but haven't put to much thought into it yet. Thanks

My biggest concern about this is getting water or debris in the feed tube. Considering this is a truck and it will be offloading occasionally. I will figure that out at a later date.


very similar to a factory airbox!!

I have a similar setup
I run Amsoil (INjen) dry filter with a pre filter and I have a plastic shield to keep the mud/water off my filter. The factory airbox feed from next to the headlight has been enlarged and allowed to flow directly to the filter

The only other thing to consider is your metal guard will get hot and heat up the air around it, consider some sort of heat shielding material

the 95-01 Factory airboxes work pretty well IMO but they just need some of the factory restrictions removed and a good flowing filter


Join the Elite Explorers for $20 each year.
Elite Explorer members see no advertisements, no banner ads, no double underlined links,.
Add an avatar, upload photo attachments, and more!
.


I agree, they are very similar. But the "ribbed" tubing on the factory setup, is VERY restrictive in my opinion. Also tube is much smaller. So that's main reason i have done all this. This was fairly cheap to build and is alot more free flowing.

Thanks for that info. That is a good thought, I will find some heat shield material to apply to the box. Thanks

Yes, the stock air feed setup is not horrible. Just like most other stock stuff. Restrictive and to small. I'm not sure how much air gets around the headlight area to feed the air box. I'm trying to keep relatively stock, but with some small mods to improve flow. I have bunch of aluminum tubing for CAI systems. I may incorporate a piece for a feed tube somewhere. Not sure yet


Back
Top