Engine swap 98 sohc | Page 7 | Ford Explorer Forums - Serious Explorations

  • Register Today It's free!

Engine swap 98 sohc

What a shame!

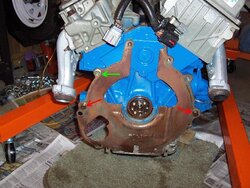
I would go with option 1. Otherwise, any work performed from this point forward is work that will have to be repeated. You'll need about 3/8 inch of separation to insert the spacer plate. I don't know if you can gain that much by moving the transmission aft without disconnecting it. I know that you're anxious to determine the condition of the Mustang engine, but consider how discouraging it would be when it starts and you'll have to tear it back down right away.

Some members have realized after assembly that they forgot to install the new rear main seal they purchased. Be patient. You're getting close to the grand finale!


Join the Elite Explorers for $20 each year.
Elite Explorer members see no advertisements, no banner ads, no double underlined links,.
Add an avatar, upload photo attachments, and more!
.


Next move

Yeah, you guys are right. I just needed some time to cool off and think straight.

I will try to minimize the sepataion.

Is there enough room to lift the motor off the mount and then unbolt the tranny? Or do I need to remove the mount to block plate?

I think I need to remove the tc nuts right? It would be nice to just slide the engine with the tc still connected, but I would be taking a chance that it would not seat properly on the reentry.


The best way is to remove engine again. If you leave converter hooked up and slide it you have a chance of damaging converter or pump or both .


Yeah, that's what I figure.


the dowel pins are too long and with out a lift to remove transmission that is the easier way


Take a look at this picture...

Does your plate look like this one? If so, this is not as bad a situation as you might think...

You will need to remove the engine/tranny bolts and loosen the tranny crossmember mount bolts and use a prybar to seperate the two pieces to slip this plate into position...

I fought this POS while installing the shortblock and wished I had left it off until I had the two together...

It can come in from the bottom of the engine and opening up the space to get it over the dowels with a prybar will get it into position...

Damn I am sorry to hear that though...But this is a minor deal.. Really it is...:D
 

Attachments

  • Plate.jpg
    Plate.jpg
    74 KB · Views: 655


Back on track

I disconnected the exhaust, starter and engine mounts. Removed the tc nuts and engine/tranny bolts and lifted the engine a few inches up and back. Put the **!!@@** plate in and put it all back together. The worst part again was getting the engine lined up and mating the bushing and tc studs.

I am pretty happy that it only took about 4 hours and I'm back to where I was....well almost. Still have to torque it all back up and connect the exhaust.

Now I will try to relax for a half day before going back to work tomorrow. The rest seems a little more tame, so I would think that I can get it back together and test fire it next next weekend.

Thanks again for the advice and good wishes. I really appreciate everyone for talking me out of finishing up and doing this later. It would have taken a lot more effort with everything bolted up. I would have probably cussed and sweared the whole time if the thing was running and I had to take it apart again.

Happy Labor Day!!!!!!


At least you are done again...

I was thinking about this yesterday and I remembered what a friend did on his Ford...We left out that plate and we did a weekend thrash and got it back installed when he noticed it sitting in his paint booth instead of the shop...

He cut the plate in half, cut the dowel holes in half, and pried the engine/tranny apart just enough to get that plate into place...He slid the drivers side half into place and put in the top bolt to hold it...On the passenger side, he did the same thing...On the dowel pins, he took the pieces and rtv'ed them and stuck each piece into place on the outside of the dowel pin holes and then tightened the engine/tranny bolts down...

I believe he did this because he realized the tc was too far into the tranny and by putting the plate into the gap the tranny was moved back just enough to give him clearance...Apparently when he was underneath the car he saw the tc studs were further out of the flexplate than before...

Like you stated at least the engine wasn't completely bolted in and set to go...

Have a great Labor day man...


Actually, it was. Tc nuts and exhaust were torqued, and the engine bolts all tightened. Well it's fixed and I move on.
Thanks


Good work fella
Take your time when you're getting close and make sure you do things properly.
Also as suggested already pre fill your oil filter and before start up remove the coil feed and crank the engine for a few seconds to build up some oil pressure before you fire her up.
Regards


Idler and tensioner

Engine bolts, mounts, exhaust, tranny lines support, connectors on back of engine etc. Done (for the second time).
On to the front accessories, radiator, coil, intake, wires and hoses. Should be all easy stuff from here on. This weekend is the target to fire it up. I'll hold off on the hood and wheel wells until I know it works.

Does anyone know the torque spec for the drivebelt tensioner and idler pulley? They are not listed in my Haynes book.


Yep.. you always need to have the dirt/protection plate... mainly a pain if you end up dropping it as you're lineing everything up.. and it hits you in the face, like it did for me... the two times I pulled my transmission.

Oh.. good site to upload pictures with is www.tinypic.com.. easy and simple to use...

Great Job with the swap.. hope everything goes great from here on...


Idler pulley and belt tensioner

I found some posts that say 35 lbs. For both of them.


help...where do ground wires go

One of the first things I did was disconnect the pcm and remove the hood. There are 2 ground wires and I can't remember how they go.

1. Short black ground wire that comes out of the pcm harness.
2. Long Braided ground strap attached to the passenge side head.

The reason I am confused is that the long ground strap has a stud with a double bolt on top. It looks like it would be used to hold down the pcm connector. The short pcm ground wire only has a term lug so it "appears" to be made to attach right near the pcm.
There is also a loose nut on the wiper mounting stud which has green (electrical) lok-tite on it, like it would accept the term lug.

PICS below

Seems the opposite of what it looks like.

Could I have mistakenly put the stud with the braided ground strap?
Does it really go with the short pcm wire harness instead?
Is there a regular bolt for the pcm mount bracket?
Does the braided ground strap mount on the wiper stud?
And finally, doesn't the hood have a ground wire?

I'm so confused!!!!!!!
 

Attachments

  • ground wires.jpg
    ground wires.jpg
    28.8 KB · Views: 618
  • wiper mount bolt.jpg
    wiper mount bolt.jpg
    19.8 KB · Views: 600


Awesome. Thanks


Will fire it up in the morning.

Everything is assembled. I need to torque the upper intake, put the battery in, find one intake tube screw I just dropped, and attach the tranny lines to the radiator. I can't believe I made it this far. Just too tired to trust myself right now. Better to do the final check when I'm fresh and the sun is out.


Before you are about to go for the start up double check the leads on the coil are correct and that each lead matches the cylinder it is supposed to.
Remember to pull the lead to the coil and turn over some to get oil pressure up before you try to start. Also have the heater on full heat with the rad cap off and the coolant at the correct level and let it idle for a while to ensure you don't get air locks in the cooling system. you will find it will need some topping up.
My fingers are crossed for you, hoping it is a symphony of quiet smooth V6 growl.


It lives!!!!!

Started right up after a couple no spark turns to move the oil. Sounds awesome.
It's not registered, so I can't really say yet how it drives, but what a feeling to hear life spewing from a new motor.

Couple of observations (concerns?)

1. It never got hot enough for the thermostat to open (I don't think). Did get some heat but the water in the radiator never got hot.

2. Some water and smoke coming from the exhaust.

3. Red fluid leak at the rubber hose going to that little radiator in front of the condensor. New hose clamp will fix that.

4. Fuel line schrader valve leaked gas. I think the little o-ring was twisted and pushing the valve. I removed the cap and o-ring and the leak stopped.

5. Smoke at the passenger side exhaust pipe. Hopefuly just some leftover anti seize or pn blaster. May need to be retightened. I think I heard a little ticking, and that might be it.

6. Idle comes down slow after revving.

Break time. If anyone has any comments, I'd love to hear them.

Thanks


Join the Elite Explorers for $20 each year.
Elite Explorer members see no advertisements, no banner ads, no double underlined links,.
Add an avatar, upload photo attachments, and more!
.


Ain't it cool???

Glad to hear your truck lives again...Some of what you are seeing will go away with run time...

1. Close up your radiator cap, fill the recovery bottle, and run the engine with the radiator cap on...It will heat up unless the thermostat failed open...Then let it cool down and the recovery bottle will displace any air in the engine...

2. Water and smoke from a first time start is normal; water is just condensation and smoke will come from normal combustion in a while...

3,4. You got these issues solved...

5. My manifolds smoked like a diesel with 500k on the engine for about 10 mins or so...PB blaster, engine oil, anti-seize, any kind of lubricant will smoke like crazy...Just run it for another 20-30 mins and it will stop...Trust me...Unless there is an oil leak from the valve covers...And I did have to retighten the manifolds after running the engine for 30-45 mins and let it cool down...

6. I would think the PCM is starting to learn the operating parameters of your engine from the o2, ECT, IAC, IAT and MAF sensors...The longer you run it the faster the PCM will respond...

Sounds like the engine is running healthy and you just need to run it for a while longer...

Congrats on the new engine man...


Back
Top