- Joined
- February 8, 2003
- Messages
- 9,814
- Reaction score
- 98
- City, State
- Sacramento, CA 95827
- Year, Model & Trim Level
- 1992 XLT
[This is part 3 of a 4 part series on rebuilding the A4LD automatic transmission. Part 1 is here: http://www.explorerforum.com/forums/showthread.php?t=98027
and Part 2 is here:
http://www.explorerforum.com/forums/showthread.php?t=101571
Each can be read stand alone, but yu will get more out of this if you start at the beginning.]
PART THREE - REASSEMBLY
Well, it is all apart, so this thread will be devoted to the "put it all back together". To strart I will devote my attention to the valve body. I still have one mod left to install, but I put the entire thing back together and will install that later. So the start off installment is
VALVE BODY REASSEMBLY
As I was doing this I realized that the actions are the same, just repeated over and over for each bore in the valve body. I will not "bore" you that much, just show you a few things, a couple of mods and call it done.
MODS
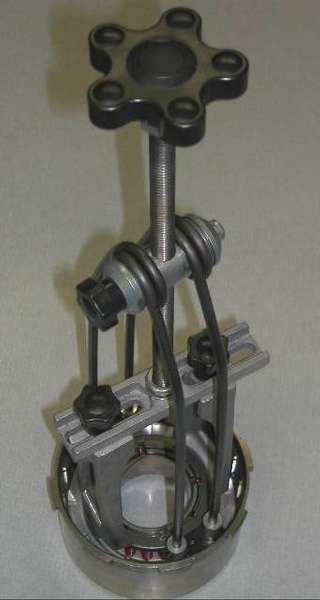
I put the Superior Valve body Kit and the Transgo kit both in. I intend to add the Sonnax Boost Valve upgrade too. I also added the Sonnax manual valve index.... Let's start with that, since it's pretty visual. The manual valve is what the shifter hooks to - when you select D, R or OD you are moving this lever. Over time the hole gets elongated. This can, in extreme cases even lead to burned front clutch plates according to Sonnax. Here is the new MOD (left) next to the old valve (right), you can SEE the elongation in the old manual valve hole.

The mod goes over the shaft... now the hole is round and correctly sized.

The main benefit of this is that it limits the outward travel of the valve. Apparently the elongated hole allowed it to come out too far opening up a pathway to energize the forward clutch in park, causing burned plates. It hits the case so it cannot come out too far:

Seemed like a worthy mod to me. $20. Wonder how many front clutch plate burnouts might be blamed on something else?
Most of the other mods involves different springs in various bores, drilling holes in the valve body or separator plate (covered elsewhere) and a few other modifications elsewhere in the trannie (which we will cover as we go). Nothing more really visual for here.
Let's walk through a couple of bore replacements. Starting with the TCC solenoid bore.
Each bore has a combination of valves and spring(s) in it - capped usually by some kind of plug held in place by one of about 4 types of "keepers" Here is what goes into the TCC bore..

There are the spring and the valve, a bore plug, designed for this type of L shaped keeper... these L babies have a way of wanting to leave, so keep an eye on them in your reassembly. In this bore, the solenoid actually only shares the bore, it does not actuate this valve directly, as there is a plug between it and the plug. The TCC solenoid is held in place with a bar keeper, AND a valve body screw. One MOD gives you a washer to use under the screw. The bar keeper also helps act as the keeper for the next door neighbor bore. (pics in a min)
Meanwhile the usual drill is to lubricate the bore and the valve, and carefully insert the valve and springs into the bore.. by hand.... feeling as you go...

Once it gets too far in to use my fingers I find a pencil eraser gives me good feel and is not likely to score anything....later I started wrapping the metal band on the pencil with electrical tape, just to be SURE.

I'll insert the valve as far as I can. Use common sense and LOOK. sometimes you are short of the final destination, and i just needs some patient wiggling to go in farther. Often I will retain it by using a toothpick or something, so it stays put (remember that SPRING) while I insert the plug. Plugs can easily get ****ed in the bore, do not force them... it's patience time. Once they are in the right spot, drop in the keeper - here the L pin, and voila!
I am pointing out the L pin here with the dull pencil...

Then add the solenoid.... the keeper really needs to await the companion bore to become occupied, but here it is for the camera...

These solenoid bar keepers do not fit tightly, and one trick is to bend them a little to snug the solenoid to the valve body. On THIS solenoid there IS the screw to hold it so it is less important - the 3/4 Solenoid has no screw and relies on the keeper for a snug fit. THAT one we will bend a little... Note the space here though...

Here's the next door bore.... (we all have one of those, right?) note the long plug.

Every bore is quite different.. reason enough to bag them one at a time as you take this apart to keep everything straight! As you go the MOD kits will tell you to substitute springs by color in appropriate cases, otherwise it is pretty rote - same same. Patience, lubricant and a gentle touch will do it. In this bore the "keeper" is the bar.... at the end of the long plug... which you can see in the bore...

The next bore is the 3/4 solenoid... the one that has the screen that gets plugged so easily. I put in a replacement without a a screen. On this one I bent the keeper:

and so it holds the solenoid snug

If you plan to reuse the 3/4 solenoid (which is perfectly ok by me), clean the screen well. It is a VERY fine screen and apparently plugs easily. [Note: I use brake cleaner for a lot of things. When it goes on sale for a buck a can I buy a case (or 2).] Here the tube snoot on a can of brake cleaner works great to blow out the plugged screen holes, backwards...compare this pic to the tear down pic..

Another type of keeper is the round "plug nickel" washer type....there are a few of those too, here is one being installed - drop it in - the separator plate holds most all of this in place, with gravity assisting.

finished appearance

Well I continued like this around the valve body until I had finished. I put in the check balls and the hockey pucks, and I was done. Here it is completely finished, save for the gasket and the separator plate. Those will await the Sonnax Boost Valve Mod and then I will put it ALL back together here.

Let's end this post by talking briefly about some thoughts on valves and bores. Most of the valves are aluminum... I polished one or two lightly with scotchbrite pads and worked them in the bores with lubricants to make them move easier. I made sure each valve moved easily in it's bore. In some cases this meant a little work and exercising it with lubricant until it moved freely. I think polishing a valve is ok, if you are judicious, and try not to round any sharp edge on the valve spool. Also never put anything metal or sharp in the bore. Usually you can work a valve out of the bore from on top of the valve body looking down into the bore - inch it along with a tiny screwdriver or popsicle stick until it's far enough out to get hold of. For plugs I found forceps to make good pliers, and then polished the plug for reuse. I am less concerned about plugs and polishing them more aggressively than actual valves. Anyway, others may have their own experiences, but I think this is good advice.
[Late Edit] A few folks have had trouble finding diagrams as to where the check balls, accumulator pucks and relief valves go... so here is the 2 pages from the FORD manual. The first page shows the locations. Note that there are 8 possible checkball locatons A through H. The 2nd image is the chart showing what ones get a check ball depending on the engine size and year. The 4.0 (which lost of us have) takes 4 balls... at locations A, D, F and G. Anyway at the suggestion of one forum rebuilder that I post them in here - here they are:

and here's the chart

Also since I wrote this Tn_Explorer did a photo thread on his Valve Body Rebuild, and I am linking to it here for you to see. EXcellent job and lots of good info there:
http://www.explorerforum.com/forums/showthread.php?t=126461
I have had several requests, and recently built a VB for someone, so I did a photo thread, in detail, like TN_Explorer. Here is a link to that one as well:
http://www.explorerforum.com/forums/showthread.php?t=137972
Hope all this helps.
Next up, OD Drum. And a discussion on spring compressors and some reassembly tools
Copyright 2004
(the last was added on a suggesion someone emailed me. I am happy to share this magnum opus, that is what this site is all about, but I want it to benefit this site and its users, and not find a booklet published elsewhere on the web - hence this notice [end legal disclaimer])
and Part 2 is here:
http://www.explorerforum.com/forums/showthread.php?t=101571
Each can be read stand alone, but yu will get more out of this if you start at the beginning.]
PART THREE - REASSEMBLY
Well, it is all apart, so this thread will be devoted to the "put it all back together". To strart I will devote my attention to the valve body. I still have one mod left to install, but I put the entire thing back together and will install that later. So the start off installment is
VALVE BODY REASSEMBLY
As I was doing this I realized that the actions are the same, just repeated over and over for each bore in the valve body. I will not "bore" you that much, just show you a few things, a couple of mods and call it done.
MODS
I put the Superior Valve body Kit and the Transgo kit both in. I intend to add the Sonnax Boost Valve upgrade too. I also added the Sonnax manual valve index.... Let's start with that, since it's pretty visual. The manual valve is what the shifter hooks to - when you select D, R or OD you are moving this lever. Over time the hole gets elongated. This can, in extreme cases even lead to burned front clutch plates according to Sonnax. Here is the new MOD (left) next to the old valve (right), you can SEE the elongation in the old manual valve hole.
The mod goes over the shaft... now the hole is round and correctly sized.
The main benefit of this is that it limits the outward travel of the valve. Apparently the elongated hole allowed it to come out too far opening up a pathway to energize the forward clutch in park, causing burned plates. It hits the case so it cannot come out too far:
Seemed like a worthy mod to me. $20. Wonder how many front clutch plate burnouts might be blamed on something else?
Most of the other mods involves different springs in various bores, drilling holes in the valve body or separator plate (covered elsewhere) and a few other modifications elsewhere in the trannie (which we will cover as we go). Nothing more really visual for here.
Let's walk through a couple of bore replacements. Starting with the TCC solenoid bore.
Each bore has a combination of valves and spring(s) in it - capped usually by some kind of plug held in place by one of about 4 types of "keepers" Here is what goes into the TCC bore..
There are the spring and the valve, a bore plug, designed for this type of L shaped keeper... these L babies have a way of wanting to leave, so keep an eye on them in your reassembly. In this bore, the solenoid actually only shares the bore, it does not actuate this valve directly, as there is a plug between it and the plug. The TCC solenoid is held in place with a bar keeper, AND a valve body screw. One MOD gives you a washer to use under the screw. The bar keeper also helps act as the keeper for the next door neighbor bore. (pics in a min)
Meanwhile the usual drill is to lubricate the bore and the valve, and carefully insert the valve and springs into the bore.. by hand.... feeling as you go...
Once it gets too far in to use my fingers I find a pencil eraser gives me good feel and is not likely to score anything....later I started wrapping the metal band on the pencil with electrical tape, just to be SURE.
I'll insert the valve as far as I can. Use common sense and LOOK. sometimes you are short of the final destination, and i just needs some patient wiggling to go in farther. Often I will retain it by using a toothpick or something, so it stays put (remember that SPRING) while I insert the plug. Plugs can easily get ****ed in the bore, do not force them... it's patience time. Once they are in the right spot, drop in the keeper - here the L pin, and voila!
I am pointing out the L pin here with the dull pencil...
Then add the solenoid.... the keeper really needs to await the companion bore to become occupied, but here it is for the camera...
These solenoid bar keepers do not fit tightly, and one trick is to bend them a little to snug the solenoid to the valve body. On THIS solenoid there IS the screw to hold it so it is less important - the 3/4 Solenoid has no screw and relies on the keeper for a snug fit. THAT one we will bend a little... Note the space here though...
Here's the next door bore.... (we all have one of those, right?) note the long plug.
Every bore is quite different.. reason enough to bag them one at a time as you take this apart to keep everything straight! As you go the MOD kits will tell you to substitute springs by color in appropriate cases, otherwise it is pretty rote - same same. Patience, lubricant and a gentle touch will do it. In this bore the "keeper" is the bar.... at the end of the long plug... which you can see in the bore...
The next bore is the 3/4 solenoid... the one that has the screen that gets plugged so easily. I put in a replacement without a a screen. On this one I bent the keeper:
and so it holds the solenoid snug
If you plan to reuse the 3/4 solenoid (which is perfectly ok by me), clean the screen well. It is a VERY fine screen and apparently plugs easily. [Note: I use brake cleaner for a lot of things. When it goes on sale for a buck a can I buy a case (or 2).] Here the tube snoot on a can of brake cleaner works great to blow out the plugged screen holes, backwards...compare this pic to the tear down pic..
Another type of keeper is the round "plug nickel" washer type....there are a few of those too, here is one being installed - drop it in - the separator plate holds most all of this in place, with gravity assisting.
finished appearance
Well I continued like this around the valve body until I had finished. I put in the check balls and the hockey pucks, and I was done. Here it is completely finished, save for the gasket and the separator plate. Those will await the Sonnax Boost Valve Mod and then I will put it ALL back together here.
Let's end this post by talking briefly about some thoughts on valves and bores. Most of the valves are aluminum... I polished one or two lightly with scotchbrite pads and worked them in the bores with lubricants to make them move easier. I made sure each valve moved easily in it's bore. In some cases this meant a little work and exercising it with lubricant until it moved freely. I think polishing a valve is ok, if you are judicious, and try not to round any sharp edge on the valve spool. Also never put anything metal or sharp in the bore. Usually you can work a valve out of the bore from on top of the valve body looking down into the bore - inch it along with a tiny screwdriver or popsicle stick until it's far enough out to get hold of. For plugs I found forceps to make good pliers, and then polished the plug for reuse. I am less concerned about plugs and polishing them more aggressively than actual valves. Anyway, others may have their own experiences, but I think this is good advice.
[Late Edit] A few folks have had trouble finding diagrams as to where the check balls, accumulator pucks and relief valves go... so here is the 2 pages from the FORD manual. The first page shows the locations. Note that there are 8 possible checkball locatons A through H. The 2nd image is the chart showing what ones get a check ball depending on the engine size and year. The 4.0 (which lost of us have) takes 4 balls... at locations A, D, F and G. Anyway at the suggestion of one forum rebuilder that I post them in here - here they are:
and here's the chart
Also since I wrote this Tn_Explorer did a photo thread on his Valve Body Rebuild, and I am linking to it here for you to see. EXcellent job and lots of good info there:
http://www.explorerforum.com/forums/showthread.php?t=126461
I have had several requests, and recently built a VB for someone, so I did a photo thread, in detail, like TN_Explorer. Here is a link to that one as well:
http://www.explorerforum.com/forums/showthread.php?t=137972
Hope all this helps.
Next up, OD Drum. And a discussion on spring compressors and some reassembly tools
Copyright 2004
(the last was added on a suggesion someone emailed me. I am happy to share this magnum opus, that is what this site is all about, but I want it to benefit this site and its users, and not find a booklet published elsewhere on the web - hence this notice [end legal disclaimer])