OK, let's get started | Ford Explorer Forums - Serious Explorations

  • Register Today It's free!

OK, let's get started

Mike's brother

Elite Explorer
Joined
September 11, 2011
Messages
167
Reaction score
2
City, State
Ithaca, NY
Year, Model & Trim Level
2001 Explorer Sport
I joined this forum a few months back, and it has been a greater resource than I ever imagined. I've picked up tons of incredible information, and learned all sorts of stuff I never dreamed of, from "torsion twists" to "rock sliders." I think I'm going to have fun here.

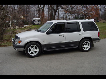
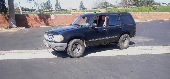
For those who didn't catch my original greeting, I inherited a 2001 Explorer Sport earlier this year. My brother bought it in '09 in the hopes of having some off-road and snowy fun with it, but never got to. He put just a touch more than 3000 miles on it, then it sat in my garage until last week. Now, she's back on the road, and I'm picking up the Explorer flag for my brother and hoping the build the daily driver/camping and fishing rig he wanted.

As it sits now, it seems entirely stock except for a set of General Grabber AT tires (245s) on the stock rims (attached a few pics below). Since I drove it to my house back in July, the "Check Gas Cap" light has decided to stay on, not sure what's up with that, and the 2WD/4WDH/4WDL knob on the dash has stopped working. No buzz or clunk or anything, just nothing. After reading some threads, I'll start hunting for a burnt fuse, and then check the motor on the transfer case. Other than that, it just seems like a sticky right front brake caliper is the only hangover from the long period of little or no driving.

So, after a whole lot of reading, here's where I hope to go with this car between now and next summer ...

-- Rear suspension: Add a leaf (to remedy a rear that already sits 1 inch lover than the nose) and some +1 1/2 Warrior shackles.
-- Front suspension: Torsion twist for +2 inches, which I hope will be a close match for the rear suspension height.
-- Body: Going for a basic 3-inch body lift, with raising the bumpers to match.
-- Tires/Wheels: I'll up it to 33s, and add some 15-inch wheels to go with them. Nothing fancy. Just going for strong and solid. If you meet me, you'll know pretty is not something I do.
-- Engine: Not looking for much here. Thinking of putting in the K&N air filter and make sure I've got a good set of plugs. Probably upgrade the oil to synthetic as well. Otherwise, I like the engine and the miles are still pretty low (91K), so I think I'll not fix it if it ain't broke.
-- Interior: For no good reason that I can think of, I'm thinking about tracking down a good roof center console and installing it. Just seems like it would be cool. I might abandon that if I get tired, run out of money, or otherwise come to my senses. Other than that, I may try to track down one of the original soft bags for the center console, just to keep it all stock and all together. Anyone have an opinion about upgrading to a power driver's seat? The manual one sits oddly high under the thighs.
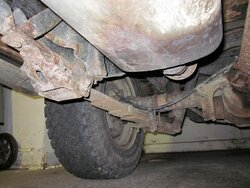
-- Exterior: Going to add a brush guard (still thinking about which one) and a roof rack with lights. Like the look, and I want to be able to pack some gear up top for a camping trip and not worry about branches smacking into the headlights. I likely add a custom skid plate to guard the lower radiator and oil pan. I've seen a few good ideas in this forum.
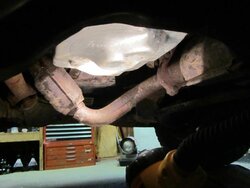
-- Other: After spending a few hours underneath the Explorer today, I'm thinking the talk I've seen about a skid plate for the gas tank makes sense. Seems a little exposed down there. If I manage to get this all done and get out for some fun in the woods -- and I'm hoping I will -- I may try to build or buy a good set of those rock sliders I've seen here. Not that I'm a wildman, but they just seem to make sense. (Oh, just for the record, the stock side step bars are coming off right away. They're rusty and very loose.)

The rest of the cash is going to go into camping and fishing gear, good food and hopefully a lot of fun weekends.

I'll keep everyone updated as the project comes along, and hopefully have some great "Before and After" forum pictures to add next year.

Best to everyone. Enjoy the holidays.
 

Attachments

  • explorer 1.jpg
    explorer 1.jpg
    73.7 KB · Views: 2,086
  • explorer 2.jpg
    explorer 2.jpg
    77.8 KB · Views: 2,072
  • explorer 3.jpg
    explorer 3.jpg
    45.7 KB · Views: 2,077


Join the Elite Explorers for $20 each year.
Elite Explorer members see no advertisements, no banner ads, no double underlined links,.
Add an avatar, upload photo attachments, and more!
.


A pleasure

I got way, way more than my $20 worth in great tips, hands-on advice and inspiration. Least I can do to pay you all back.

Looking forward to making some friends and setting up a great ride.


Welcome!

1st thing I would take care of is getting that 4wd sorted out. Their really not that hard to figure out, once you learn all about the design, set up, etc...

2nd thing I would do is change the gears in both axles, to match the 33" tires your going for. 4.56 R&P work perfect for both on/off road with 33".

3rd thing is I would make a set of leaf packs using the lower leafs out of a upper 80's/lower 90's 2wd F-150 (2.5" wide) leafs for the lift and avoid the shackles. I made mine including hardware for $100. That's not much more than new shackles cost, and way better for the rig. You can get a full 2" of lift, and you can add leaves for even more height.

4th thing is the 3" body lift. Your going to want the needed clearance for those 33" meats. This also helps with working on everything underneath, as it provides much needed space. Underneath the vehicle is where you will spend 90% of your time wrenching. Down the road, if you change up the suspension lift method, you can remove it.

5th thing, the front bumper. That bumper will be toast off road. Bad approach angle, in the way of everything, funky looking pc of tupperware.

6th thing, sliders & skids. Weld on, bolt on, they both work great. Stock skids from the JY are cheap for fuel, T-case.

These are the main areas I would focus my attention too right off the bat. All the easy simple personal touches can wait. Those 6 things will make your rig into a off road worthy vehicle to get you to your fav camping spot or fishing hole and back.


Thanks gmanpaint!

Great tips. I didn't know about the F150 leaf spring option. I'll do some research on that. I did overlook the axle gearing. Definitely have to tackle that as well. Didn't know that front bumper was so bad off road. Maybe, instead of the brush guard, I'll think about one of the custom front bumpers I've seen around here. Do they pass muster with the state vehicle inspection folks?

I'm with you on tackling the mechanical/functional upgrades first, and then adding the luxury/pretty stuff after that. Just makes sense. Kind of how I've handled my life, except at 48 years I'm still not around to the make it pretty phase.

Once more, proving why this place is more than worth the price of admission. Thanks again.


OK, I'm about three weeks in here and already breaking the budget. That puts me right on schedule.

The first order of business was to get the Sport road ready. It spent most of two years sitting idle outside my brother's house, which is in Western New York, so idle during the winter means the rig sat hood deep in snow. It had six months in my garage after that, but only got started once a week or so until it was warm and then shut off. No rolling anywhere, except occasionally up and down the driveway. I hoped for the best in terms of getting on the road, but definitely had a few wrinkles. So far, here's what's been done ...

-- Replaced all four brake calipers. Front right was seized solid. Front left wasn't much better. Rears floated, but still dragged a bit and a simple pad/lube job didn't get it done. After a 2 mile test ride, I hade smoke coming off all four wheels, so off they went.
-- Replace all four rotors. Two years sitting still, half of it under snow, didn't help. I figured if I'm in for four calipers, let's do the whole dance.
-- Replace all brake pads, including the parking-brake pads. Like I said, if I'm in, let's do the dance right.
-- Parking-brake cables. Stepped on it to test the new pads, and the cable broke (and scared the heck out of one of my cats, which is a good thing). I guess they don't like sitting in snow either.
-- Replaced the tranny pan. Not sure if it was hit by a rock at some point, or if the moisture got to it, but it had what looked like a chunk knocked in toward the front. Small leak, but the pan looked old. Ordered a new one from Ford and slapped it on. Changed the fluid and the filter while I was there (didn't pump out the coolers, though. I'll have to learn that trick).
-- Did the fuel filter (my thanks to the member who posted the tip on wearing goggles)
-- Did the standard oil and filter replace. Went with standard oil for now. Once I know this will all work out, I'll upgrade to synthetic.
-- And the air cleaner. Again, went with a good replacement in the stock box. If all goes well, I'll upgrade this later in this project.
-- Oh, and I took off the factory side steps. I never liked those, and they seem an enemy of ground clearance. I'll add some rock sliders down the road. I'm guessing I'm not the first one to discover that the steps looked OK, but the sheet metal they bolted to was just about dust. I read folks here talking about plugging the holes where the bolts were. Man, mine are wide open and jagged with rust (there's a photo below). Does anyone have a good strategy for coating this so the cancer doesn't continue?

(and if anyone wants those factory steps, feel free to come get'em)

Everything else looked pretty solid ... belts, hoses, fluids, bushings and such. At this point the NY State inspection folks were happy, and my brother's '01 Explorer Sport hit the road again.

Now, with about 350 miles under my belt of daily and around town driving, and a few more trips under the rig, here's what I've noticed ...

-- There's a heck of a lot of rust under there. Nothing look like I'm about to face a structural failure, and the inspection mechanic said it looked fairly normal for upstate NY, but it ain't pretty (another pic below).
Is there a good thread here with some tips for cleaning and coating the frame and underbody? I'll do some looking, but if anyone has a favorite, feel free to point me in the right direction.
-- I'm pretty sure someone back before this was mine did some exhaust work and got the crossover pipe wrong. The damned thing hangs a good two or more inches below everything else, and looks like it's waiting to be hooked by a willing rock or tree stump. There's a picture below. Am I nuts, or is this not quite right?
-- Driver's side door won't unlock from the outside (key doesn't turn), or with the remote. It clicks, but the button doesn't pop up. I can pull the interior handle and it will unlock, and then work fine from the outside, but once it locks again you have to start over. I'll be looking for a few threads on that before I go in.
-- Just an odd quirk ... when I start the car cold, the oil gauge stays flat and the "Check Gauges" light comes on. Panicked the first time, then realized after about 3-4 minutes, the oil gauge pops up into the right range and the light goes off. Anything I should be worried about, or is this just part of my Ex's unique charm?
-- Did the battery disconnect/reset thing I found here and got the "Check Fuel Cap" light to go away, but the 4-wheel control still does nothing. I went through all the fuses (under hood and inside) and checked and cleaned the 4x4 module connections, but no luck. There's no clicking and no flashing lights, in fact, no lights on startup either. From what I've read here, it looks like the module is dead. I'll be ordering a new one from one of the places you all recommended tomorrow morning.

Beyond that, it seems like a pretty decent ride. The tires are a little noisey (Grabber AT2s, inflated just to 32 psi. I think I'll up them to 40 or so based on a few threads here), and the drivers seat still feels a bit odd, but I'm enjoying it. The stereo survived the first energetic playing of Zappa's "Joe's Garage," and the Explorer even made it up a wet, narrow limited use road I found myself accidentally forced to climb (no sign at the bottom that it turned into a water-scoured dirt path on the side of a steep hill; once I could see, it was too late to turn back).

Next up ... install the 4x4 control module and get that system working (snow hits hard here when it comes), add some warrior shackles for 1.5-2 inches of lift in the rear and then TT the front to match. After that, it's body lift time.

Hopefully, by next summer, I'll be heading up a few hills and finding the fishing and camping spots that the weekend warriors never see. If I don't embarrass myself too much on here by then, I might try to make one of those events you all talk about as well. Figure I can learn a heck of a lot there, and maybe buy you all a beer for all the help this forum has been giving me.

Until then, Happy holidays :exp:
 

Attachments

  • crazy exhaust.jpg
    crazy exhaust.jpg
    46.3 KB · Views: 1,999
  • general rust.jpg
    general rust.jpg
    78.1 KB · Views: 2,009
  • rusty rockers.jpg
    rusty rockers.jpg
    73.1 KB · Views: 2,033


Congrats on getting things done. :thumbsup: Your going to fit in just fine here. :)

There are threads in the body section for repairing the rockers.

There are threads for the exhaust as well. Your right on that one, it don't look right to me either. Needs to be tucked up way higher than it is.

I would wait another 6 months or so and do another pan drop fluid change again. This better than a complete flush when the trans is older and has not been routinely flushed in 30k intervals. Trans fluid is high in detergent and could loosen up chunks of crud, blocking ports, and killing the trans. Little at a time is a softer more gentle approach for it. There is a way to clean out the coolers tho. Remove the lines & spray a pressurized cleaner made just for this application. Most major auto parts stores carry it. Just make sure you get the can made for ford line fittings.

The oil pressure gauge is actually a dummy. It activates with 7 volts, and just lets you know if there is or isn't pressure. There is a thread to convert it to an actual pressure read out gauge, if you think you can solder a resistor to the back of the gauge cluster circuit board.

The door lock actuator might have stripped threads in it. Again, this is also covered in threads for you.

As far as rust maintenance, there are all kinds of choices. I personally choose to use a Rust convertor, then rust inhibiting paint. Both can be sprayed or brushed/rolled on. Just find a car wash with a good under carriage wash, or let the rig sit on a lawn sprinkler for a while to rinse it off. :)


OK folks, just had a great few days and plan a few ahead this weekend in the '01 Sport resurrection project.

But first, if you're a newbie here like me, I need to testify ... here are a bunch of reasons from just the past few days that show that plunking down a few bucks to become an "elite member" and support this forum is the smartest investment you'll make in your rig ...

Today, I restored full functioning four-wheel-drive to this two-years-idle Explorer. Total cost to go from "I'm clueless, lost and stuck in the mud" to "it's done and I'm tearing up the mud," a few days of careful reading here (www.explorerforum.com/forums/showthread.php?t=229571), and about $150 including shipping for a part I got in less than 48 hours from www.directfordparts.com (an amazing place I found through this forum as well).

Before that, this very same day, I solved the mystery of the car locks that did not work. The key seemed to be wrong for the door and the hatch, and I suspected the ignition was changed and I was out of luck. Cost to have a locksmith or the dealer install two door locks and a hatch lock: upwards of $350. The cost of the brake cleaner/graphite fix I found in this thread (www.explorerforum.com/forums/showthread.php?t=228039): less than $8. And they all work, smooth as silk.

And before that, I tackled this nagging little embarrassment (www.explorerforum.com/forums/showthread.php?t=288067). I no longer have a limp fuel door cover, a proud boast for any man. Cost: the time it took to search and read that thread, and a spare spring I found in a random-parts bag in my toolbag. By the way, my local dealer wanted $98 to sell me the whole assembly, and as much to install it.

And, while I was playing around, I also fixed a problem with the keyless unlock not unlocking the driver's side door. Turned out the actuator is fine (I knew to check that because of a thread here, by the way), but a small spring had broken in the latch mechanism, keeping the rod for the interior manual lock button from shifting into the open position unless the interior door handle was pulled. The spring used to keep the rod from leaning back and getting tangled. There was no easy way to open it and install a spring, so after some head scratching, I fixed it with one of my daughter's elastic hair ties. Works like a charm. Really, no kidding.

So, with my Warrior 153 shackles sitting in a box in my garage, this Saturday, I'll be doing this (www.explorerforum.com/forums/showthread.php?t=212451) and this (www.explorerforum.com/forums/showthread.php?t=196965). And don't worry, I've been soaking all the right parts with PB blaster for the past several days (just like the veterans around here told me to).

After that, it will be time to get serious and tackle this (www.explorerforum.com/forums/showthread.php?t=240957). Wish me luck.

And that, my fellow newbies, is why I love this place.

Happy Holidays :exp:


Rite of seized shackle bolt passage

OK, now I feel like I'm finally starting to fit in around here. One of those 2-hour jobs ended up as an 8-day battle of wills, but I've lived to share the tale and offer some advice.

The problem was simple and a classic one, if all the other posts talking about it are any indication. I'm reviving a '01 Sport that's been outdoor and idle in the snow belt for a few years, and rust is menace. Ended up doing a complete brake overhaul (calipers, discs, and pads all around) just to beat the rust, so I should not have been surprised when a Warrior 153 shackle install got snagged.

Completely seized in place upper shackle bolt. The top bolt that runs through the bushing pressed into the frame simply would not come out. I soaked it for days in advance with PB Blaster, then tried breaker bars and sledge hammers and C-clamps. I heated the bolt with a propane torch, took an electric impact driver to it and even tried to melt the bushing. No luck.

Now there are lots of folks here who mention pneumatic tools, high-heat torches and ball-joint presses, and I have no doubt they'd all work. But I'm a garage/driveway hobby guy, so I don't have those tools, yet (after this experience, I think I'll be adding a few). So here's the eventual solution I came up with for the less-blessed among us ...

First, with the car all jacked up and on stands like the pros around here suggest, drop the spare out of the way and use that space to let you take a reciprocal saw to the old shackles (if you're Popeye, you might use a hacksaw). With a good metal blade, they cut away like butter. Then, and this one takes a little patience (and that power saw), cut the heads off the old upper bolts. It will eat a few blades, but you'll get there. If you get the power saw placed just right, you can use the cross member just inside the bumper as a fulcrum and get some good downward pressure as you cut.

Next I used a 3/16 drill bit to make Swiss cheese out of the old rubber bushing (working from the inside, now that there's room and no bolt head in the way). That was about as big a bit as I could fit between the outside of the inner metal sleeve (the one with the bolt seized in it) and the outer sleeve that's permanently pressed into the frame. Be careful to stay straight, and avoid drilling into the outer sleeve. Just hug the inner sleeve and make a hole all the way through for every hour on the clock.

When that was done, I could wiggle the bolt/sleeve seized combo with my hand and was able to use a 32 mm socket (the biggest one I had) and a low-cost hand clamp to create a makeshift press (added a pic below) and squeeze the old bolt and the inner sleeve right out. Most of the rubber that was left just peeled away with my fingers, and the rest was easy to fry with a quick pass by the torch. I cleaned up the inside of the sleeves in the frame with 1-inch wire wheel in that same drill (cost about $5 at Sears) and the outer sleeve was shiny and clean.

I can't speak to all 2nd gens, but I bought the Energy Suspension kit (4.2124 G, or "R" if you need red bushings) officially listed for the 1st gens and the upper shackle bushings were a perfect fit. The kit comes with the lube and a new inner sleeve, and with a good coating of grease it pressed in nice and smoothly with the same hand-clamp rig that pushed the old bolt out. The new bushing even has an added collar for the inside that increases the surface area for the inside of the shackle and keeps anything from shifting out of its place in that frame (inside and outside pics below). I really like the fit and feel. I didn't change the lower bushing that's pressed into the leaf spring at this point, mainly because after 8 days I was eager to get this job done. I'll likely replace the front and rear leaf spring bushing (both of which came in the same Energy Suspension kit) when I do an add-a-leaf, or get one of those ball-joint presses, down the road a bit.

The bolts that came with the Warrior shackles were a perfect fit for the new bushing. I added some anti-seize to the shaft of the bolts, and a few drops of red Loctite before I torqued on the nuts to the recommended 35 ft lbs.

I do dig that new look (a pic below; and a tip of the hat to CJarret for working with Warrior to get these developed), and the new shackles added 1 5/8 to the saggy driver's side and 1 1/2 to the passenger side.

I did a torsion twist to match front height to the new rear height (lots of good threads on that here), which was WAY easier than doing those top shackle bolts -- since I was spraying the TT bolts with PB Blaster for about two weeks straight by the time I tried to turn anything. If you're thinking about that project, I wouldn't let it scare you. Piece of cake.

With both ends done, the ride is definitely a little tighter (not sure if that's the new bushings or the added tension on the suspension, or my imagination; I'm OK with either one) and the added height has this all-but-tires stock '01 Sport starting to feel like a future trail truck. It was a bear getting it done, but sitting on this side of the project, I'm glad I did.

Speaking of bears, next up sometime in February: 3-inch body lift.

Be well :exp:
 

Attachments

  • IMG_0977.jpg
    IMG_0977.jpg
    70.7 KB · Views: 1,969
  • IMG_0967.jpg
    IMG_0967.jpg
    80.3 KB · Views: 1,978
  • IMG_0955.jpg
    IMG_0955.jpg
    73 KB · Views: 1,972
  • IMG_0950.jpg
    IMG_0950.jpg
    62.5 KB · Views: 1,961


Congrats on defeating the battle of the rust monster. :thumbsup:

Not all bushings like to play well with others, and they are a royal PITA when they decide to be this way. There really isn't any foolproof way that I know of to remove them uppers, other than just attacking it with everything (including the kitchen sink) you have in your arsenal. Whatever it takes to get er done works. :D


As advertised ...

We've hit February, so it's time for the next rite of passage into a decent daily driver/trail ride ... the PA 883 body lift.

I've got printed instructions from Performance Accessories hanging on the wall right along side complete instructions from ShadowRaven and Mudmarine (who has a '01 Sport like me, so it's all good). Excited to get this done. Tires and rims are waiting on deck (15x8 Crager Soft 8s with 33x12.5 R15s).

Day one, did about 4.5 hours solo, at a pretty slow pace. A lot of set up, and just got into the tear down. Front and rear bumpers are off. PB Blaster everywhere. Had some Pink Floyd on the box. All good.

A few quick observations off SR/MM instructions ...

-- Rear bumper bolts were 21mm, not 7/8 inch as I read in a few places. Probably doesn't matter much when they're new of if you live in Arizona, but after a decade in snow and salt country, I'm guessing it's important to get an exact fit so you don't round off the nuts breaking them loose.

-- Front bumpers, likewise; bolts are 15mm, not 5/8 inch.

-- There was a lower radiator cover on my rig. Bolted to the bottom of the bumper and the frame. Guess it will have to go since the bumper is going up 3 inches.

-- The stock front tow hooks, which seemed pretty hefty, were mounted to special welded perches inside each frame rail just behind the bumper mount (pic below). The two perches were designed to handle the load of pulling the truck, and seems like a natural place to mount a cross member and front hitch receiver. I haven't seen anyone on here talking about doing that. Is there a link around for that?

That's about it. I'll pay my respects to you all for the great advice here, and post a few before and after pics, once this part of the project is done.

Be well. :exp:

EDIT: OK, nevermind on that tow hook/trailer hitch question. I did that lame thing where you ask before you search. Never wanted to do that. Found plenty of folk talking about doing just what I mentioned. I'll add this to the to-do list as I get a little more serious about the off-road part of the on/off concept.
 

Attachments

  • IMG_1013.jpg
    IMG_1013.jpg
    17.6 KB · Views: 1,935
  • IMG_1022.jpg
    IMG_1022.jpg
    20 KB · Views: 1,943
  • IMG_1026.jpg
    IMG_1026.jpg
    22 KB · Views: 1,911


Body lift, Day 2

Chugging ahead, as fast a middle age lets a man chug. Day 2 was all about the final prep details (steering extension and radiator freedom) and breaking 10 body mount bolts that have seen many snowy/salty winters -- including the past two where the whole rig sat outside buried in snow.

With a little help from a buddy, his impact driver, and a lot of advice I've picked up here (propane torch, PB Blaster and patience!), I worked a slow-but-steady 9 hours and got all the old bolts free, and half the lift in place. (pic below)

Only learning-curve snag so far ... I didn't pay enough attention to the lines that feed the small extra tranny radiator in front of the main radiators. As the extra radiator went up with the body, and the main radiator did not, the coolant lines got stretched and one (rusty in the first place, pic below) started to leak. I should have seen that coming. Plenty of folks here warned to keep an eye on everything as you go up. I just let this one get past the goalie. Live and learn.

My only contribution to the conversation from Day 2 is on those front body mounts. I heard they were hellish to deal with, but I found a hole through the front of the body that allowed access straight down to the nuts on top of the mount. A 2-foot 1/2-inch extension and a breaker bar, and I had those PB-soaked nuts off in a few minutes (pic below). An impact driver from underneath followed that, and both front bolts were out in under 10 minutes. Once the side was up, I took the stock bushing out and drilled the threaded hole out on a benchtop drill press. Some cutting oil and a few minutes and it was all set to go together. So far, that was the big relief moment of the project.

Be well :exp:
 

Attachments

  • IMG_1058.jpg
    IMG_1058.jpg
    68.1 KB · Views: 1,937
  • IMG_1037.jpg
    IMG_1037.jpg
    59.9 KB · Views: 1,924
  • IMG_1048.jpg
    IMG_1048.jpg
    60 KB · Views: 1,954


Body lift, Day 3

Well, in spite of the fact that my wife keeps making a face every time a new package with parts arrives at the door, I'm still out putting in one weekend day each week getting this lift together. She didn't even notice one of the packages had some new "Serious Explorations" license plate frames, and that I put two on her Trailblazer. Chalk up one of the good guys.

Day two ended with me breaking the transmission shifter cable and calling it a night. During the week I ordered the replacement from Silver State Ford, and it turns out the cable that was on there was for an earlier model Explorer, and a little shorter than the one Mike at the parts counter sent me this week.

Day three was all about checking lines and cables and wires, and then getting everything put back together. I found a few details to add to some of the discussions on body lifts -- more wires to watch, a few places where the two main threads on this disagree, and a few ways to make things a little easier -- and when I'm all done I'll add those to the right threads.

Big win of the day (not much, I'll admit, but I'm still a relative rookies at this), was figuring out a way to modify the lower radiator guard so that I could reattach it to the frame, protect the now hyper-exposed main radiator bottom, and still get the front to bolt into the lifted front bumper cover. Of course, I'd be a heck of a lot better off with a serious skid plate up there. But I'm saving that for the brush guard or the custom bumper upgrade down the road, so I figured this might keep a few chunks of flying debris from ruining a fishing trip until then.

Here's the stock guard, measured and marked up for a few cuts and bends ...

IMG_20120226_122717.jpg


After a little chewing and screwing and sealing, it looked like this ...

IMG_20120226_150646.jpg


And then on the Sport, it did the job perfectly. Use the stock mounting holes on the frame, cleared the tranny cooler lines and the lower radiator hose just fine, and then tucked up perfectly inside the front bumper cover and screwed in tight. I'll hit it with some black paint to cover the sharpie lines and the white sealer, and it should look pretty decent.

IMG_20120226_155859.jpg


I know, it's hardly a custom cut and welded set of sliders, but you have to start somewhere, right?

Next up, rear bumper, button up the interior and replace that shifter cable. Oh, and one of the big boxes was a set of transfer case and gas tank skid plates, so I'll get those on while I'm at it.

Be well. :exp:

IMG_1082.jpg


Body lift, Day 4 (part 1)

Day 4 was the final day for all of this work. Overall, I put in about 30 hours of work on this, a little higher than most estimates I've heard but right about on par for a middle-aged dude who spends as much time looking and thinking as actually doing. Cut that time estimate in half if your half my age, and drop it even more if you know what the heck you're doing.

All in all, not a bad experience though. Installed the lift kit, repaired my broken transmission cooler line, then swapped in a new shifter cable to replace the one I broke, installed transfer case and gas tank skid plates, and got it back out on the road with no leaks, rattles, rubbing lines or other snags. I'm guessing I'm halfway through this project, and it's finally starting to look a little for real.

lifted.jpg


I worked from three main instruction sheets -- the PA 883 instructions (written for a Ranger, but important to read), Mudmarine's solid write up (you can find it here, http://mudmarine.tripod.com/3bodyliftinstall/index.html) and the legendary ShadowRaven walk-through on this forum (http://www.explorerforum.com/forums/showthread.php?t=240957). There are some places where they disagree, a few things they left out I think are worth mentioning, and a few rare places where I disagree with one or both of them. I took some pictures and made some notes, and I'll add those comments to ShadowRaven's thread, where they're most likely to add something useful for someone.

One thing that I will add here is a quick idiot-proof way to make good use of the completely no-use-to-us-Explorer-folk rear bumper brackets. Mudmarine and ShadowRaven both pound the angled PA 883 kit brackets flat, which is a surprisingly enjoyable first step. From there, Mudmarine uses one bolt between the kit bracket and the stock bumper "L" bracket, and then one lower on the kit bracket that bolts into a new hole in the frame. He then welds the two edges to lock things in. A good, strong fit, but not easy to remove and impossible if you don't have a welding rig handy. ShadowRaven seems to use one bolt between the kit bracket and the L bracket, one connecting the kit bracket to the frame, and leaves it at that. I didn't think that would be strong enough.

So I experimented with a careful (remember idiot proof, and I'm the idiot who tested it) way to take the flattened stock brackets (which I already paid for as part of the kit) and turn them into a set of the custom brackets for the 3-inch lift like the ones Blee1099 describes (http://www.explorerforum.com/forums/showthread.php?t=246475).

Here's how I went at it.

First, of course, heat the bends in the kit brackets with a propane torch for a few minutes, then beat them flat. I used a 3-pound sledge, and it was pretty easy.

The top, forward (as in ultimately toward the front of the car) hole in the kit bracket is a dead-on match for the top hole in the stock "L" bracket that used to connect the bumper to the frame. With that as a fixed reference, I marked out a new hole in the kit bracket centered 3 inches below the first hole, and drilled it out with a 1/2-inch bit on a small tabletop drill press.

brackets 1.jpg


After that, I bolted them together through that first hole I mentioned. Once I lined up the top edges so they were exactly even and got the front edges nearly exactly aligned ...

brackets 2.jpg


I snugged the bolt and marked where I had to drill a new hole in the bracket to match the other stock hole in the L bracket. You'll need a super-steady hand or a drill press for this, since the new hole will slightly overlap an existing slot on the bracket.

brackets 3.jpg


Squaring the two brackets and matching the stock two holes in the L bracket means you'll be guaranteed a near exact match to the bumper's height and distance from the rear quarter once you're done, if you create two holes in the kit bracket exactly in line and 3 inches lower.

OK, on to part 2


Body lift, Day 4 (part 2)

OK, where was I ...

Now I already had the top holes to mount the kit brackets to the frame drilled, so, rather than trust my math and my eye on the square, I marked the final holes in the field. I usually work solo, so I used a couple of nested 5-gallon buckets under the center of the bumper to hold it up, and lined up the holes I made in the kit brackets (the one exactly 3 inches below the first hole I mentioned) with the top factory-drilled holes in the frame rail ends.

I should mention here that to do this, you need to trim about 3/8-inch from the very top of the frame rail so the nut on the lower bolt that connects the kit bracket to the stock L bracket will clear the frame. There already is a slight cut in it, you just have to curve it a little deeper. Here's the way it looked done, with the piece I cut out shown for reference.

brackets 4.jpg


Ok, here's where I saved myself from the idiot. Once you slide the bumper up to the rear of the frame, just put a high-strength 1/2 bolt (I got mine at a local Fastenal) through the hole in the kit bracket and the upper stock hole on the frame and hand-tighten a nut and washer. Do the same on the other side, and now the bumper is attached, and will pivot through a small arc in place. I used a pair of Vice Grips to hold it still, then just stood along side the truck to eyeball when the everything seemed right. You're used to seeing the truck, so you know what is should look like. Adjust that angle until it's right, then lock it in place with the Vice Grips and mark where the final holes need to be drilled in the kit brackets. While you're at it, you can mark the lines at which the kit brackets need to be cut so they don't extend below the frame as well.

brackets 6.jpg


At that point, before taking it off, I checked height and center on the bumper. Mine was about 3/16ths low on one side (using the taillights as a reference) and about 1/4 too far to the right (compared to the quarter panels). I took the hand-tightened bolts out and carried the bumper back to the saw horses (old guys can't do all this work on the ground). I made the slight height and center adjustments where the stock L brackets bolt to the bumper (there's enough play in both directions) and bolted them tight, which is much easier at this point then when the bumper is on. I took off the kit brackets, drilled the final lower holes in both sides, cut off the excess tails, then bolted them firmly to the stock L brackets. Now, the bumper went back onto the buckets and the brackets slid tight on the outside of the frame rails. I re-attached the top bolts and hand tightened, then swung the bumper up (easy enough from underneath, even for an old guy, since the first bolts are carrying the weight of the it) and slid another set of 1/2-inch bolts into the new lower holes in the kit brackets and the stock lower frame holes. I snugged them with a ratchet, tapped the bumper to fine tune the final alignment, then cranked the kit brackets-to-frame bolts tight with a 1/2-inch breaker bar. The bumper aligned perfectly, and feels rock solid.

Here's what it looks like in the end, from the inside ...

brackets 8.jpg


And from the outside.

brackets 7.jpg


That's about it. It's stronger than just two bolts, easier to take off than a welded set up, takes advantage of the 1/4-inch steel kit bracket you already paid for if you buy the PA 883, doesn't add any new holes in the stock L bracket or the frame rail, and makes lining the bumper up right a pretty easy gig, even if you're doing the work solo.

Well, that's about it for now. The lift is done. I've got about 100 miles on it now, including some snow and a few miles through a logging road, and everything seems solid. I like the higher perch, and I'll like it even more when the extra space in the wheel wells gets filled with a nice set of 33s.

Next up ... tires and rims (thinking Goodyear Duratrac 33x12.5x15 with Crager soft 8s), an Ausie locker for the rear, some much needed rust converter and undercoating, and then I'll see where it goes from there. My thanks to everyone for all the shared knowledge and encouragement. Hope I can earn my way into being a useful member around here.

Be well. :exp:


An added quick note

An extra thanks to BoominX for an excellent set of transfer case and gas tank skid plates, pulled from a 99 Sport he parted out, I think. I found the parts on this forum, made the deal through PayPal, and BoominX packed them like a madman for the trip to Upstate NY. He even included the stock bolts and nut-clips for the tank plate, a huge bonus compared to trying to get a bolt inside the frame rail. Some fresh paint, and they are on and rockin.

skidplates.jpg


Actually starting to think I might get this thing on a few trails this year. Hope to see some of you out there, so I can buy you a beer.

Be well. :exp:


Join the Elite Explorers for $20 each year.
Elite Explorer members see no advertisements, no banner ads, no double underlined links,.
Add an avatar, upload photo attachments, and more!
.


Looks good buddy!!!!:thumbsup:

Last summer i tackled every thing you did in the same order that you did it... Reading this brings back some reeaaallllll fond memories of thoes dam cold welded shackle to frame bolts :frustrate .. And the loonngg days putting in the body lift :splat:


Back
Top