Kirby's Spare Time Sucker.... 1995 Full Size Bronco Solid Axle Swap !!PICS!!
This is where I have been putting in all my time lately. It is going to be sweet when it is done. I thought I would share. It is my buddy Phils rig. He has been driving it for a few years. It has never been modded at all ( OK, we built him a bumper a couple of months ago). He has never even had a lifted truc. He is determined to build it right the first time! He is doing all the research and the grinder work, rebuild work, etc. I am just there for experience, moral support, and welding. He has done an incredible job planning it out considering he started gathering parts a year and a half ago. It has been down for about 2 months now. We did the rear first.
Specs:
Rear- Stock 8.8. 4.56 Yukons, Aussie Locker, Sky Shackle Flip, Ruff Stuff Spring perches, welded axle tubes, shock mounts cut and turned for extra clearance
Front- 1977 F150 Dana 44 (1/2" axle tubes) Fully rebuilt with all new bearings, ball joints, seals and a paint job.
6" Deaver Coils, Yukon Chomo Shafts, 4.56s, Yukon Superjoints, Warn Premiums, Ballistic fab poly/ flex joint on trackbar, Chevy TRE conversion, Threaded DOM Tie Rod, drag link, trac bar, and Tera 2.5" Johnny Joints on the Radius Arms, Stock f150 Coil Buckets. Full height. Probably stock Super Duty upper shock mounts too, but we haven't decided quited yet.
He also has a new set of 35" BFG Mudders he will be running.
Unlike explorer swaps, the Tranny crossmember has to go on these full size swaps. The front driveshaft can't move with down travel at all really with the stocker. That caused us to have to build a crossmember for the tranny, and we decided we might as well attach the radius arms there too.


The Radius arms are fully plated with 1/4" flat stock, then the threaded stud was ground smooth and a piece of small DOM was slid over it and plug welded in two spots as well as the ends. Then another piece of DOM was threaded for the Johnny Joints and bent in the bender to keep the link mounts near to the frame rail and to make the mounts paralell to the frame. It was plug welded in two spots and of course on the end. They are 15" extended over stock.

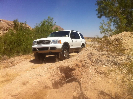
Side Shot As it sat tonight:

Now we are working on the tracbar. We are using Ruff Stuff brakets top and bottom. The tracbar will need to be bent to clear the crossmember/ steering box. We hope it will be done by the end of June. More to come...
This is where I have been putting in all my time lately. It is going to be sweet when it is done. I thought I would share. It is my buddy Phils rig. He has been driving it for a few years. It has never been modded at all ( OK, we built him a bumper a couple of months ago). He has never even had a lifted truc. He is determined to build it right the first time! He is doing all the research and the grinder work, rebuild work, etc. I am just there for experience, moral support, and welding. He has done an incredible job planning it out considering he started gathering parts a year and a half ago. It has been down for about 2 months now. We did the rear first.
Specs:
Rear- Stock 8.8. 4.56 Yukons, Aussie Locker, Sky Shackle Flip, Ruff Stuff Spring perches, welded axle tubes, shock mounts cut and turned for extra clearance
Front- 1977 F150 Dana 44 (1/2" axle tubes) Fully rebuilt with all new bearings, ball joints, seals and a paint job.
6" Deaver Coils, Yukon Chomo Shafts, 4.56s, Yukon Superjoints, Warn Premiums, Ballistic fab poly/ flex joint on trackbar, Chevy TRE conversion, Threaded DOM Tie Rod, drag link, trac bar, and Tera 2.5" Johnny Joints on the Radius Arms, Stock f150 Coil Buckets. Full height. Probably stock Super Duty upper shock mounts too, but we haven't decided quited yet.
He also has a new set of 35" BFG Mudders he will be running.
Unlike explorer swaps, the Tranny crossmember has to go on these full size swaps. The front driveshaft can't move with down travel at all really with the stocker. That caused us to have to build a crossmember for the tranny, and we decided we might as well attach the radius arms there too.
The Radius arms are fully plated with 1/4" flat stock, then the threaded stud was ground smooth and a piece of small DOM was slid over it and plug welded in two spots as well as the ends. Then another piece of DOM was threaded for the Johnny Joints and bent in the bender to keep the link mounts near to the frame rail and to make the mounts paralell to the frame. It was plug welded in two spots and of course on the end. They are 15" extended over stock.
Side Shot As it sat tonight:
Now we are working on the tracbar. We are using Ruff Stuff brakets top and bottom. The tracbar will need to be bent to clear the crossmember/ steering box. We hope it will be done by the end of June. More to come...
 . Anyway we swapped in some BC Broncos 6.5" with winch coils like I am running on my explorer. Now they are supple, travel well, and it sits 3" or so lower which is much more useable on the trail.
  Maybe we need to wheel the life out of it more!