Completed Project - Brandon's mild 4.0 OHV build | Page 6 | Ford Explorer Forums - Serious Explorations

  • Register Today It's free!

Completed Project Brandon's mild 4.0 OHV build

Use this prefix for completed projects that are not "How to" articles or threads asking for help.
So, as of 5 hours ago Ronin8002, or James' built OHV block became mine; and with the stea.. I mean deal I got and all the extra goodies he threw in, he seemed a little too happy to get rid of this thing :shifty_ey... lol! But WOW this thing is in good shape! As a christmas gift from my parents, I've been given the opportunity to really dig into an engine like I've always wanted to do. I've watched and assisted a couple chevy 350 builds over the past few months but have never done anything by myself.. so here goes nothin!

The Meat (James' Block):
- 1995 block bored .030 over and torque honed
- Keith Black Hypereutectic 1995 Style Pistons (staying around 9:1)
- Total Seal piston rings
- Clevite bearings
- Stock Water pump/timing cover (awesome shape!)
- Stock Fuel Rail
- SOHC Oil pump/pan - to strengthen up the bottom end
-- Possible port/polish on the lower intake, we'll see when I get there

The Goodies:
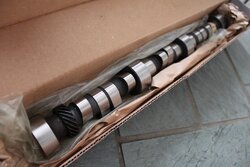
- Comp Cams 49-422-8 Cam
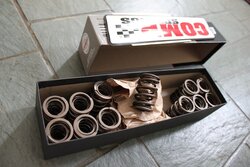
- Comp Cams 988-12 dual valve springs
- 95tm heads with minor porting/polishing

(on the way, supposedly 11/28/10)
- SI sev2027 and sev2028 valves
- Delta Cam rockers
and pushrods will come later down the road when properly measured

I'm going to keep a diary as things progress on the motor, once I get all the parts in it really should start coming together quickly. I'm down for any type of constructive criticism you have, if you don't like the way I'm doing something PLEASE let me know, as this will be my true first solo go at an engine! JD4242 has really given me a lot of direction when it comes to the 4.0, by reading through his posts in the forums I'm still baffled by the amount of knowledge he has of these things. So, many thanks to you JD!

First order of business, I need help tracking down a full gasket kit, reasonably priced as the budget is dwindling down, I hear an ebay seller has them for around $130??, as well as new head stud/bolts. I'm not feeling ARP's $400 set of head bolts/studs. Does anyone have any suggestions or leads on either?

Thanks for lookin! Here's a couple of teaser pics! Pics of the motor when I get it all unpackaged and on a stand.

-Brandon
 

Attachments

  • IMG_0007.JPG
    IMG_0007.JPG
    91.8 KB · Views: 6,273
  • IMG_0009.JPG
    IMG_0009.JPG
    76.1 KB · Views: 6,674


Join the Elite Explorers for $20 each year.
Elite Explorer members see no advertisements, no banner ads, no double underlined links,.
Add an avatar, upload photo attachments, and more!
.


went at it all night tonight... i swear this better be worth it! :).. EVERYTHING was either dry rotting or brittle. i spent 2 hours battling the lower intake bolts.. the last 3 ive been dueling the egr/dipstick shinanigans and trying to get the headers off so i can have just the heads to go to the shop. coming up on 40 hours with no sleep... its time to go to bed, ill update with pics later on today.


Join the Elite Explorers for $20 each year.
Elite Explorer members see no advertisements, no banner ads, no double underlined links,.
Add an avatar, upload photo attachments, and more!
.


Intake cleaning

Yeah
Mine was jacked up too. I put it in a bath of Simple Green and hot water.I didn't want to craze the intake. Be careful to replace or replenish those gaskets because if (read when) it leaks when you restart the engine will be a pita.
At least your indoors. My repair is outdoors and is continuing. I got the brake rotors, wheels and pads to do along with the exhaust to finish up and it ain't exactly summertime in the Catskills (10 Degrees) on a hot day.
I still love doing it and I don't know why???? You can get vacuum hose at most auto parts stores. The Germans saying about vac lines is that if you pull it off~replace it. Keep it moving.+:salute:


Those plastic vacuum lines break easily. Most of mine were replaced with rubber lines. A few places I combined rubber and the orig plastic lines. It not a big deal.

~Mark


Update:

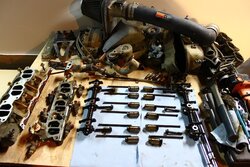
Last night I got all the way down to the heads, got the rockers off and began working on taking the headers off. For some reason after unbolting the dipstick, it would not budge, therefor I could not get the EGR off. So then I tried to unbolt the headers from the rest of the exhaust system, those bolts didn't move in the slightest bit, even after heating them up and beating on them with an impact gun, so I had to give it up for the night and turn in. So unfortunately, all that's left in the truck is the heads, block and pan.

James - That makes total sense, I remember looking at the PCV when I took it out, I replaced it about a year ago and the new one already looked like it was shot.

Mark - That's what I was thinking, using some of the plastic ends to slip into the connections, and finding some rubber tubing to slip over them to be used as the 'body' of the line. I broke some while working on my mom's '00 Expedition a few months ago and went around looking for some, Advanced/AutoZone and Napa don't sell them, and Ford didn't even have a part number for a vacuum line harness, they said it was probably discontinued, so looks like I'm SOL on that idea..

Also, the rockers, I by no means consider myself experienced enough to judge whether or not they are bad or not, but.. all the wear seemed normal and even on the rockers, though I don't reeeaally know what I'm looking for. Before I pulled them out, upon original inspection, none of the rockers moved or wiggled, they were all snug and appeared to be in good condition. None of the pushrods spun freely or had play in them, though I could spin a few of them with force. When everything came out all of the pushrods displayed, for the most part, the same amount of wear except for 2. The #3 and #4 pushrods on the firewall side of the cylinder had a slight bit of 'grooving' for lack of better terms, in one direction, on the rocker side of the pushrod. The #4 had a bit more than the other and appeared to be slightly out of round. I'll get pictures of them tomorrow if I can get out there. I haven't pulled the lifters out yet, I need to get those heads out of the way.


I'll get some more pictures of the whole project when I can tomorrow, I can't stand crappy cellphone pictures. But I will show you these; I think I found an extremely effective method of pulling those NASTY lower intake studs out.

Grab the 3/4" chuck out of the nearest drill press, attach it and tighten the H#@* out of it! :thumbsup:
 

Attachments

  • 1217000325.jpg
    1217000325.jpg
    91.2 KB · Views: 825
  • 1217000325a.jpg
    1217000325a.jpg
    138.2 KB · Views: 867
  • 1217000330.jpg
    1217000330.jpg
    75.9 KB · Views: 815


Brandon,

If you want to get rid of the engine stand when you are done, let me know. I still need to do what you are doing to my X.


Got the passenger side head off, trying to take the drivers side off and it's just not moving.

The two bolts that hold the header to the y pipe are NOT moving. I got the three off the top of the header, stripped 2 of the 3 on the bottom after PBblaster and heat :mad:

any suggestions?


Grind the head off and after you pull the manifold off you can grab it with channel locks or like you did with the intake


on the y pipe bolts that is.

Not sure on the bolts going into the head but maybe cutting the y pipe bolts will let you get the head off and get a better working angle.
i dont even try taking exhaust bolts off anymore,straight to the cut off wheel!!easyer to buy bolts than to deal with getn them out,also i cant or dont wanna get pbblast on the exhaust wrap


I sawzalled the sucker as I planned on a y tube. the bolts were a little easier but there's always one or two


ok... HEADs ARE OFF!!

MAN that was a lot harder than it should have been..

I forgot what it was called, but my brother had not a propane/butane torch, but one that was supposed to burn hotter than both, put that on the headers and practically melted the bolts off :D.

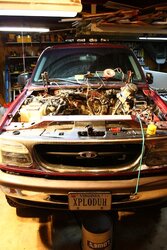
The engine in the truck is basically ready to come out, I'm just going to wait until I can get the new one all bolted together before I do it though.. to get the old one out and the new one in all in one go.

Ok, enough talk, picture time..
 

Attachments

  • 4.JPG
    4.JPG
    142.1 KB · Views: 890
  • 3.JPG
    3.JPG
    144.1 KB · Views: 782
  • 2.JPG
    2.JPG
    109.4 KB · Views: 799
  • 1.JPG
    1.JPG
    145.8 KB · Views: 792


Here I have another picture of all the nasty carbon-like build up I was talking about that made it all the way down to the heads. Ignore the metal shavings, they were part of the 2-3 hour lower intake bolt extraction :rolleyes:

And the other is a picture of the only true wear I could find among the rockers, pushrods and lifters. It was single directional grooving on the rocker side of two of the pushrods on cylinders #3 and #4.
 

Attachments

  • 6.JPG
    6.JPG
    53.5 KB · Views: 1,437
  • 5.JPG
    5.JPG
    128.3 KB · Views: 800


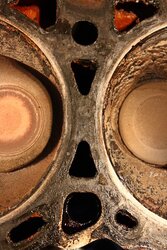
This is the Passenger side, (bank 1?) head and gasket.

At first glance I noticed some of the coolant passages were blocked, then I saw some debris in between the cylinders that leads me to believe I had some failure in the head gasket..

Tell me what you guys see/think!
 

Attachments

  • 7.JPG
    7.JPG
    113.5 KB · Views: 785
  • 8.JPG
    8.JPG
    140.8 KB · Views: 800
  • 9.JPG
    9.JPG
    122.8 KB · Views: 803
  • 10.JPG
    10.JPG
    146.2 KB · Views: 778


This is the Driver's side, (bank 2?) <-- or do I have those mixed up?

I noticed the same deal, blocked passages and some hints at a possible gasket failure between the cylinders..

On this one check out the head.. #4 looks like it has rust -ish built up on the valves, possible coolant leak? #5 was white, looks like it got burnt up. #6 has oil residue all over it, somehow I was leaking oil into that cylinder.

Basically this side was a total crap shot. (IMHO)

Opinions?

((notice I didn't get the headers off, D@#* those bolts!!!))
 

Attachments

  • 11.JPG
    11.JPG
    121.3 KB · Views: 796
  • 12.JPG
    12.JPG
    145.6 KB · Views: 774
  • 13.JPG
    13.JPG
    149.8 KB · Views: 769
  • 14.JPG
    14.JPG
    148.2 KB · Views: 786


Wow that dirty.way worse than mine was.the wear would be on the rickers the worse,not the cup side the side the sits on the valve.not all the holes in the headgasket will be cut out for water passageways.so you decided how much head and intake work your going to do? Dont worry about cleaning none of that stuff they can soak for cheap!!just by how dirty that thing is,its going to run 3 times better!!:)


Join the Elite Explorers for $20 each year.
Elite Explorer members see no advertisements, no banner ads, no double underlined links,.
Add an avatar, upload photo attachments, and more!
.


Flip one of those rockers over and take a pic and a pic of the cylinder walls,wanna see if you can still see the factory hatch marks.


Back
Top