OK, let's get started | Page 3 | Ford Explorer Forums - Serious Explorations

  • Register Today It's free!

OK, let's get started

OK, I’ve got some serious catching up to do.

As I’m sure will surprise absolutely no one here, 4-8 weeks became 4-plus months, and I still haven’t done a whole bunch of the things I was sure I would tackle before the summer started around these parts. But, since it’s the first week of August, I figured I’d better turn the corner of this “pre-season” cleanup and upgrade and get this rig out on a trail somewhere.

First up was the dirty work, and up here in Central New York that means another round at war with rust. When I got this rig, it had spent most of the previous two years in a driveway south of Buffalo, in what folks in that famously snowy town consider the “snow belt” because lake-effect snows pile it on by the feet. This Ex saw less than 4,000 miles from 2009-11, but did get parked next to a horse barn and covered to the hood in snow for months at a time. As you can imagine, this things was a mess, so back in December 2011 when I got it here, I tore off all the brakes, rotors and calipers, and those factory sidesteps (pretty much anything that could unbolt that lived within a few feet of the ground) and rebuilt from there. I also did a fair amount of wire brushwork, coating most of the frame and suspension with Rustoleum rust converter and then flat black paint.

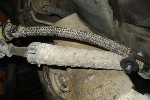
After only adding another 4,000 miles in 2012, the car came back into the garage before the worst of last winter set in. It never drove on a salty road, but the rust completely took over once again. The passenger side rocker is barely there, the frame and suspension looked like I’d painted them brown, and even the new part – Warrior shackles and Rancho shocks – showed signs of cancer.

rust 1.jpg


The lower Tupperware along the sides was packed with mud and bits of what used to be body.

rust 3.jpg


So this year, I threw everything at it. Grinding wheels, scrapers, wire brushes, sandpaper, and about every chemical anyone on here recommended.

rust 4.jpg


This year, I’m a rolling test lab for rust control. The heaviest sections, which was most of the truck, got all the loose stuff cut or ground off, then scraped and sanded, then covered by brushed-on Eastwood rust converter. I bought some sprays cans for the places I couldn’t reach by hand, and pretty much gave the whole underside – body, frame and suspension parts – a serious flea-dipping. Underbody and frame from the fuel tank and front leaf-spring mounts back was coasted with Eastwood rubberized rust encapsulator. I even yanked off, cleaned and coated the metal bumpers.

under 2.jpg

under 3.jpg


Front and rear suspension parts were coated with Rustoleum flat black paint, including those one-year-old shackles. I ran out of the mail-order Eastwood stuff, so the front frame rails got coated with Rustoleum’s version of rubberized undercoating (way cheaper per can at Wal-Mart, although one can did not cover nearly as much as an Eastwood can so the savings may turn out to not matter much. Rancho shocks got cleaned up and given a fresh coat of white. I even threw a fresh coat of red on the front and rear sway bars, a tradition I began last year for no apparent reason and seem to be keeping up for the same.

under 4.jpg


The test will be the middle section of the frame rails. I left them completely alone on the reasoning that I’ll be welding rock sliders to them at some point this season, so why treat and paint a section of frame that will have to be ground bare, then treated and painted again. Of course, the sliders were due on in May and haven’t been ordered yet (a needed alternator and battery just at that reserve), so it looks like I’ll get to compare a few different rust coating combos against the nothing-at-all option, at least for a few months more. I’ll keep you all posted.

:exp:


Join the Elite Explorers for $20 each year.
Elite Explorer members see no advertisements, no banner ads, no double underlined links,.
Add an avatar, upload photo attachments, and more!
.


On idiots and leaf spring bushings

Because it’s the next thing I had to go after, I came up with an idiots guide to upgrading spring bushings.

Last year, I bought the Energy Suspension polyurethane bushing kit for the rear leaf springs of my 01 Sport. It has the multi-leaf pack, and I was adding Warrior shackles, so I thought let’s swap out those old bushings while I was at it. After the top shackle-to-frame bushing busted my knuckles and drove me nuts for hours, I gave up and just bolted the rest back together. Not a proud moment, but it happened.

Part of the reason it happened is because this rig spent 2-plus years buried in Buffalo snow, and part is because I’m an idiot by the standards of most folks here – working out of my one-car garage with 30-year-old sockets and a few sometimes-useful carpenter’s tools. No pneumatic tools. No presses. Nothing beyond a propane hand torch. Most of the solutions I saw required at least one of these things. But I kept on digging around here, and found some great comments that offered some driveway-mechanic-level solutions to the challenge of removing these factory pressed-in and time rusted-in monsters.

So, if they look like this, change them.

bushings 1.jpg


After putting on the Warrior shackles last February and managing to get that upper frame-to-shackle bushing swapped, I started to notice how poor the spring-to-shackle bushings under them looked. The rubber had deteriorated to the point that the inner metal sleeve could slide out a bit to the inside. The rubber itself also mushroomed out of the outside, forming a bit of a gasket between it and the inside of the shackle. If I put a big plumbing wrench of the spring, I could make it twist a little and see the rubber give. If I could do that with just a couple of hundred foot pounds, what was going on when I turned, took a hole or leaned around a rise off-road? Not sure if the salt and rust made that break down (hell, look what less than a year of it did to the finish on the Warrior shackles), or if a few years of inaction did the trick, but they were toast.

Then there’s lesson No. 2, learn to love anti-seize.

bushings 2.jpg


I read about it here, and even dabbed a little on when I mounted the Warrior shackles to the springs last year, but I didn’t really heed the warnings. And I paid for that. No amounts of pressing (with pipe clamps, I admit), or heat from my little torch could break those bolts out of the metal sleeve. I finally gave in and did to them what I had to do the upper bolts a year before – crack out the reciprocal saw and toast a few blades cutting those grade 8 bolts. If you end up here, watch out for those shackles. You don’t want to eat into those and cost yourself another chunk of cash.

The next part, which I read in a post here that I can’t find anymore, is pretty easy.

bushings 3.jpg


Just take a standard drill bit that’s a little bit smaller than the thickness of the rubber in the factory bushing, and drill it along every point on the clock. In the rear of the spring, where you’ll be taking the outer metal collar out as well, wiggle that bit around with abandon and chew that rubber out. You don’t have to worry about scoring the metal you hit. In the front of the spring, though, where you keep the outer metal collar, pay closer attention and keep the drill bit along the edge of the inner sleeve.

After you chewed a bunch of rubber out, you’ll notice the inner collar is easy to move. Grab a pair of Vice-Grips and it will pull right out with a twist or two.

bushings 4.jpg


With the inner sleeve out and a dozen or so holes in it, that rubber will just roll up and peel off of the outer metal collar. A flat-head screwdriver or a scribe can detach and stubborn pieces in a few seconds, and out it will come.

bushings 5.jpg


On idiots and leaf spring bushings, part 2

What you end up with is the spring eye with the factory pressed-in metal collar staring at you. In the front of the spring, you’re set. Just get a wire brush and a little sandpaper and make that surface shine. In the rear, at least with the Energy Suspension bushings I used, you have to remove that outer piece too. Now I saw people on here used air chisels to rip it out, and who pressed it out with a special hand tool, even one you can rent from the auto parts store or buy cheap at Harbor Freight. Still, if I can figure out a way to do it with what I have – and save $20 or a trip downtown – I’m all for doing that.

Again, I stole some advice from a follow-up post I saw one some chain here and I grabbed my reciprocal saw instead. Once the inner collar and rubber are out, the hole is just about big enough for a standard (aka: inexpensive) short metal-cutting blade. If you take your time, watch your blade angle and keep checking your work, you can cut three slices lengthwise into the outer collar.

bushings 6.jpg


Three is the minimum number of cuts for any one slice to be able to just fall out. Feel free to slice them into more pieces, just be careful not to start cutting into the spring. My guess is that metal would be a little harder to make a dent in, but why risk it?

bushings 7.jpg


I erred on the side of not cutting up the springs, so the collar still had a little bit of metal on the outers edges holding it together. Even with that, it just took a few shots from an old paint-stirring screwdriver to bend one section in a bit and push the whole things right out, neat and clean.

Once again, get a wire wheel in there and some sandpaper and polish that surface up a bit. Once you do, this thing is all down hill (except you still have to do the other three).

First, a warning: The two or three little tubes of “prelube” grease they give you with the bushings are not nearly enough to get the job done. If there’s one knock I read on polyurethane bushings it’s from the folks who are driven mad by them squeaking. Every one who answers those posts reminds that the key to avoiding the squeak is to make sure the parts are clean when they go together, and to lube the heck out of everything.

I went down with the old prelube tube to my local auto parts stores, and not one of them could tell me what exact kind of lube was needed to go with polyurethane bushings. They suggested everything from marine grease to white silicone. Then I read some posts, and there seems to be some fairly energetic arguments going on over what is the best type of grease to use on poly bushings. Seemed like chemists arguing with engineers and racecar drivers. Might as well bring up high-flow air filters. Rather than sort that out, I just went online and bought a small tub of the same prelube from Energy Suspension. About $12 on Amazon, and I had every surface on the bushings swimming in it.

bushing 9.jpg


As you can see, the new bushings are in halves, with a single metal center sleeve. That’s what makes it possible for an idiot in the garage to press these in by hand (in my case, I used a low-strength, one-handed carpenters clamp).

bushing 10.jpg


The Energy Suspension bushings also have sides, which increases the diameter of the shoulder upon which the spring meets the shackle and the frame mount, which this non-engineer thinks has to help increase strength. It also makes them a much tighter fit than the stock bushings when it comes to putting them back together, so prelube the heck out of that surface as well.

bushing 11.jpg


If you’re doing the front and rear spring bushings at the same time – and since they come in a kit it makes way more sense to do it that way – my suggestion is you get all the bushings in, then install the front spring-to-frame bolts first. It’s way easier to swing the rear shackle to line up with the rear spring bushing than it is to pull the whole rear axle and spring assembly forward and backward to line things up between the front spring bushing and the frame mount. Take it from a guy who did it the wrong way first, tried to beat it all into alignment, then had to undo the rear shackle-to-spring mounts, do it right, and repaint my springs to cover the sledge marks.

And one last piece of advice …

bushing 12.jpg


I’m all for liquid thread locker to keep key nuts from backing off. I’ve even safety wired a few things to get a better night’s sleep now and then. And I did use red Loctite on the nuts that hold these spring bolts in. But when it comes to sliding those grade 8 bolts into those hardened metal sleeves – both of which will be bathed in water (and if you live near me, salt) – slather them with anti-seize. Every time I took something apart this spring that I put together last spring without it (which only covers about 9 months and 4,000 miles on the road) I had to soak it in PB Blaster, bake it with my mini-torch or just give up and cut the damned thing off – including the brand new rear spring-to-shackle bolts I installed last year. I thought all those folks on here talking about it were nuts, but they are, like so many folks here, dead on right. If it doesn’t have to be locked down, and you ever want to get it off again, anti-seize the snot out of it.

And on that happy note, I’ll bid you all a good day.

:exp:


With the weather clear and hot, I took the rust war to the yard. All the plastic and minor parts that I could strip off and still roll what was left of the rig – from body plastic to bumper covers, rear and side door steps, shackles, sway bars, two hooks, brackets, mounts of all kinds; and even the once-white, now-rusty Rancho shocks – got hooked to the steel cable dog run in the yard, cleaned and painted. My wife was thrilled, especially when I started taking pictures.

plastic 2.jpg


The plastic cladding went from gray to black, courtesy of several cans of Fusion paint. Prep was just a liberal dose of Windex and a good rubdown. Once dry, the spraying started. A few lessons learned there: keep a good smooth coat and fan your edges, that stuff dries much darker the heavier it’s laid on; and pay attention to the recoat before 24 hours or after 7 days rule. I tried some edge touch-ups a few days after everything got covered, and the new paint bubbled the old paint on contact. I had to sand and repaint that piece to fix that mistake. I’ve since touched up pieces that were dry for more than a week, and no problems.

plastic 3.jpg


Everything now waits for the war against body and frame rust to turn in my favor so it can get bolted back on. I’m adding an RCI skid plate and a Reese rear hitch, so I’ll take care of those before the chip-able stuff goes back on as well. I’ll have to figure out how I’ll handle the painted nose and the number of times I’ll need to take it off to make custom mounts for the brush guard. My guess is, I’ll just have to take the damned thing on and off a few thousand times.

And my apologies to any bow hunters out there. That is just a pitiful shot group. No excuses. I was shooting at 30 yards from a 15-foot treestand, and I just sucked it up that day.

:exp:


There is one thing I want, and one thing I know for sure.

First, I want to add a winch to this rig at some point down the road, since I do most of my wheeling on deep-woods trails and solo. Second, I know I won't be smart enough to stay out of trouble until I do have that winch mounted, so I better at least get the truck set up with some reliable tow points, in case anyone out there is nice enough to yank me you of the mess I will no doubt get myself into.

The first, and simpler, answer for this seemed to be the rear, where BonesDT has already done the research on the best rear hitch to mount to a lifted second gen Ex, and laid out the instructions so clearly that even a chimp like me could do it.

Here's proof.

hitch 1 copy.jpg


Following his lead, with only a $4 metal cutting blade for my portable table saw for added parts (unless you count the new Reese Class III/IV hitch that says "Do not cut"), I was pretty quickly able to modify the hitch and the mounts for a 3-inch lift. A little edge cleaning and black paint, and they went right on.

hitch 2 copy.jpg


I was particularly happy with the way the Reese hitch attaches – both under and on the side of the frame with some pretty serious bolts – and the way it tucked inside the rear spring shackles. With the trimming BonesDT recommends on the bottom of the mounts, even the extended Warrior shackles have no problem. BonesDT nailed this one.

hitch 3 copy.jpg


The only problem I did end up with was this. The bolts that come with the setup that connect the main hitch bar to the side brackets have a knurled shoulder on them, designed to pull through the hitch itself and dig about one-third of the way into the hole in the 1/4-inch steel side bracket. The problem I found is if you drill the 3/8-inch hole to fit the bolt and try to muscle it in, the bolts just snap once they hit that thick steel side plate. I lost four of them before my meat head finally got the idea.

Now, I have to admit I wasn't thrilled that I was even able to snap them at all, given that they need to hold on someday when someone much more sensible than me is pulling me tail first out of some mud pit. But that aside, if you're going to do this right with the original parts, I'd suggest either a slightly larger hole (if you're lucky enough to have a handy 13/32 bit around) or that you ream the inside of the holes in the side brackets a bit. Since I was already four bolts into the land of the stupid, I just went out and bought some 3/8 Grade 8 hardware and replaced the four that I broke.

hitch 4 copy.jpg


All tightened up, the hitch looks good and tight up against the frame. It was also a pretty easy install, especially with the bumper off. Even with it on, I imagine this is an easy few hours in the driveway.

Looking at it from the side ...

rear done 2 copy.jpg


I imagine the hardcore rock guys wouldn't be thrilled with the additional loss of departure clearance, but for a camping trail driver like me, it doesn't seem like too great a sacrifice for the benefit of knowing the rig can be recovered when needed. Doesn't seem to push much past the plane created by the tires and the Warrior shackles anyway. If you're serious enough to be considering F-150 springs and tossing your Warriors for extra exit clearance, then this is definitely not a mod for you. Then again, in your in that deep, just spend the money or break out the welder (a skill I don't have) and go with a custom rear bumper with a hitch and tow points built in. I'm headed there someday, but for now, this will do just fine.

Now, on to the front. I envy you sun-belt folks. I bet you never tear off the bodywork and find this rusty mess.

rear done 4 copy.jpg


And all that comes just one year after the last wire brush, spray can fiesta. Let's hope that Eastman rut converter stuff can earn its keep.

:exp:


Looking really good. Goodluck with the rust. Living here in SoCal mine gets nothing like that. Removal and installation of stuff comes relatively with only slight rust.


Looking really good. Goodluck with the rust. Living here in SoCal mine gets nothing like that. Removal and installation of stuff comes relatively with only slight rust.

Worse part is, Frankcal, most of the front suspension was stripped and painted just last year.

:exp:


Heading to the front, the first challenge was all that rust. This rig had rot, in some places clean through the body and all the way up to the headlights. Nothing quite like a decade of Buffalo winters to make a mark on metal.

Scraping, sanding, rust converting, painting and/or undercoating later, and at least I was working with this.

front 1.jpg


I added some new sway bar ends from Raybestos, for the added strength, to eliminate the wiped out bushings, and so the new ends would be easy to take off when needed. I also, once again inexplicably, painted the sway bar red. I did that in the rear, so I repeated it up front. I still have no idea why.

Next up for me was one of those now standard must-have add-ons, the RCI front skid plate.

front 3.jpg


When I first started this project about two years ago, mostly everyone I found here was making their own front skid plates. Some were good looking and seemed strong, some were not so much of either. I'm pretty sure mine would have been in that latter category, so I was already sold when I looked around here early this year and found everyone buzzing about these.

For the record, the real deal absolutely lived up to the hype. The guy behind these was great to work with, kept me updated on the progress of the order, and delivered the plate on time. It was packed well, came with good instructions and all the hardware needed, and it's just solid as hell. I can see how the hardcore rock climbers might need more stiffness or a more rigid mount to the frame, but for a road and trail rig like mine, this thing should bounce away the stray rocks, branches and suicidal racoons that otherwise can ruin a weekend.

I did buy a few extra self-tapping bolts and took the suggestion the RCI folks make in a note at the bottom of the instruction sheet, drilling and tapping some short bolts through the lower corners of the skid plate and into the cross member. With six mouting bolts, and some rigid triangulation, I figure this thing should be nearly indestructable. One word of caution though – if you have a tap, my suggestion is to tap the holes before cranking the bolts in if you need to drill any new ones. Two of mine that came with the guard commited thread-crushing suicide on the way in to the new holes, and I needed another trip to the hardware story to replace them.

front 4.jpg


A few other things worth noting ...

Even with the added bolts pulling it tight to the crossmember, the front of the plate tucks nicely inside the plastic nose on my 01 Sport with a 3-inch lift. In fact, it's such a good fit, it looks like he meant it that way.

Although I didn't end up putting them back on (yet; still considering a front hitch), it looks like the trimmed upper front corners of the plate would allow the factory took hooks to still mount.

If you can get a hand with this, do it. It's heavy and not east to hold up and bolt on at the same time. I did mine solo, and gave it its first spot of rash when I dropped it on my head and it bounced onto my garage floor. Guess I need a softer head.

By the way, from the looks of their website, RCI is expanding. They now offer a Ranger transfer case skid plate (the front skid plate is also listed as a Ranger part). If I didn't already have the stock plate for the transfer case, I would add this in a heartbeat. Based on the heft of the front plate, I still might.

:exp:


Yeah that really sucks, but looks like you're at least attacking it and not letting it take over. Would be a shame to such a nice sport go to waste because of rust, but looks like its in good hands. How are you liking those end links so far? I bought some moog ones about a year ago and theyre cracking and splitting already so I'm trying to looks for somewhat of an upgrade.


Major catch-up work

Falling behind on the build thread once again, thanks to a job that pulls me away for months at a time. Still have some promises to keep (Frankcal, those steps are in my garage and headed out one of these days), and it's definitely time to tackle some catch-up posts.

With the front stripped, cleaned and repainted, the pre-wheeling season mission moved to getting the front reassembled so I could hit the road and the trails. Before that, I wanted to do a little foundation work to set things up for a more serious than average front brush guard.

Purists hate them, and I get why. For the most part, it's a wanna-be decoration. Still, I love the look on a dual-duty rig, I've taken enough branches and deer across the fronts of various vehicles to know I don't want to hit the highways or the trails naked, and I thought if I bought a decent guard and gave it a little thought, I could get the thing mounted in a way that could at least prove weekend-warrior trail worthy.

The first snag, of course, was the body lift. The 3-inch PA lift meant the factory mounts from whatever guard I chose wouldn't work. I did some measuring and came up with a prototype design a while back (more on that here) that should work with any guard and a 3-inch body lift on the Tupperware-nosed Exs, so it was time to make those things real.

I started off with an A36 angle steel, 3x3x48 inches. I chopped it in half, into two two-foot legs. Likely longer than I needed, but I didn't want to drop on the plastic nose and find I'd done everything to get there and needed to throw it away because it was a few inches too short.

bracket 1.jpg


The key to the strength of the design was to use the horizontal leg to slide under the bumper mounts and frame head to bolt to the stock tow hook mounts and have the vertical leg slide through the frame head, inside the frame, and then bolt to the frame itself through a factory hole just above the tow hook mounts. I used that sheetmetal prototype I made last year as a template, and traced the pattern on the angle steel. I dropped a 10-inch metal blade in my portable table saw, grabbed a few file, and got to work.

bracket 2.jpg


You can see the top leg has to be trimmed to fit under the front bumper mount once it's in place. The two legs have to separated as well so one can go under the frame while the other goes inside. A small cutout where they come together allows room for the head piece on the frame rails. A small L-shaped folded corner detail I designed into the sheetmetal prototype proved to be utterly unneeded in the real version. Believe me, that angle steel didn't need the reinforcement. You can see that I field-checked the bolt hole locations, and they were as little diffeent from the initial design. Definitely a smart thing to do. Here's how it looked mounted on the frame rail, without the front bumper in place.

bracket 3.jpg


The nice thing about working with the sheetmetal prototype as a pattern was that all I had to do was fold it inside out, and I had the pattern for the other side. Here they are, both bolted in place.

bracket 4.jpg


Looking at this I got all sorts of ideas. This could be a great way to mount a winch tray and/or a front hitch bar. If I had the welding skills, I might have done both. For now, I'm a cut-and-drill-and-bolt metalworker, so I stayed on plan for the guard mounts.

(Part of me did just want to point them, paint them red, and go scare the hell out of some Porche drivers. But I think I'm supposed to be too old for that).

Here's how they fit with the metal bumper in place (I primed them and gave them a few coats of black as well). You can see why that top notch is needed.

bracket 5.jpg


And here's how they come through the Tupperware.

bracket 6.jpg


Have to admit I was pretty pleased with the result. Plenty of steel to work with, each piece connected to the frame with three half-inch Grade 8 bolts -- one on the vertical and two on the horizontal legs -- and with the mounts coming through the nose instead of going under it (that was key to me) I had the best odds of keeping whatever angle of approach the Tupperware would give me. I still wasn't crazy about a guard that extends all the way to just above the hood mounting only through the lower nose, but it seemed like, and turned out to be, a great foundation.

:exp:


It's looking really good and coming along nicely even if it takes longer than expected, but at least your getting it done, and done right. The mounts you came up with came out really nice and beefy, they would be killer to any porsche haha


Guard on a raised tupperware nose, part 1

OK, I'm going to concede that brush guards are not a hardcore off-roading weapon. If you're going to be rock crawling at Moab on the weekend, a serious steel bumper bolted to the frame is the way to go. Better angle of approach, and rock-solid protection.

But I'm a weekend trail warrior, when the weekends are kind to me, and my '01 Sport has the full tupperware nose, so a steel bumper project is a major undertaking. Beside which, I can't weld worth a damn, and I hate asking (or worse, paying) anyone for help.

So, to keep that plastic snout somewhat safe and in street-presentable condition in spite of the occasional slide down a muddy trail into a tree – not to mention a little more resistant to wayward deer and poor parallel parkers – I decided something had to be done, and a serious brush guard was that something for me.

Serious was key there. I'd seen a whole lot of them that mount to the frame by first going down and around the bottom of the nose/bumper. That's no good. The plastic-nosed Ex doesn't have a great angle of approach as it is, I didn't want to make it even worse. Also the geometry of that type of mount just doesn't add up. How stiff can a 1/4-inch flat steel piece be if it arcs under then up in front of the nose for another two or three feet? You can grab the top of most of those and shake them back and forth into the front of the hood. No good at all.

The first step in doing better than this was to make a mount that would go straight from the frame through the nose. The 3-inch body lift made that much easier, since the lower openings in the plastic nose line up perfectly with the ends of the frame rails once the body moves up. I outlined the design of that, and how I made the basic mount pieces, already. Now I just needed to figure out who to mate them with a guard without wrecking both.

To try and improve on that, I also checked out some of the tougher vehicles I see around my Upstate New York home that have these guards – police pursuit and rescue SUVs – and noticed that most add a custom mounting bracket higher up on the vertical legs of the guard itself. On the new rigs, the police had someone cut a hole in their plastic nose and bolt it to whatever is underneath. Triangulation, and a reduction by up to half on the lever rising to the roofline. That geometry makes much more sense to me.

The most important leap here is the guard itself. After a lot of reading and a lot of grabbing and pulling in parking lots (good tip – always asked the police officers first), I went with a new Westin guard (part no. 40-0805/45-0800). I like that it's made in the US with US steel, that is was designed to mount through – not under – the plastic nose, and that the one-piece construction meant the headlight guards are much more solid. I did some online hunting, and found one through Amazon for a hair under $400, and grabbed free shipping with my wife's Amazon Prime account.

Then there's that dilemma we all face from time to time – taking an expensive and brand new addon and cutting it up right out of the box.

guard 1b.jpg


I've been there before, most recently with that Reese Class IV hitch that needed to be modified for the lift, so I dove in.

You can see from the pic that the Westin guard is designed to reach through the lower front opening in the plastic nose, and then mount to brackets they provide that attach to the bolts that also anchor the factory front tow hooks. It's even designed to let you keep the tow hooks while attaching the guard, although mine went up on a shelf during the lift. With my custom mounting brackets replacing the Westin ones, the first modification needed here was to cut the mounting legs of the guard – which, with the lift, now need to stop at the ends of the frame rails because they're not the right width just to slide inside.

I did some math – measuring how far the nose came out from the heads on the frame rails and adding 1 inch for clearance (I wanted to keep the fit tight to maximize approach angle), and then measuring how far that would place the lower horizontal bar going across the front of the guard. The guard's legs and the custom mounts I made (see that previous post) were cut accordingly.

guard 1c.jpg


Cutting the leg and not using the Westin brackets meant I was on my own for lining up the guard to the nose. I had one factory slotted hole in the guard, and none yet in my custom mounts, so fitting the guard – height, depth, angle – all had to be done from scratch. I love math and geometry, but I don't trust my brain nearly enough to guess in three dimensions at once. Instead, I set up a saw horse and some wood scraps, clamped the guard at about the right height and depth, and then used a few rags to adjust the angle so it followed the nose of the car dead on. It took a little playing, and then a little more for me to get up the nerve to mark the holes, but it all came together on the end.

guard 2a.jpg


While I had everything clamped, propped and lined up, I also used a straight edge to make a pencil mark on the plastic nose that covers the steel bumper to trace the edge of the guard upright (making sure to add a few "x" marks so I knew which side of the line the uprights occupied). With the holes in the legs and brackets marked, and the line of the upright traced on the lower plastic of the nose, I crossed my fingers and moved the guard away. I knew once I pulled it away I'd never line it up exactly the same again, so this was a little bit of a leap of faith. The last step was to drill two small holes on that line – one just under what a little more math told me was the height of the top of the bumper inside, and the other just above the bottom of the same. I made sure to push the drill a little bit into the steel bumper underneath, to leave a clear mark. Then, off with the tupperware too.

guard 2b.jpg


With the holes in the custom bracket drilled and the two small marks easy to see on the bumper, I was able to slice a few pieces of the Westin mounting brackets that I wasn't using, and make an upper mounting bracket to attach the upright of the guard, through the nose, to the bumper. Any angled steel will do the trick, although because of the curve in the bumper you have to heat it up and bend it a little tighter than 90 degrees I used my eye to make it parallel to the custom brackets below.

Since I was using a chunk of the Westin-machined mouting bracket, it had slotted holes. I lined up the outside edge of the bracket with what the small drill holes told me would be the inside edge of the guard upright, traced the slots, and drilled the holes there as well.

guard 3.jpg


Here it is with the guard bolted in place (minus the plastic nose). All the bolts are grade 8 1/2-inch steel. If you look carefully, I had to use small pieces of 3/4 inch steel pipe as spacer collars between the custom brackets (which had to go inside the frame rails) and the guard (which was designed to go under them). Also notice that I didn't drill the holes for the bolts that will go through the new upper mouting brackets and the guard uprights. I figured it was better to save that until I have the guard in place and the tupperware nose back on – this way I have a little ability to adjust the guard to make as perfect fit.

Piece of cake.
:exp:


Guard on a raised tupperware nose, part 2

With all the design and most of the math and foundation work done, finally comes the fun time – putting the thing together.

Before that happened, however, the needless work beast reared its head in me. The custom brackets I designed and made for the frame-to-guard mounts were drilled and cut to size, but they weren't pretty. You never know who is going to look up your nose, so you have to keep things trimmed and neat.

guard 7.jpg


Beyond just trimmed and neat, rounding out the corners means less knuckle damage during trail repairs, and a lower chance that those 1/4-inch steel angle brackets will get shoved right through the guard if Bambi ever decides to commit suicide by Explorer.

Here, in sucession, it goes together ...

guard 8.jpg


Custom frame mounts painted with a few good coats and back on the rig. All bolts are 1/2-inch Grade 8 steel, and everything gets a dose of Red Loctite so there's no suprises down the road. Before the tupperware went back on, I also gave all the metal –#exposed or just possibly scratched by the work going on – a good coat of Eastwood frame paint.

guard 8a.jpg


With the rubber nose on. I was able to use the two small holes I drilled through the plastic nose back when I was marking the metal bumper for the upper brackets as a guide for cutting a 3/4-inch wide slot in the plastic nose itself. I used a wood spade drill to make 3/4-inch holes centered about 1/2-inch above and below my top and bottom marks, and then a small keyhole saw to join them together in a straight line from each outside edge. After a few fits to make a few adjustments, the new upper brackes come right through nice and even. Even better, a feared "whistle" effect from the new holes in the plastic nose cover never turned up. Like the boys in Detroit meant it all along.

guard 8b.jpg


Here it is with the guard attached. One of the things I also liked about the Westin is the way it was designed specifically for the Explorer's nose. The lines on the guard uprights and the bends in the guards itself follow the body very closely. I kept the frame mount hardware a little loose, then used this chance to adjust the guard's lean to match the nose as well. Once that was set, I drilled holes to attach the upper brackets to the guard uprights. After adding some paint to keep it all rust free, I bolted it all tight.

guard 9.jpg


You can see the complete system here. Custom frame brackets come out from behind the frame head and bolts in 2 places with 1/2-inch Grade 8 hardward to the trimmed lower legs of the guard. The two bumper-mounted brackets come though the custom-cut holes in the plastic nose and bolt flush and flat to the upright on the guard – about 6 or so inches higher and 3 or so inches forward of the lower bolts. Those bolts are 1/2-inch Grade 8 as well, and the two sets of attachment points triangulate the system and cut down on the leverage a force hitting the top of the guard can exert. I've had these monted a for a bit now, including a round in the Advanced Off Road Driving class at Rausch Creek (where a few rocky climbs and decents made good use of the guard), and this thing does not budge. The headlight guards have fended off a few stray saplings, and one surprised turkey, and the custom frame mounting brackets look like a ready perch for a future winch tray and some front tow points.

guard 10.jpg


All in all, it ain't a custom steel bumper, but for what I need, I don't have a single regret or complaint. And, pretender detail or not, you've got to love the way this Westin looks on the front of the Ex.

Now, I just need some lights up there for those evenings on the local logging trails, and dear lord somebody get this thing a respectable set of tires.

:exp:


that looks sharp, good clean work i really like it! i wish that i would've had this when the large buck decided to jump in front of me a few months ago.


that looks sharp, good clean work i really like it! i wish that i would've had this when the large buck decided to jump in front of me a few months ago.

Thanks Jen. I just read up on your recent adventure. Always worse when when you getted whacked while out of town. Hope you get all those bugs sorted out.

:exp:


Finally

So, with a few big tickets items paid off ...
  • Taxman wants all his money. Check
  • Daughters' college fund up to date. Check
  • Wife's Trailblazer (I know, sorry) paid off. Check
... in a stunner, there was a little bit left. That can mean only 10 things:

t+r 1.jpg


t+r 1a.jpg


Tires and rims. A weekend warrior's dream.

I went with a set of 5 Goodyear Duratracs, 33x12.5, after reading a ton of reviews, both here and elsewhere. The weight was modest, I found tons of praise for both the on- and off-road capability, and I knew living in Upstate New York that I'd need a snow-rated tire for buried asphalt and winter trails. I checked out my local Goodyear dealer, who told me he could order them and have them in 10 days. I went online to Tire Rack and had them in 3 days at a better price (once their tech called me to warn me about the rollover risk of my first generation Explorer. I sent him to this forum so he could learn that my 01 Sport ain't even close to 1st Gen -- too bad, I'd love that front suspension).

The rims -- 5 Black Rock flat black steel 15x10s -- were a bit more of a lucky find. I was orginally hunting for steel Mickey Thompson MT-28s, but after much searching and a few calls to MT, I was told they stopped making them. They didn't live up to the quality standards for MT rims, I was told. I then went to Summit Racing and placed an order on some Pro Comp steel rims. They shipped the center caps right away, and then told me the rims were on backorder. My only options were D-holed rims (hate the wagon-wheel look) and gloss black (like a prom dress on a pig for a trail truck). I waited almost a month for what I wanted, and then gave up. They were good about rhe refund, so no hard feelings.

I then took my quest back to this forum and found a few folks on here were praising Black Rock rims, so I checked them out. California made (except for the included center caps, which are stamped "Made in the USA" on the display side but had a "Made in China" sticker on the back), had a slightly higher load rating than the MT or Pro Comps, and had the exact 8-hole flat black look I wanted. I found them for a great price through Quadratrec, and they were here in two days. Which is a good thing, because my family was getting tired of me rolling those Goodyears up and down the driveway and were starting to ask where I got the money for them.

For the record, I know I likely gave up some off-road performance points going with 10-inch rims, rather than 8-inch. I just like the wider look, and I like the idea of giving the a lifted Ex a wider footprint. I also knew I was going to cause myself some trouble when it came to getting those front tires to turn lock-to-lock, so I put a few extra bucks aside for good reciprical saw and razor knife blades.

Since I ordered online sight unseen, I check one rim's fit before I opened the other 4 boxes or mounted any tires. The rim had a good, deep set, and didn't snag with any suspension parts.

t+r 2.jpg


It defitely had a wider stance than the stock aluminum rims I was running.

t+r 3.jpg


And, the big relief, they cleared the Sport's brake calipers just fine. Cozy, but fine.

t+r 4.jpg


With all that checked, I got the rubber put on them. That same local Goodyear dealer told me they were too big for him to balance (you'd almost think he was trying to avoid my money), but he recommended a local farm equipment place that found those 15-inch rims and 33-inch rubbers no problem after pulling off the 5-foot tractor rims from the John Deere that was in there before me.

I have to admit that I was stunned that the tires looked that much wider on the 10-inch-wide rims, and I had more than a few moments of doubt as I started bolting them up. The rear seemed to be fine, plenty of room to be stuffed under there, but the front looked like it might get interesting.

t+r 7.jpg


I might have gotten lazy and just decided to make 15-point K-turns for a while while I figured something out, but instead I used the time-honored method of forcing a solution on a delicate issue -- I mounted the tires on the truck about 12 hours before I was due to wake up with the dawn and head to Rausch Creek for their advanced offroading class. Figured I might need to be able to turn the wheels all the way for that, so I had no choice but to crack open those blades and hope I didn't wreck the joint.

:exp:


Nice updates.

I wouldn't worry so much about the brush guard not being for "hardcore wheelers." I have gotten a lot of great use out of mine. I think the notion that they are not for trail trucks comes from rock crawlers out west who are more likely to slam down on a rock rather than slide into a tree. I have needed to bend some smaller trees with my brush guard before and have been very glad to have it on most trips I've been on. If you ride tight wooded trails, a brush guard will do exactly as it's name implies. I still intend on building (or buying, I have no shame) a steel bumper but the $125 Westin showroom special is holding me over just fine. I think you'll be very glad you put it on.

Looks awesome, too!


I think the 10" wide wheels are better than the 8". I run both size's on 2 dif rigs, with 12.5" wide tires. You get way better handling with the 10" wheels on/off road. That wider stance really helps when your lifted. The 10" wheels will put more tread contact on the ground, for more traction. The trade off is a little less sidewall height/cushion, but hardly noticeable IMO.

If it makes you feel any better, chances are you would have had to do the same to the sheet metal no matter which wheel you went with.

It is def looking good, and that brush guard high mount is very nice, and smart to boot. :)


Join the Elite Explorers for $20 each year.
Elite Explorer members see no advertisements, no banner ads, no double underlined links,.
Add an avatar, upload photo attachments, and more!
.


OffTrac – I'm with you, that brush guard has already come in handy on a few tight trails. I'm much more confident in and around brushy spots. That's how that turkey ended up bouncing off it.

gmanpaint – Good to hear your take on the rim width. Given the monster work you do, and that you've run 8s and 10s, I'm sold. I have to admit, with about 5 inches of lift, I wanted a wider base, and I'm getting exactly the feel I hoped for out of these tires. With the add-a-leaf and twist up front stiffening things up, and the extra 6 inches of width (3 inches or so each side going from stock to these, by my rough measure) I'm feeling way better on sideways trails and country roads.

Trimming was fun, but I've hit a good spot on that. I'll post some pics and suggestion and soon as I get back from a little snowtrail riding today.

:exp:

And Rick, thanks for the move. I love faking that I'm smart after reading everyone else's great ideas. Hopefully, I can help a few more folks fake it too.


Back
Top