supercharged 5.0 true fire 98 explorer sport | Page 170 | Ford Explorer Forums

  • Register Today It's free!

supercharged 5.0 true fire 98 explorer sport

its been a busy weekend. got the heater core done, i also did some cleaning and moving around my hoard pile of parts in my shed. today i was going to kick back and take it easy, then my phone rang which lead me to go get this.

441319531_1165553844795617_7131789810562646948_n.jpg


i got it fitting real nice, but when i put the weather strip on, and the latch, it kinda threw it out. i also didnt notice, but i will have to make a extension for my pinch weld at the cowl. to big of a space. i will have to fiddle with it some more, but i will do it later.

441270362_777867430754897_6211297642673965968_n.jpg

437667686_926028842650252_5319380043613678592_n.jpg


if you look at the back edge, it sits a little high. will deal with that this week when i have some more time.

440404147_10159465491512513_5249782249612354665_n.jpg


also when i went to pick the hood up, he had a car sitting in the both with a cover on it.

"guess you didnt see this the last time you where here"

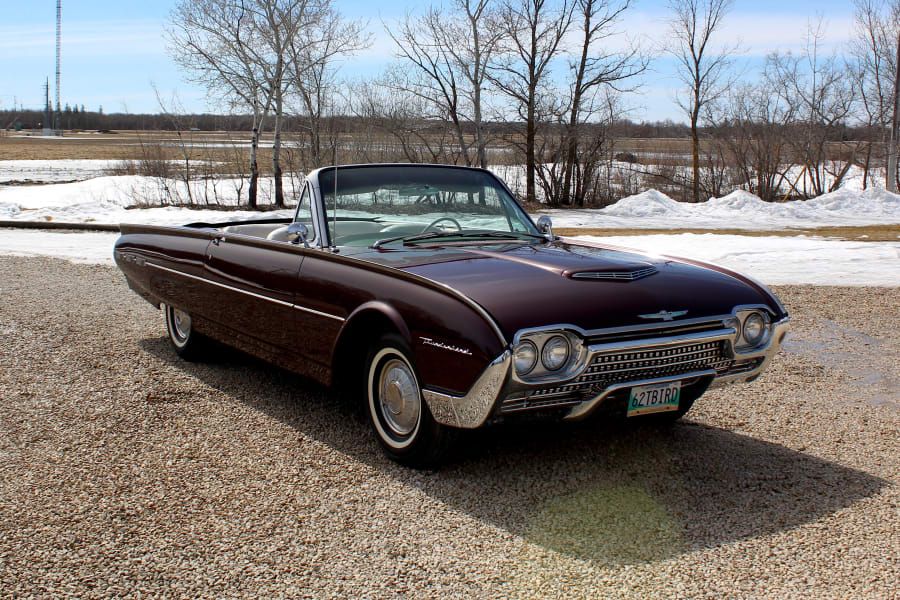
"what is it?" he rolls the cover back and there is my bother in-laws fathers 62 t bird.

"they are coming to pic it up today, should be here soon"

i forgot his dad is selling off his cars because they have their house up for sale, and no longer have storage. so if you are able, on Thursday it goes up on auction.


Join the Elite Explorers for $20 each year or try it out for $5 a month.

Elite Explorer members see no advertisements, no banner ads, no double underlined links,.
Add an avatar, upload photo attachments, and more!
.


Progress looks great!

I'm really interested to see if you can get the back of the hood to sit down. I tried everything I could think of and settled for a little offset on mine.


Can you slot the hinges where they bolt to firewall and move them down 1/4”?


∆ makes sense


Progress looks great!

I'm really interested to see if you can get the back of the hood to sit down. I tried everything I could think of and settled for a little offset on mine.
Can you slot the hinges where they bolt to firewall and move them down 1/4”?
that was the first thing i did. it did help. i will take the weather strip off, and bend the pinch weld down a little and see what that will do next.


that was the first thing i did. it did help. i will take the weather strip off, and bend the pinch weld down a little and see what that will do next.
It looks awesome! I'm sure you will get it sitting and looking the way you want soon.


no word on the flame guy. im good with that at the moment because it got busy here for me real fast.
bought another truck to flip, however i may have screwed up on it, shes got a lot of barnacle that will need fixing before it can be saftied, not awesome. also the amp in my 07 ranger decided to leave the chat as well. good thing for me i have a buddy that works at a auto video store and does all the car audio stuff.
however, after waiting a month, my mount is back from the machine shop. what sucks it they couldnt move my IAT sensor. they were going to drill and tap a hole , but it would have been right on the weld and near the cooler. i said if hes not sure thats a good idea, dont do it. i bought a bung for them to weld in, but it just melted into a ball, so that was the end of that. he did mill the bottom of the mount, but had to stop short, or my holes for the injectors would have opened up to big, and they would have fallen into the bottom intake. it did make a little difference, but not totally flat.
started to do a little on friday, then saturday was rain (surprise on a may long weekend here.....) today however was nice so i had at it.

442421791_1188965979125873_5017767825151044201_n.jpg


i made a few more small changes. i moved my coil driver down below the supercharger. this gives me a little more room up top so its not as crowed at the back of the supercharger. i as used a gasket this time at the base where the supercharger sits on the mount. trying to separate the the 2 was not a fun thing. this also makes it a lot easier putting it all together and apart because its not as heavy (and i aint get'n younger either). i am using arp bolts instead of the grade 8 ones. was a little on edge the last time when i was torqueing them down (35 ft/lbs going from the mount to the head, and if that bolt broke, off come the head, nope. no)
when i made this mount, i kinda also made one error and that is at the back where the outlet for the cooler is. it comes out to a 90 degree fitting, then a short hose, to a joiner because you couldnt unscrew it before. the problem was that hose is right above the back bolt on the passengers side of the intake, and no matter what i would do, i couldnt get a socket on it. now putting it together like this, i can put the hoes on later, and torque that bolt, hopefully no leaks either. i can also torque the supercharger to the mount now as well......right up until the bolt gets loose before the torque wrench clicks........its staying that way because i am crazy like that. i will check for leaks tomorrow.

speaking of, i didnt get as far as i wanted today, but further ahead then i was yesterday. hopefully it will be nice out so i can finish it up, scale the new IAT check over everything to make sure all is good, then set a appointment with moe's speed shop to continue with the tune.

436578582_707389371413192_289171199097785038_n.jpg


:mad:

442651116_25476549945325059_6885181588639324011_n.jpg


436667506_463226686211321_4806348209179444246_n.jpg


leaking intake gasket make tim something something.

so its back to looking like this again.


called the guy who built the motor for don, and also machined the lower intake for me. had said to use some aviation gasket sealant or yamnar gasket seal on the gasket because the intakes can or will warp overtime. i can see that after what i have done with it. looks like i wont be driving it this weekend. i also discovered a way to test the motor without it being completely together, so i will be doing that for now on as well.


I hate walking backwards. Crap .

Is it out of line to smear the head and intake surface, with gasket in between?

i would say no because i do believe thats what he was telling me to do. never done it before, but hey that dosent mean it wont work. i will find out tomorrow or the next day when i try to put it back together.


Double up the gasket? Thicker gasket? Yamabond? That stuff is like a permanent gasket

Geeze man! At least you know where the issue is and can see it with your eyeballs that usually means it can be fixed


Double up the gasket? Thicker gasket? Yamabond? That stuff is like a permanent gasket

Geeze man! At least you know where the issue is and can see it with your eyeballs that usually means it can be fixed

not a big fan of doubling up gaskets.

i did get that gasket sealant today, its this stuff.

81I+HzDgrVS._AC_UF1000,1000_QL80_.jpg


it looks like baby $hit, almost smells as bad to.

loctite-mr-5923-viscous-liquid-thread-selant-396003-29192-color-reddish-brown-l.jpg


this probably would be wrose for getting it on your hootus, then herculiner, major sticky stuff and i can see it not being any fun getting it off any surface. put that on as well as the lower intake, and mount. will let it sit overnight and retorque. hopefully this solve my problems.


I've used that on different things and yes it works well. I just don't recall a temperature rating on it. I stays pliable and isn't that horrible to clean up.


That looks similar to an old sealant product that was popular in the late 70's. I hope it's better, when it's old it is very very hard, and hell to scrape off. I used it for sealing a water pump twice(Cleveland), and a thermostat gasket at least once. Back then there were not many RTV choices, those were just coming out. We used Spray Tack by Permatex a lot too, it was great for the WP gaskets, after I learned how hard that brown stuff was to get off.

If the two mating parts are well fitted together, no major gaps, nice even gaps, then any Ultra RTV should seal it well. I would again double check the fit of the intake to the blower plenum, look at it all very closely. I hope you get it sealed up soon.


Use this stuff its great

Permatex-The-Right-Stuff-Black-1-Minute-Gasket-Maker-7.5-OZ-85224-1.jpg


Indian head gasket schellac

Permatex makes it! Can’t use an Inian head for Marketing anymore otherwise your head gasket glue maybe considered racist
Is the old brown stuff you are talking about

They still sell it! I have some

It worked wonders pita to scrape off, but it fixed any leak basically glueing the metal bits together lol


I’m worried that any rtv or sealant will blow out of that hole under high boost
Which is why I was thinking of stacking gaskets, to fill the gap. Nobody wants to stack gaskets but it does fix machine edge problems!


My upper and lower intake
The intake lid
Blower
All rtv
The Moddbox r&d guy said that gaskets were blowing out lol

I emailed them asking for gaskets and he told me no lol

I'd hate to see it leak again


I've used that on different things and yes it works well. I just don't recall a temperature rating on it. I stays pliable and isn't that horrible to clean up.
im going to say it should be ok temp wise, the engine builder that dono used for this motor, and he has also done work for my other motor recommended it, and he is very well known in these parts lol.

Use this stuff its great

View attachment 452718
OH HELL NO! lol. i have used that in the past. it works well. actually too well. just want it to seal, not liquid weld itself together lol.

Indian head gasket schellac

Permatex makes it! Can’t use an Inian head for Marketing anymore otherwise your head gasket glue maybe considered racist
Is the old brown stuff you are talking about

They still sell it! I have some

It worked wonders pita to scrape off, but it fixed any leak basically glueing the metal bits together lol


I’m worried that any rtv or sealant will blow out of that hole under high boost
Which is why I was thinking of stacking gaskets, to fill the gap. Nobody wants to stack gaskets but it does fix machine edge problems!

fair enough. when i tested the motor for leaks, i know i was above 13lbs (cant say for sure how much but was more then what it would make in boost). the last time i had this problem i was using a buddys home made smoke machine. he had used a bbq regulator to bring the pressure down. i used a old valve that i had on a air sanding board. i wanted to go a tad overkill that way i knew i wouldnt have problems down the line.


after ark like rain for the past 2 days it was back to smelling resin cure. i think however those 2 days were a good thing. i think one of the problems was i wasnt letting everything dry before smacking air at it. this time it had 2 days to dry. pushing air into it, and doing my little bubble test, snowed no leaks. the next was putting water in, once again success! with that all said it finally let me win one.

444483710_10159505116137513_1009505795471074226_n.jpg


was going to start it when i forgot i have to scale the new IAT. with that, i needed my laptop.......which has been sitting since october. so now it waits till tomorrow. no big deal, fat guy was hungry anyway.


Join the Elite Explorers for $20 each year or try it out for $5 a month.

Elite Explorer members see no advertisements, no banner ads, no double underlined links,.
Add an avatar, upload photo attachments, and more!
.


she crackled to life tonight. had to get a buddy to help scale the temp sensor. also forgot i had to do a map sensor as well (drop down menu, easy one).
for whatever reason my fans were kicking on as soon as i turned the key. will have to look into that one, also still getting high IAT's. was hoping the new sensor would read a little different, but nope. was 56F with the hood open, after idling long enough to burp the coolant, it was reading around 145F for IAT's. that sucks. it also is idling on the high side. around 950rpms. going to look and see if i have a vacuum leak someplace else, or if the throttle blade is hung up. it also will idle fine for a min or 2 then die for no reason. it wont start unless i turn the key to off, then back on again. im sure that is a tuning issue. cant remember if it did that before or not. but its running now, and i can move it.


Featured Content

Back
Top