2000StreetRod
Moderator Emeritus
- Joined
- May 26, 2009
- Messages
- 10,597
- Reaction score
- 334
- City, State
- Greenville, SC
- Year, Model & Trim Level
- 00 Sport FI, 03 Ltd V8
Tensioner tool
I decided to convert my old rear tensioner into a tensioner tool to use during my future engine rebuild.
Plan A was to drill a .25 inch diameter hole thru the piston and the housing and then install a .25 inch treaded hex stove bolt with a nut at the piston end to adjust the extension to the desired amount and a nut at the housing end to tighten to compress the piston. I quickly learned that the piston was made of tempered steel and my high speed drill bits would not hardly even scratch it. I purchased a small diameter titanium drill bit just to see how thick the piston was. I was thrilled when the bit broke thru the piston but then puzzled when a firm, black substance started traveling up the bit. I realized that it was hardened sludge that probably had been blocking the oil relief hole in the piston. This situation is another reason to change the tensioner every 75,000 miles. The drill bit made rapid progress thru the caked sludge but then hit something hard. It turns out the piston is not open at the other end.
Plan B was to only drill a .25 inch diameter hole thru the hex head end of the housing, thread the opening and screw a long cap bolt into the housing until it pressed against the inner end of the piston to keep it from retracting. Working my way up in diameter from .125 inches I settled for a 3/16 inch hole since the housing was quite thick and hard. Unfortunately, the housing was too thick and hard for a self tapping bolt to thread the hole.
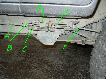
Plan C was much simpler and easier and I should have thought of it first. I merely cleaned the piston and housing at the area where the two intersect, mixed some two part epoxy and applied it to the piston and housing. I stood the tensioner up vertically so the epoxy would seep into the crack between the piston and the housing. I heated the tensioner with epoxy over one of the burners on my wife's electric range and then took it out to the garage to test it. The arrows in the photo below indicate the location of the applied epoxy.

My tensioner tool was easy to hand thread into the rear tensioner opening. As it increasingly pressed against the guide and tensioned the chain I switched to a 1/4 inch drive torque wrench with a 27mm socket. The epoxy held the piston in place as I increased the torque to 20 in-lbs which is adequate to make the chain taught.
I decided to convert my old rear tensioner into a tensioner tool to use during my future engine rebuild.
Plan A was to drill a .25 inch diameter hole thru the piston and the housing and then install a .25 inch treaded hex stove bolt with a nut at the piston end to adjust the extension to the desired amount and a nut at the housing end to tighten to compress the piston. I quickly learned that the piston was made of tempered steel and my high speed drill bits would not hardly even scratch it. I purchased a small diameter titanium drill bit just to see how thick the piston was. I was thrilled when the bit broke thru the piston but then puzzled when a firm, black substance started traveling up the bit. I realized that it was hardened sludge that probably had been blocking the oil relief hole in the piston. This situation is another reason to change the tensioner every 75,000 miles. The drill bit made rapid progress thru the caked sludge but then hit something hard. It turns out the piston is not open at the other end.
Plan B was to only drill a .25 inch diameter hole thru the hex head end of the housing, thread the opening and screw a long cap bolt into the housing until it pressed against the inner end of the piston to keep it from retracting. Working my way up in diameter from .125 inches I settled for a 3/16 inch hole since the housing was quite thick and hard. Unfortunately, the housing was too thick and hard for a self tapping bolt to thread the hole.
Plan C was much simpler and easier and I should have thought of it first. I merely cleaned the piston and housing at the area where the two intersect, mixed some two part epoxy and applied it to the piston and housing. I stood the tensioner up vertically so the epoxy would seep into the crack between the piston and the housing. I heated the tensioner with epoxy over one of the burners on my wife's electric range and then took it out to the garage to test it. The arrows in the photo below indicate the location of the applied epoxy.
My tensioner tool was easy to hand thread into the rear tensioner opening. As it increasingly pressed against the guide and tensioned the chain I switched to a 1/4 inch drive torque wrench with a 27mm socket. The epoxy held the piston in place as I increased the torque to 20 in-lbs which is adequate to make the chain taught.