Completed Project - jamest's "RE-SAS" | Page 9 | Ford Explorer Forums - Serious Explorations

  • Register Today It's free!

Completed Project jamest's "RE-SAS"

Use this prefix for completed projects that are not "How to" articles or threads asking for help.
... or SAS pt.II, or SAS redeux, or axle remix thread. :p:

As some of you know, ive recently got a 94 sport that is the typical fullwidth HP44 with coils/arms, fullwidth 9" type swap. Its currently on radial 36" Iroks.

Right now im lowering it down 4" and extending the wheelbase a couple of inches. It wheels great but its just too tall for what i want to do. Ive got some Bilstein 7100's in the mail and my general idea is to make this more of a dual sport type rig that can get it on the rocks and also be able to blast some fire roads and play on the sandbars here in the summer.

Currently the truck has 4" blocks under the back and a "W" shaped set of hybrid 4 door packs. Im going to take the blocks out, throw on a freshened set of low mile 4door leaves with the overload removed, run anti-wrap pertches with the holes redrilled to move the rear back on the springs 2".

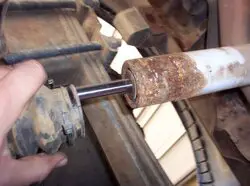
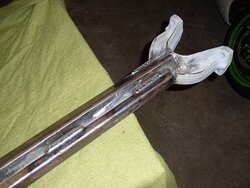
Pic below is why you DONT run shock boots. This was an Arizona rig and never really saw any mud after sureshot40sw bought it-
 

Attachments

  • sas1.jpg
    sas1.jpg
    75.8 KB · Views: 4,791


Join the Elite Explorers for $20 each year.
Elite Explorer members see no advertisements, no banner ads, no double underlined links,.
Add an avatar, upload photo attachments, and more!
.


Ive been working on new radius arms all week since my current ones are bent.

These will be direct replacements for what im running now, but hopefully a bit stronger. To start with, im using 2" .250 wall square tube turned at an angle and welded to a short piece of stock radius arm.

The joint is a weld on blue torch fab, no need for a threaded end as i already have a length example to build off of. I tacked the tube to the radius arm heads, and then tacked the joint to the tube, then carried it all down to my dad's and burned it in with the miller bobcat. Ive been practicing with the stick... but they're still pretty ugly :p:
 

Attachments

  • sas42.jpg
    sas42.jpg
    97.8 KB · Views: 1,628


Join the Elite Explorers for $20 each year.
Elite Explorer members see no advertisements, no banner ads, no double underlined links,.
Add an avatar, upload photo attachments, and more!
.


Im running a truss down the length of the bottom... the reason for this is twofold. One, it adds quite a bit of strength and two it gives the arm a flat bottom that will slide over rocks easier.

The truss is a piece of 1.5" .120 wall cut in half. Even though its only 1/8", it will be plenty strong. It rests up against the edge of the 2", and i cut grooves in it and welded it down the bottom.

Not quite done yet but you get the idea-
 

Attachments

  • sas43.jpg
    sas43.jpg
    133.7 KB · Views: 1,837


Lookin' good man!


Arms are done and on, now building shock hoops for the front.

This is a PITA. No problems building the hoops, the main issue is how tight the areas they need to mount are... besides removing the 4wheel ABS pump and replumbing the brakes there are also about 20 different wiring harness plugs that need to go somewere else.

Hindsight is 20/20, but instead of a 14" shock up next to the coil, i should have went with a stiffer 10-12" shock and moved it back on the arm some. It wouldnt have been ideal, but it would have been alot easier. My main issue is the fact that my shocks are really long and need to mount up top in a spot that is what can only be described as an over-engineered Ford cluster#$%&.

Wish me luck. :p:
 

Attachments

  • sas45.jpg
    sas45.jpg
    135.5 KB · Views: 772


They're on and done, next comes the brakeline replumbing and moving a few harnesses around.

Hindsight = 20/20... it would have been alot easier to tack everything together and weld it all up off the truck, then weld the frame mounts on when its all done.
 

Attachments

  • sas46.jpg
    sas46.jpg
    148.6 KB · Views: 773
  • sas47.jpg
    sas47.jpg
    142.6 KB · Views: 745


Hoops gotta have some re-work done. When adding the middle brace tube i was not thinking of the reservoir hose which hits it and doesnt allow the shocks to bolt up. I spent alot of time cutting a piece of tube in half, grinding it all to fit so as to have a relief notch, etc. and that wasnt enough. The center bar down to the coil tower has to go forward a few inches. No biggie. :p:


Welcome to my life!


Brakes are plumbed and bled.

If you want to get rid of the 4wheel ABS pump, this is the easiest way-

You will need 3 male ends for 3/16" brake line, a female T for those ends, and your standard brake line cutting and flaring tools. The thread size doesnt matter so long as its all for 3/16" line, and your fitting threads match the T block. Your Explorer has a mixture of 12mm and 10mm fittings on standard 3/16" line.

The factory rear brake line that runs to the ABS pump gets bent upward and screws right into the brake master cylinder. Bam, you're done with the rear.

The front is where your new ends and the T block come in. Mount the T block on the frame around were the ABS pump used to be. Us the factory master cylinder-to-ABS pump line to go to the T. Cut the end off the bottom of that line and add your new standard fitting, and reflare it. Your other stock front brake lines (the ones that run from the frame to the drop lines to the caliper) will get the same treatment. Just cut the ends off, and the new ends and flare it.

I can tell you now if you can find a metric brake T block that is for 12mm threads you dont have to change the ends. I could not find such animal... not even online.

Just putting this out there incase some of you want to get rid of the 4wheel ABS pump- i couldnt really find alot of info on it. Thanx section525 for your help.

:)


Welcome to my life!
Haha, what really sucks is i wasted an entire day trying to make them work. I worked my ass off on making that notch and it looked pimp- but it didnt work either. :p: I already had them painted and everything!


Well, i blew the stock 9" carrier apart last weekend. Somehow the lockright is still alive, but the edges of the teeth are pretty worn. It is time to build the new 3rd and be done with it all. Now i shouldnt have any more worries with the rear end.
 

Attachments

  • sas49.jpg
    sas49.jpg
    93.7 KB · Views: 678
  • sas48.jpg
    sas48.jpg
    101.9 KB · Views: 659


Started on the rear shockmounts.

The shocks are outboarded right behind the housing, just slightly leaned back and in (about 80 degrees back and 85 degrees in) and the mounts come through the fenderwells.

The really clean tube going from cage to mount is 1.75" 3/16" wall DOM i found in the scrap metal bin at work. It will be gusseted to the cage along with a crossbar that will go over the spare. Overkill for non-weight bearing shocks, but the crossover bar along with the rear hatch will hold the spare in place without actually bolting it down. Flip the hatch up and the spare will slide in and out
 

Attachments

  • sas50.jpg
    sas50.jpg
    102.7 KB · Views: 659


Thats beef James! Beef!! Cant wait to see the rest of the tooobs.


Good work man. I dig those hoops. I really want to do that with my brakes and my buddys bronco's brakes. Thanks for posting up!


Can you post some additional pictures of your radius arms? I'm thinking about building a set for myself.


Can you post some additional pictures of your radius arms? I'm thinking about building a set for myself.
Ill get some later this evening.

Mounts are coming together slowly but surely. I hope to have it all done by tonight.

Gusset is 3/16" plate with more redneck speedholes- these should also make a nifty tie down point for gear
 

Attachments

  • sas51.jpg
    sas51.jpg
    97.6 KB · Views: 666


Done

Ran out of bolts or i would've mounted the shocks.

The little inner gusset with the holes in it is .25", it would have been alot stronger had i ran it down to the bottom of the mount but i needed the room for spare tire and gear.

Either way, i think its kinda overkill but it'll do. :D Fits an irok with plenty of room leftover... could fit a 38.5x14.50 SX in there if i cut the plastic on the back hatch but im not ever going bigger than a 37" anyway.

For now the spare will be held with ratchet straps... mount will come later
 

Attachments

  • sas52.jpg
    sas52.jpg
    82.1 KB · Views: 684
  • sas53.jpg
    sas53.jpg
    94.9 KB · Views: 644


Double bling! I like it a lot. :cool:


Join the Elite Explorers for $20 each year.
Elite Explorer members see no advertisements, no banner ads, no double underlined links,.
Add an avatar, upload photo attachments, and more!
.


A couple of pics for zainyd-

Understand, running the square tube "daimond style" instead of "flat" its actually weaker... however the truss on the bottom more than makes up for the difference. It also gives a nice flat surface to slide over rocks. If you're not gonna do the truss, then turn the tube flat.

Looking back on it, i wish i would have ran a threaded in joint instead of weld on. I warped the ever loving **** out of the threads in the joint and had to grind them down and weld in the caps, which means these wont be rebuildable. :rolleyes:

You can see tire marks on the sides of the arm in the pics- yea i need to set my steering stops. :p:
 

Attachments

  • radiusarm1.jpg
    radiusarm1.jpg
    71.7 KB · Views: 619
  • radiusarm2.jpg
    radiusarm2.jpg
    92 KB · Views: 642


Back
Top