120:1 | Ford Explorer Forums - Serious Explorations

  • Register Today It's free!

120:1

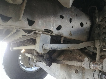
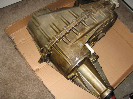
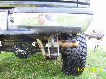
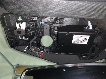
I finally got around to getting that doubler in and getting most of it squared away. Swapped out rad arms and got new mounts for them. New tranny cross member that doubles as a skid. The cross member supports both eh tranny and the doubler. With that much added leverage on an aluminum housing it wasn't a bad idea to put in a little support. Now it's got clean lines with a flat belly. Rad arms now can act as sliders and everything is up and out of the way. Total crawl ratio is about 120:1. There are a few more things to finish up, need to get the drivelines build and it should be ready to go.
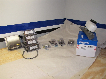
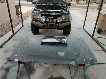
Also modified the coil bucket. Get a bit more flex out of it. I'll need to ramp it again to get definite numbers, but limit straps are in the picture. I will need to get some new shocks as the current are not the proper length and are shot. On with the pics.

P3120015.jpg


P3120001.jpg


P3120009.jpg


P3120006.jpg


P3120005.jpg


P2280003.jpg


P2220008.jpg


P2280003.jpg


Join the Elite Explorers for $20 each year.
Elite Explorer members see no advertisements, no banner ads, no double underlined links,.
Add an avatar, upload photo attachments, and more!
.


Allright!! Someone's finally got their T+M installed. :thumbsup: I forget, were you part of the last group buy, or did you get it from someone who was?

Can you post a pic showing how the new crossmember supports the doubler? I want to do that with mine.

How are you getting 120:1? 5.13s?

Nice beefing of the Rancho RA brackets!


Once it started coming together, the skid was finished on the truck. So I don;t have any pictures of it off the truck. As far as the doubler support, I will get some when I get back into town.

The 120:1 is more of a rounding, in reality it's a touch above 117:1. With the 3.72 5sp x 6.25 doubler x 5.13 gears

BTW RangerX, good call on the rancho RA Brackets. Those are just the part that the actual bushing fits in, the rest of the bracket was scrapped. The support is made from 1/4" steel that was heated and rolled to shape. (long process!!) If I rip that bracket off, something else is coming with it.


looks good. When do you plan on "testing it" or taking it out on the trail?

-Drew


Can you take a pic of the side of the crawl box where they sealed the gap b/t the adapter plate and the 1350 case?


after much looking around i think i will too be going with a doubler. prolly will end up buying the stubler from 4xfab


Well, as far as testing it, I need to find some rocks that aren’t buried in the snow. Currently everything is still covered by white stuff so most trail runs end up being snow runs and don’t really require the use of a doubler, but I will keep my eyes open.

Redranger4.0, I think the stubler is a great idea, had it been around when I got this, I prob would have gone that route, a little less fab work in the end I believe.

034x4 Are these what you were looking for?

P2220001.jpg


P2220002.jpg


FINALLY

Now does it work? hahaha


Signing up for progress reports.

Looks good! Did you figure all this stuff out by yourself?


There wasn’t really much to figure out. The actual install is fairly simple and straightforward. Then from there you're stuck with a driveline that's too short and one that’s too long. I took those to a local drivetrain shop and talked to the owner about options. After some research we came up with a couple solutions and had him build me a new rear driveline and extend the front. As far as the skid plate, that’s all just fab work that was worked out along the way. You've got you're low points with the t cases and you can go from there. The tranny support needed to be added, then the doubler support was built. This is just what was produced at the time. I didn’t really follow any design concepts or anything, and who knows, after a few runs out, I may find some flaws and decide to modify. There is one thing for sure, this set up doesn’t make for an easy t case/tranny access. For a better system, I would recommend sitting down and figuring a way to build a skid and then add the rad arm mounts separately. That may be something that I might regret later on, but in my mind, I'm thinking for the simplicity of the build, a few extra bolts and the rad arm bolts shouldn’t be that big of a deal to remove when needing to remove parts from the drivetrain.


Here’s a couple shots of the drivelines, the top one is the extended front, the one below that is the stock length one minus 2” for the front D35, this is just there for a comparison. The next two are the rears, one is a standard u joint style and the other is a cv style. They ended up around 23.5” static. One will be a spare. I may retube the other front d shaft as a spare as well. There are still a couple more pic requests I need to get, but I had some time last night I figured I would put in the d lines.

P3170001.jpg


P3170005.jpg


Wow, that rear driveshaft is short. :eek: Then again, I'm used to my 114" wheelbase. ;) Did you do anything to help that angle it must be at, like a double cardan joint, or clock the rear axle?


Why does the front shaft need to be modified? What did I miss??


Front D shaft needs to be lengthened. The rear needs to be shortened. And yes, the 94" wheelbase can be a killer. For me optimal woild be anywhere between 100"-110" (closer to the 110" mark) As far as the rear axle goes, it's up 18 deg ( 21 deg to the t case minus 3 deg to keep the u joints running on the needles) And the t case is down 5 deg.


I understand the rear being lengthened but why did the front need to be shortened?


The doubler goes between the trans and the stock T-case. That moves the stock T-case back 8.5". That means the front shaft needs to be lengthened to reach it. ;)


Join the Elite Explorers for $20 each year.
Elite Explorer members see no advertisements, no banner ads, no double underlined links,.
Add an avatar, upload photo attachments, and more!
.


To lengthen that stock front one a piece of 2.5" .120 wall tubing will slide over it. Cut it in half and well a new tube in between. I did that on mine and it works great.


Back
Top