Betty's "I want to be a mule" progress log thread | Page 70 | Ford Explorer Forums - Serious Explorations

  • Register Today It's free!

Betty's "I want to be a mule" progress log thread

The new turd mobile. 2000 Mountaineer v8 awd.


The bad:

Was living it's prior life on a dusty road. Must tear out interior and deep clean.
Driver window off track "or something" and will not roll down. It tries but the rear part wants to stay up.

3 out of 4 door handles have issues. I have 4 new outer handles on order.
Cracked passenger side tail light housing. ( Ebay for some cool tail lights)

Compass-Thermometer thingy lit up and went out--idunno bout that yet

Door locks seem sticky, probably has to do with the handles.
It has a funky purple color trim with red metallic ( you'll have that every now and then) :(

The good
Gas tank was full
109k miles
I am the 2nd owner!!
Is from the local area, which means no salt!
The undercarriage is fairly clean
No dents to underside panels
Good rubber
Camber shims already installed
Looks like good service records, all recalls were completed.
Clean carfax believe it or not.

The "maybe" bad

The original owner, told the dealership it had a bad "heater core" however I have run it for several cycles, over an hour each idling in the driveay and see no leaks.
However, there was evidence of a windshield leak or the like,I saw condensation on the inside of the windows this AM. The moisture smell is that of water only-no anti freeze smell. I am thinking it could also be a cowl drain which is clogged???? but she did say the passenger carpet got wet.

I tried to get heat, however it is an auto climate control. Being 90 degrees outside, I doubt it would have given me heat.The heater core hoses were hot, and the coolant bypass valve does operate. AC blows Ice cold.

Maybe she meant to say "heater door"???

Anyway--here are the pics.


My intent is to drive this and use it as a tow rig for a light weight off road toy. Mods will be minimal. Edit: This plan did not work out so on to plan "b"

Current visual status

001-8_zps25438bd5.jpg


Progress pictures
025.jpg


026.jpg


027.jpg


028.jpg


031.jpg


032.jpg


044.jpg


043.jpg


042.jpg

038.jpg


Now, let's clean it up a little


Herculine'rd rocker panels. Rock sliders installed

005-4.jpg


004-3.jpg


BW 4406 True 4x4 Manual transfer case ( AKA Mouse entry point) installed 8-27-2012
Installed newer Tcase from a 2003 11-14-15

003-7.jpg

Saw a rainbow in Colorado so yeah, time for a picture
119.jpg

And here she is, on top of the highest pass road in North America. Careful tire placement a must!!!
041-1.jpg


2-2-2013

Changed "color scheme" of the Dick Cepek DC1 wheels. New Falken Wildpeak AT 31x1050x15

005_zps519396ed.jpg


Then I decided Maroon washer on the wheels would look better

006_zps9145ce92.jpg


003_zpse4691714.jpg


Update 6-6-2013

New bumpers, winch and Pro LED light . Front Bumper from RLC, Skid plate from RCI, rear bumper from Kert307


001-8_zps25438bd5.jpg


002_zps7dd4e30f.jpg


Rear anti sway disconnects

004_zps1b757042.jpg


Update 9-2-2014
A cracked radiator at 70mph led to engine failure. Replaced with a freshened up a bit 80k mile engine starting on page 23

001_zps0a3e1791.jpg


Found another rainbow in Kansas.

008_zpsarhv1lwt.jpg


Join the Elite Explorers for $20 each year.
Elite Explorer members see no advertisements, no banner ads, no double underlined links,.
Add an avatar, upload photo attachments, and more!
.


Aw fudge. I knew I was forgetting something but was just reminded.
I need limiting straps.

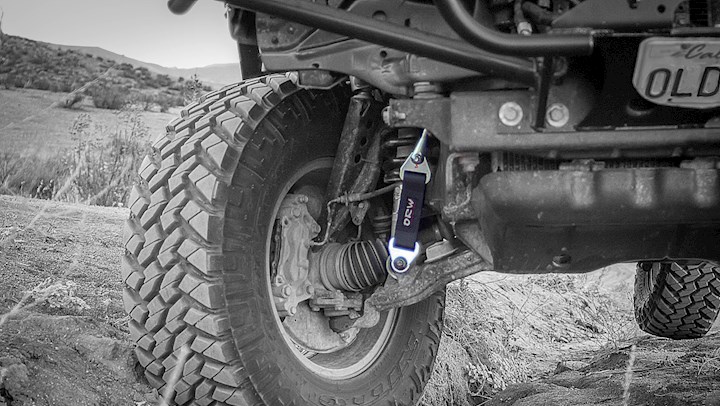
So, I need recommendations where to acquire them, and , installed pictures if anyone has em so I can sort out a mounting spot and measure for length.

4 ply?


Join the Elite Explorers for $20 each year.
Elite Explorer members see no advertisements, no banner ads, no double underlined links,.
Add an avatar, upload photo attachments, and more!
.


Pics of upsetting cv axle angle and control arm to coil clearance that'll make ya chew your fingernails off

P1000944.JPG
P1000945.JPG
P1000946.JPG
P1000947.JPG
P1000948.JPG


or at least it will chip your powdercoat. See why I said fudge? ( kinda didn't sound like fudge)


12" quad wrapped with grade 8 ends. Lots of good ones out there to choose from.

Can weld a set of strap mounts to the frame and lca.

Those upper adjustable strap links work well, but have to weld the mount higher, or use 10" straps.

Will post a link later when I can. Currently sitting around a campfire.


the TTX stuff is pretty decent, not holding up as great as I had hoped but still holding up better then most of the aftermarket junk

My wifes FJ cruiser the stock UCA was hitting her Fox coilover coil too....I clearanced them with a grinder until I could get aftermarket UCA with more extension to them

What is hitting? the shiny metal part of the UBJ?


@410Fortune Yup, its the big silver part that looks like a washer--spacer. You must have been reading my mind about the grinder because I was like " hmm, what if I just flip that control arm up and accidentally bump a grinder into it." hmmm

I do not see how removing the needed material would cause a problem so thanks for the permission.

@gmanpaint thanks for the tips. So, it is ok to just bolt a strap tab down and call it good?

Web ends, can be pruchased. I have a lot of black 12000 lb strapping. Wife has a few singers. DIY straps?


ok wow. I can get tie dye limit straps here


STB-AUT-LMT-POL-12K-7608.jpg


Thoughts about reboring this lower shock mount hole to 1/2", and mounting lower limit strap tab there following green line up to adjustable clevis-weld on tube mounted to frame in the general area of green line ending spot?

limit strap thoughts 1.jpg


looks like good a spot as any
here is a good read about installing straps


Thats a very informative read. I've been wanting/needing a set of limiting straps for a while. I liked the clevis idea for adjusting the straps.


Well, long time no see. Had to order some stuffs and wouldn't ya know it --- limit straps are not being shipped until mid september. lucky I found some on ebay.
Other stuff was slow getting here.

Now that I have these things in hand I have some pictures and questions.

question 1.
How do you get these bushings to go inside the spacer washers? Is this a press as you tighten in fit?
P1000956.JPG


And second question.
How does this placement look?
P1000953.JPG


Bottom shock bracket to side of control arm bolt was enlarged to 7/16 for this. @RockRanger


So the thick spacer washer ( included in straps package) is less than 9/16" but greater than 1/2" center bore. .520 or so. does not make sense because hardware in bushing kits is 7/16 bolt for both ends of strap. bushings have 9/16 outer. The thick spacer washers would need to have a 9/16" center bore to work. dubble yew tee F?

According to the "how to fit limit straps" link above 8" strap length was the sweet spot for the toyota, so I said " heck yeh it's the same here" . Looks kinda tight for up travel so I guess I gotta just remove the coils, tack the adjuster tube thingys there, and cycle the suspension to see if there is enough room for up travel before the strap eyes crash onto each other. Good times.


Ok. Ever notice how getting older means more stuff happening and the ability to deal with them slows down? Me too.

Lots of things getting in the way of priorities but we're back. going to let these stretch overnight because man I am just done.

P1000960.JPG


You are doing great :)


Ok, wow.
With the truck sitting level now, it looks lifted in front almost enough to fit 35" tires. 33" will fit for sure. I'll have pictures tomorrow after a hopeful alignment.

There are 7 shock threads showing above lock ring on driver side, 6 showing on passenger side. About an inch of pre load give or take is ll it took to get it up in front. wowzers
Before was 10.75" to center of lower control arm bolt. Now it's 12.5" without getting greedy.


Those coils will settle. Take it for a spin around the block. Swerve side to side, hit the brakes hard a few times, punch the throttle, etc...

Then remeasure, adjust height as needed. Best to do this before the alignment.


Join the Elite Explorers for $20 each year.
Elite Explorer members see no advertisements, no banner ads, no double underlined links,.
Add an avatar, upload photo attachments, and more!
.


It looks great Jon!


Back
Top