Scott B.'s V8 Ranger Conversion | Page 5 | Ford Explorer Forums - Serious Explorations

  • Register Today It's free!

Scott B.'s V8 Ranger Conversion

I purchased my Ranger XLT new in September 1993. I ordered it from Ford – even had to wait an extra 2 weeks for delivery due to the floods in the Midwest. After driving the truck for almost 18 years, (including 9 trips across the country) I have put 320,000 miles on the original 4.0L engine and A4LD transmission. The time has come to replace the drivetrain.

The new drivetrain will be a 5.0 L engine (SN95) with an AOD transmission. I am going to run my stock BW1354 transfer case. I have already swapped in a 31-spine 8.8 rear axle.

The objective of the engine build is reliability and reasonable performance. I am looking for 275 – 300 horsepower, lots of torque, and to start every time I touch the key.

I plan to keep the truck OBDI for simplicity, and use my existing column shifter for operating the transmission.

I will detail the engine build here, and the conversion/installation in my build thread. (Starting on page 10, post 192)


Join the Elite Explorers for $20 each year.
Elite Explorer members see no advertisements, no banner ads, no double underlined links,.
Add an avatar, upload photo attachments, and more!
.


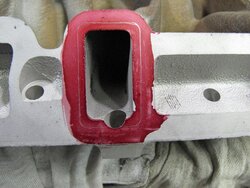
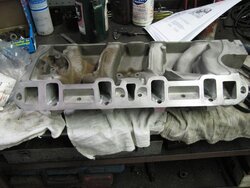
We are port matching the intake to the heads.

The gasket matches the heads perfectly - the intake has smaller ports. (The red on the intake is Dykem.) You can see the scribe line in the Dykem...

I thought these heads were good flowing heads. They will be now!
 

Attachments

  • Intake1.JPG
    Intake1.JPG
    79 KB · Views: 1,028
  • Intake2.JPG
    Intake2.JPG
    74.8 KB · Views: 1,022
  • Intake3.JPG
    Intake3.JPG
    78.1 KB · Views: 1,012
  • Intake4.JPG
    Intake4.JPG
    58.2 KB · Views: 1,001


Join the Elite Explorers for $20 each year.
Elite Explorer members see no advertisements, no banner ads, no double underlined links,.
Add an avatar, upload photo attachments, and more!
.


The lower intake will be powder coated to match the accessory brackets.

The heads and the intake are going to the powder coat shop (local - too heavy to ship to Turdle...) tomorrow.

As soon as the parts are done, the engine will get assembled. We are going to prime the oiling system, then I will be taking it home!

The plan is to drop it into the truck next Saturday!


Good looking build!


Nice! Opening up the manifold should help a lot:chug:


The heads and lower intake went to the powder coater's yesterday - should be finished today or tomorrow!

I modified the engine mount brackets I made - since I wanted to raise the engine. I'll post some pictures tonight.

Getting close!


Subscribed!
wish i had an obd1. the 347ci carbed wont pass...
but im in texas.. what the hell, haveing worked for ford, an extra 40 bucks gets me a sticker!


Way behind on pictures.... :(

Everything got bolted together, the oiling system was primed.

We had a problem putting in the distributor. The spring clip on the oil pump drive shaft turned out to be too high. A quick push down fixed that. (We though the oil pan might need to come off.)

I get a nice of valve covers from Ford Racing. Two problems. First, we had to grind off 3 mounting bosses on the underside of both covers so they would clear the roller rockers. Of course, that meant removing the baffle under the oil fill tube.

It turns out, that wasn't a problem. The oil tube, however, was a problem. In '94, the intake incorporated a 45 degree curved section to mount the throttle body. That put the throttle body right where the oil fill tube is. So, after removing the tube, we had to make a new one. The only place it would fit (due to the alternator) is on the forward-facing side of the cover. Fortunately, we were able to cut a new tube on the lathe, and cut a nice hole in the cover on the mill.

The engine has been at my house for a few days, and I have been doing some last minute prep - touch-up paint, replace a couple of bolts, etc. It is going in the truck on Sunday.

I've been doing more prep work on the engine compartment as well.

Pictures coming soon - really!


Are you doing the engine machining yourself?

I assume you mean the engine machining - no, a local machine shop did all that work. They usually build race engines, so they are not a run of the mill engine shop.

All the other work I am doing myself.


Yeah that's what I meant. It just seemed like you had such good pics of the process that I was guessing that you were doing it. I am trying to gather as much info as I can about that world before I drop off my 351 at the machine shop.


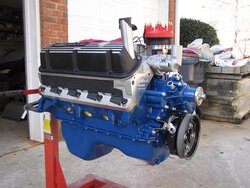
Here it is, about ready to go in.

You can see the dual block heaters, oil fill tube, the electric fan control temperature sensor (in the waterneck), and the crank pulley PCed by Turdle!

I got an oil pressure extension tube from the junkyard, but I am not sure I will be able to use it with the SN95 bracketry.

These pictures were taken before I put the oil filter relocation adapter on.
 

Attachments

  • Stand3.JPG
    Stand3.JPG
    86 KB · Views: 913
  • Stand2.JPG
    Stand2.JPG
    86.2 KB · Views: 946
  • Stand1.JPG
    Stand1.JPG
    91.5 KB · Views: 952


It's in!!!!!

We put the engine in on Sunday. All went well.

Pictures:

Last minute engine prep: install remote oil filter adapter, etc.

Torque converter installed.

Install block plate and flex plate.
 

Attachments

  • EngineInstall1.JPG
    EngineInstall1.JPG
    84.2 KB · Views: 889
  • EngineInstall2.JPG
    EngineInstall2.JPG
    90.2 KB · Views: 942
  • EngineInstall3.JPG
    EngineInstall3.JPG
    72.9 KB · Views: 893


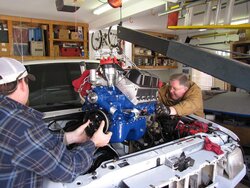
Pictures:

Aligning and dropping it.

The assembled 302 is longer than the opening... :(

Bolted up!
 

Attachments

  • EngineInstall4.JPG
    EngineInstall4.JPG
    80.8 KB · Views: 896
  • EngineInstall5.JPG
    EngineInstall5.JPG
    100.6 KB · Views: 1,076
  • EngineInstall6.JPG
    EngineInstall6.JPG
    94.1 KB · Views: 1,125


Since the engine is now together and installed, I am going to continue the conversion process in my build thread: link.

Continuing at post 257 - page 13 if your browser is set to forum defaults.


Yes, I am.

There are so many little things to do...

I hope to have it running in a couple of weeks.


no need to shoe horn. ive put a 351 in a 87 model ranger and a 302 with all air cruise and whole 9 yards in a 94 splash. its all straight forward. only real mods are you have to use a external electric fan that pulls air in. wont fit in engine compartment and you can use the factory manifolds but you need an experienced welder that can reroute the number 1 primary on drivers side around the steering shaft. everything else is easy


Join the Elite Explorers for $20 each year.
Elite Explorer members see no advertisements, no banner ads, no double underlined links,.
Add an avatar, upload photo attachments, and more!
.


Back
Top