The Juggernaut 97 EX 5.0 | Page 4 | Ford Explorer Forums - Serious Explorations

  • Register Today It's free!

The Juggernaut 97 EX 5.0

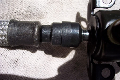
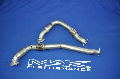
Okay a productive weekend, and some eye candy to share. The first thing i did this weekend, was the air intake replacement. say what you will, but the 5.0 likes it. it doesn't really make more noise, but it sure does breathe better. i had the air filter intake that looked like a 5 gallon bucket, with a lid. So i got my MAF adapter in,
MAF_zps84bccb6a.jpg

took the old air filter/maf apart, picked up a new spectre cone filter, and 3" coupler. and voila!!
CAI_zpsdd6eb3ab.jpg

Looks pretty good, and works very well!!


Join the Elite Explorers for $20 each year.
Elite Explorer members see no advertisements, no banner ads, no double underlined links,.
Add an avatar, upload photo attachments, and more!
.


Next was the light bar and lights.
The bar didn't come with instructions, but it didnt take a genius to assemble it.
lights1_zpsa81418b9.jpg


I then went to work, designing a way to properly mount them to the top. I went by the pick and pull, and got a cross bar slide rail, from the top of an explorer sport, and 2 sets of end caps. I cut them into 16" long sections, (not including end caps), and painted them. i wanted something to match what was already up there. a little paint, and here they are.
barmounts_zps0f8513ba.jpg

the lights only come with 4 approximately 4" long pieces of wire loom, (black), to hide the wiring. so i bought a 10 foot, roll of blue, and soldered, and heat shrink protected every connection.
You can see here how the mounts i made, work.
I also drilled wiring holes in the bar mount itself to run the wires inside the light bar supports, to hide the wiring.
lights2_zpsca725094.jpg

And here are some shots of the finished product.
lights5_zps1c085cdc.jpg

lights4_zpsb04cb319.jpg

lights3_zpsb76ef727.jpg


And a couple of nights pics.
nightlights1_zps6fc5a471.jpg

nightlights2_zps056b463d.jpg

i am very pleased with the end product. and in case you are wondering, i drilled a hole in the top, (under the bar mount rail on the drivers side to route the wires inside. i siliconed each screw hole, and the hole for the wiring. everything is completely hidden, with only 1 small switch placed inside to match the radio bezel.


after a bit of looking and debating, i think i am going to use aluminum paint, and a couple coats of clear, to make the safari rack look like aluminum, to closely match the light bar itself. the hardware, and lights are chrome, but the bar is aluminum. so we will see how that turns out.


Well a shameless post here, just another front shot.
lights6_zps6afde550.jpg


Also designed and had made a new sXc (Southern Explorers Club) decal this weekend.
sxcdecal_zpsecb8c958.jpg


And i have some more pics coming of a new front light bar, and more lights coming later today.


Okay, here is what i have. This weekend i built this......
frontbar1_zps21e29d43.jpg


I wanted a way to have front lights, i didn't need a grill guard, or even a bull bar, and i REALLY wasn't going to drill holes in my front bumper. I wanted to be able to remove my grille if needed, and keep it polished without squeezing my hand and cloth, (and polish, lol) between the front lights and the grill. so i came up with this. A couple more 6 1/2" lights.... and
frontbar2_zps92b26e15.jpg

frontbar3_zps4ab37e74.jpg

frontbar4_zps8b1c44a8.jpg

I hope you like them. i do.


No doubt on the thumbs up, Nice Work!


Love the lights! Personally I think the front end would look a LOT cleaner without that massive bug deflector, but that's just my .02


Thanks everyone. yea, but i live in Florida, and the bugs here are terrible. one season of luv bugs, can completely destroy a paint job. and the night bugs are well....... just terrible. so it does help protect the front of the hood.


Okay, here is what i have. This weekend i built this......
frontbar1_zps21e29d43.jpg


I wanted a way to have front lights, i didn't need a grill guard, or even a bull bar, and i REALLY wasn't going to drill holes in my front bumper. I wanted to be able to remove my grille if needed, and keep it polished without squeezing my hand and cloth, (and polish, lol) between the front lights and the grill. so i came up with this. A couple more 6 1/2" lights.... and
frontbar2_zps92b26e15.jpg

frontbar3_zps4ab37e74.jpg

frontbar4_zps8b1c44a8.jpg

I hope you like them. i do.

Hey man looks really good! Where did you mount the bracket for those front lights?


On the rack itself, i also welded two (down) square tubing brackets, the same hight as the small ledge on the front part of the bumper. there are two holes in the bumper there, where the lower valance attaches with plastic push clips. i drilled those hole larger, and used grade 8 bolts (overkill i know), to bolt it to those holes in the lower bumper. extremely sturdy, no rocking or bouncing, and you can bounce the front end of the ex, pushing, and lifting that bracket. very sturdy.


nice man! it looks really good


Thanks, i appreciate it. Next i am taking my roof rack back down, and modifying it. after i built it, and had it up there for a little while, i have a couple of changes i want to make to it. i should be able to start on that this weekend.


Looks great nice job


Then it was time to lose the running boards.
so i went from THIS....
publixphoto_zps0973d93c.jpg


TO THIS....
runningboards2_zps910e1daa.jpg

runningboards1_zps1add6666.jpg


With the help of this stuff!!!, i had the same problem as everyone. the "close to 20 or so, holes behind the running boards. I waited until i had a plan, before i removed them.. and here is what i came up with. Easy Peasy..
tape1_zps651636bc.jpg


After installing it, i just painted the area below it black, to match it. sweeeeet!!


CRAP, gotta re-type all this again!! arrrrgh. okay short version. Picked up a set of generic Advance Auto parts shackles made by superior. Didn't think they would be sturdy enough, (like warrior shackles). They are Galv, so i cut up heavy duty Galv, 1-1/8" pipe, and beveled for welding.
shacklecenter_zps3beff9b9.jpg

after welding, and a coat of paint.
shackle1_zps2212d7ff.jpg

2nd coat of paint an bolts,
shackle2_zps92b6fdc4.jpg

Finally decided on ford blue, and drained my diff, filled with synthetic, and painted blue to match. no pics of this yet, but soon.
Even after cranking my longer t-bolts, i still have a rake, so lift spindles coming soon.
will be re-reading Dirt Junky's thread, to prepare for that.

These gave me a 1-3/4" lift, over what i already had.


Join the Elite Explorers for $20 each year.
Elite Explorer members see no advertisements, no banner ads, no double underlined links,.
Add an avatar, upload photo attachments, and more!
.


That light bar and rack looks awesome! Where did you get the lights from? Also I made my own rear shackles cost about $20 if you want to check out the thread I made on how to make them


Back
Top