1956 F100 Explorer Chassis Swap | Page 8 | Ford Explorer Forums - Serious Explorations

  • Register Today It's free!

1956 F100 Explorer Chassis Swap

Great project truck - it'll be worth the work !

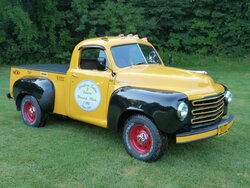
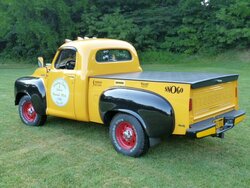
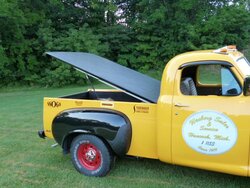
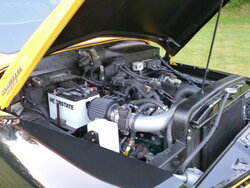
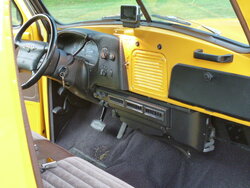
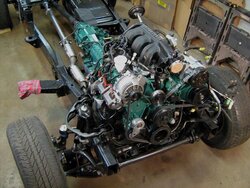
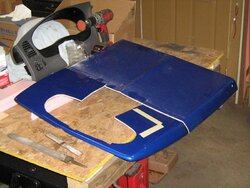
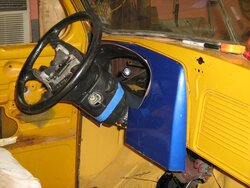
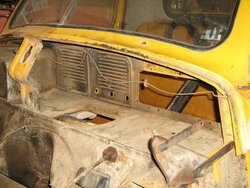
I've enjoyed reading thru the posts , and it's clear that many others have an interest in using the Explorer chassis under different vehicles. I found a '96 Explorer with 61,000 miles , that had been sideswiped by a semi while parked on a city street. Damage all high on the body. Saved it from the crusher ! Then placed a Studebaker body, with 64,000 miles on it, onto the Explorer chassis. Hardest part was sorting out the miles and miles of Ford wiring ! Had to use 1.5" wheel spacers to get the track out wide enough. This truck drives and handles like new.

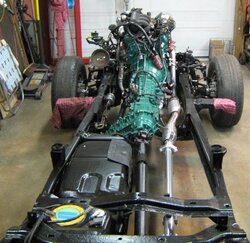
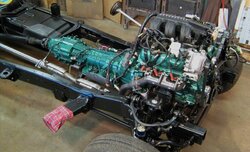
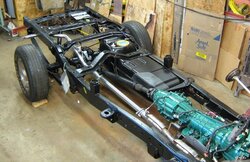
If you guys are interested , I can also post pics of the chassis after it was restored, but before the body was placed on it. Just don't know if the interest is there ? Thanks - Best of luck to you.
 

Attachments

  • 5.JPG
    5.JPG
    107.7 KB · Views: 2,235
  • 1.JPG
    1.JPG
    108.9 KB · Views: 2,126
  • 12.JPG
    12.JPG
    105.6 KB · Views: 2,040
  • 10.JPG
    10.JPG
    154 KB · Views: 2,469
  • 14.JPG
    14.JPG
    100.7 KB · Views: 2,330
  • 15.JPG
    15.JPG
    154.5 KB · Views: 2,090


Join the Elite Explorers for $20 each year.
Elite Explorer members see no advertisements, no banner ads, no double underlined links,.
Add an avatar, upload photo attachments, and more!
.


If you weren't so far away, I could help you out with your truck/trailer dilema. I actually have family in Arkansas, ironically enough, they are up here for the week for Thanksgiving.

I appreciate that! I'm very excited to do it myself and then have the equipment for the future, maybe by my next project, I will be able to use this truck to haul a trailer if needed :D

Thanks, again!


Absolutely Benmar!!!! That is sooooooooo cool!!! I love the dash migration old/new. Super awesome work!

Share with us your story, pics, and whatever advice you can give. There are a lot of people who are doing/wanting to do something like this out there.


Blue Oval Studebaker

Absolutely Benmar!!!! That is sooooooooo cool!!! I love the dash migration old/new. Super awesome work!

Share with us your story, pics, and whatever advice you can give. There are a lot of people who are doing/wanting to do something like this out there.

Thanks for the kind comments. This didn't start out to be a project like this , but rather a "normal" Stude job , to become my daily driver. But , things do happen to change the path of the job.

I like to remove the body , and do the chassis first. I spent a year restoring all things on the Stude chassis, with a fresh engine, trans , and OD unit , and an updated rear axle.

On the actual day I was to start the body work , a friend stopped by to check the progress , and told me about the Explorer he saw at the salvage yard. When we discovered that both vehicles shared a 112" wheelbase , our collective minds began dreaming of how sweet it would be to have a modern chassis under a '53 truck body. That afternoon I had a wrecked Explorer sitting next to my completed chassis ! Now - what to tell the wife - eh ?

Two years later the truck was done enough to drive to the 2013 Studebaker Drivers Club Meet in St. Louis. Well, OK - please allow one bragging comment here - the truck scored a perfect 400 points in the judging , for a 1st place trophy in the Modified category , as well as Best of Show trophy ! It was a good event , for sure.

Adapting the body to the chassis was much easier than I thought it would be. The hard part was because I had never before had to deal with modern electrical thingys ! Studebakers didn't have PCM's , TCM's , and things like oxygen sensors , plus the host of other items that sniff , smell , measure , etc. If I were to ever do this again , I would use a Ford Ranger instead of an Explorer. At least all the wiring harness would have been for a pickup , instead of the station wagon as the Explorer is.

I'll try to attach some picts of the completed Ford chassis. Since there was so much involved , please feel free to ask any questions you may have. I took about 300+ photos of the job , so I should have a photo for nearly each question ! Again - Thanks. Ben
 

Attachments

  • # 5.jpg
    # 5.jpg
    110 KB · Views: 2,045
  • # 4.jpg
    # 4.jpg
    77.5 KB · Views: 2,054
  • # 3.jpg
    # 3.jpg
    89.9 KB · Views: 7,308
  • #1.jpg
    #1.jpg
    91.4 KB · Views: 2,101


The truck looks awesome! I love the colors, how clean it looks under the hood, and the dash looks incredible! :thumbsup:


That's a real nice truck Ben! Awesome job, congratulations on your wins!


WOW BENMAR!!!! I didn't expect such a detailed and admirable story and have such a super nice truck! Thank you for sharing this with all of us.

I have many questions, but I'll keep it short tonight. Tell me more about your dash, the challenges merging firewall and components, and your AC system (under the dash components.) Mainly want to know because it's where I'm at with mine... so many ways of doing this, none of which have looked like fun to me.

Thank you!


Try to answer que's !!

Hey Buddy - I don't know if you have ever looked at the dash in a 1949 thru '59 Stude truck , but the construction of the dash/ firewall was unlike any other I have seen. Some engineer convinced Stude that it would be a good idea to allow EZ access to the back side of the instrument panel if needed , so it was built so that you could see the wiring , and the rear of the gauges if you were under the hood ! Dumb idea. In the attached photos you will see how open it was , even tho I had removed my gauges in this photo. Because of the horizontal metal panel just above the driver's knees , it meant that any under dash A/C unit would not fit. More about that later.

Ok , so to keep the Ford brake pedal mechanism intact , as well as the throttle cable snap-in location , I cut away the firewall from the Explorer , and implanted it into the Stude firewall. I cut away just enough Stude material to allow the Explorer portion to fit in. BUT , I overlapped the two by about an inch all around , so I could double weld the panel in place. When done , I had the Explorer pedal panel , with the hole for the steering column as part of it , all secured and probably stronger than either was by itself!

Once the pedal part was solved , I moved up to instrumentation. I wanted to use the Explorer instruments , so when it was time to get it all operating again , it would be a plug-n-play setup for me. But where to start ? I have a neighbor that races stock cars , and I frequently dig thru his scrap pile of parts tossed behind his garage. I noticed a new fiberglass hood scoop in the pile. It was on a hood he bought from another racer , and he had no use for the scoop. I took it home , and that scoop became the starting point for an instrument cluster surround. Once I had a rough cut-out for the gauge cluster , I used scraps of insulating foam ( the pink , solid stuff ) to the shape I needed. Then I covered the foam with layers of fiberglass cloth , just like building a boat ! Soon , I had a completed fiberglass instrument panel. On the internet I found a company that sells carbon fiber material , and I used it to cover the fiberglass. I wanted a "look" that was different than one normally sees.

Back to the A/C unit: All the "behind the dash" evaporator units I have seen are designed so that the air flow is thru tubes that exit the top of the unit. From these photos it is clear that it would not work for me ! As it turns out , I have been friends for about 25+ years with the owner of Vintage Air , in Texas. I have helped him twice before bring A/C units to the market for Studebaker sedans , so I asked him about developing a new unit for the Stude trucks. It took us 2 years , and lots of trial & errors , but using my truck as one of the test beds , the unit has now been placed in the Vintage Air catalog ! The one you see in my truck is actually the last pre-production unit , so it's a 1 of 1 deal.

Anyway , the unit you see is both heat and A/C , and now is being used in many other makes of vehicles , due to it's compact size , and useful air duct design. I think you'd find the guys at Vintage Air to be most helpful in answering about any question you'd have about heat and A/C.

Here's a tip for all : Vintage Air is one of the only places you can buy the Aeroquip black rubber hose for A/C lines. It's a commercial design , so not many places will sell you this hose by the foot. But , look at info in the Vintage Air catalog on-line , and look for the page with the E-Z Clip lines and fittings. I think it's back around page 68 to 70 if I remember correctly.

This is really the best idea for DIY installations. The hoses are smaller diameter than normal A/C hoses , they bend easier and will flex a lot more , and you do not need to pay for the expensive hose crimping ! You can adjust your hoses at easy in your garage , and then using the hardware you buy for each hose end ( called cages and clips ) you really do all the hook-ups yourself. I have used this for years , and never had any failures at all.

Well , I'd better let you get back to your project ! Sorry for being so wordy here ! Have a great turkey day ! I hope the photos get on here OK. Ben


Missing photos ?

OK - I'll try again with the photos! I think it's easier to build a truck , that it is to figure out how computers work !
 

Attachments

  • donor hood scoop.jpg
    donor hood scoop.jpg
    75.4 KB · Views: 1,892
  • Dash .JPG
    Dash .JPG
    120.7 KB · Views: 1,941
  • 53 Truck Firewall IMG_0001.jpg
    53 Truck Firewall IMG_0001.jpg
    88.8 KB · Views: 1,969
  • 53 Truck Under Dash IMG_0006.jpg
    53 Truck Under Dash IMG_0006.jpg
    75.4 KB · Views: 1,886
  • Vintage Air unit.jpg
    Vintage Air unit.jpg
    46.9 KB · Views: 1,877
  • Vintage Air Evaporator in Studebaker truck.jpg
    Vintage Air Evaporator in Studebaker truck.jpg
    56.7 KB · Views: 1,898


amazing..just amazing! Cheers!


The more words and details the better, BenMar! Excellent work and transformation! Thank you for the info and happy Thanksgiving everyone!!!!!


I had some time to go back a few pages and realized that I forgot to do a couple of things. First off, I made some comments on the red paint that I tested on the cab..... only to forget that I did paint the intake plenum with it. Here are those pics.

IMG_20131121_222148_470.jpg


IMG_20131121_221952_678.jpg


IMG_20131121_222044_738.jpg


Next, I forgot to go back and add pics of the Harbor Freight coupons. I was trying to add them from my phone, that just hasn't worked out for me that well. I do use Google+, so using the pic URL's from there works much better when I get them from my PC. I haven't tried to add them to my user gallery page yet. Here is the post WITH pictures this time.

Harbor Freight has this 110lb. Pressurized Abrasive Blaster "ON SALE" for $134.99.

IMG_20131125_183025_208.jpg


I kept the coupon page that had the engine crane for only $99.99, on the same very page was THIS coupon for $89.99:

IMG_20131126_152158_925.jpg


Considering the tax savings there would be accompanying this coupon, this makes the actual price better by nearly $50!!!!! That savings can buy 50+ lbs of blasting media!

IMG_20131125_183137_800.jpg


IMG_20131125_183200_829.jpg


You don't even need the paper coupon, all they need is the code at the bottom. Check out some of the previous posts for coupons I've used as well. These are good through Dec. 22 or beyond. Enjoy!

IMG_20131126_201532_466.jpg


IMG_20131126_152216_496.jpg


IMG_20131126_152111_773.jpg


IMG_20131126_152207_437.jpg


IMG_20131126_201544_236.jpg


IMG_20131126_152116_326.jpg


Just consider this for a moment with me. I have to borrow truck/trailer to haul the cab to a shop that is no less than 5 miles away, pay $500+ for blasting this one piece. Probably have more than $1000 total to complete all the panels.... if not more.

-OR-

Buy the blaster and we'll just say 200 lbs. of media. (not sure how much this may take to do the entire truck.) I already have a compressor, hose, etc. Total cost should not exceed $250..... and I don't have to move the cab more than 20 feet from where it's at to blast it. I could then offer this service for others to help recover the cost of the equipment completely.

I think this is the route I will be taking.

I recovered from my turkey-induced coma and have more pics to post. I want to make sure all of this loads and I will get started on the newer stuff to post tonight. I'm not too far from previous posts with the coldness of the season and holiday "busyness", but every chance I get, I am finding something I can do each time I get out to the shop. Whether it is to drill a few welds, measure, organize, clean, or examine perspectives, I am moving forward even though there may be gaps in my posts.


To fit the two vehicles together mending firewall and cab, I don't want to: 1) hack it into pieces that never seals off from the engine compartment, 2) make it look like a mess by taking shortcuts, or 3) regret cutting pieces that I could have left in place for easier use or kept for rigidity and strength.

Soooo.... the plan is to cut only the floorboard where applicable and drill out the welds of the firewall and other Explorer panels that may need to be trimmed. Using the weld-remover bit, I went all the way through, in case I need to install bolts temporarily to hold in place, etc.

IMG_20131128_221933_559.jpg


I want to keep the firewall intact in case I need to use some pieces to weld to the explorer, at least the edges already match the 56's firewall sides and will make welding easier here than in the hidden areas, you'll see what I mean when I get to that point. There are a lot of welds to cut........

IMG_20131128_221527_689.jpg


IMG_20131128_225632_632.jpg


All while I'm standing over a heater. Trying not to freeze my balls off, lol.

IMG_20131128_225914_213.jpg


If you use lighting just right, finding the pinch welds can be much easier.

IMG_20131128_230537_881.jpg


IMG_20131128_234616_561.jpg


Yes, that is a lot of drilling, but I did all of this side in about an hour or so, worth the time now than extra HOURS in the future correcting incorrect cuts and patches. The other side got a small start, but I was cold, and counted many more welds than the first side.

IMG_20131129_013405_550.jpg


So, I moved on to the Explorer chassis. The inner surface from hood hinge to hood hinge (on the 56) is 54". That means the side panels need to go.

IMG_20131129_013244_474.jpg


I may use this panel somewhere, drilling out the 100 welds or so for both sides to retain the panels plus keep the inner panels from being damaged trying to cut these out.

IMG_20131129_013256_022.jpg


Next up will be just more and more drilling and planning. Wishing it were Spring, I truly HATE cold weather.


Man you need a wood stove


Hey Buddy -A couple comments ; 1 - Sure do love the picts you post - it helps us share in the pain of the project !! 2 - Your blasting efforts on the cab will need to be done carefully in test areas. Different blasting media , from different companies , works in different ways. I normally use my blasting cabinet for parts the size of a wheel , or smaller. Because of that I use aluminum oxide in a fairly aggressive grit size - usually 60 grit. Yes, it leaves a small pattern in the material , but that make a great way to get prime to stick well ! However , doing a cab exterior would not be an effort I would try unless I was using soda. There are guys that use sand , walnut shells , and all sorts of stuff , but warping the sheet metal panels is a real worry. To be honest , I would not even try to blast a whole cab , or a whole roof on a sedan , for example. For the last 8 or 10 vehicles I have done , I used a D/A sander with a vac attachment , and use 80 grit paper to remove the old paint. If the paint is thin , I can get by with 120 grit paper. Harbor Freight paper is crap , so forget that right away. If you buy good quality paper , it will last , and the job will move along quickly - and without warping any panels. 3 - If you chose to blast the cab , have you thought of a way to collect the used blasting media ? When I see guys blasting outside , it looks like about 50 % of the material drifts into the neighbor's back yard !! It's not something you can rake up from the lawn ! 3 - working over the heater to preserve the "Family Jewels" made me smile. If you have any sort of insulation in your shop building , maybe you'd do like I have done in my last 3 shops ; I buy and install a 6 foot electric baseboard heater from Menards. My advantage is that I have no worrys about an explosion when I have paint mist & vapors , or laquer thinner vapors. I figure the lights and heat , plus compressor use and welder use , average about $25 / month added to the electric bill. I am in Iowa , so it's plenty cold here now also. OK - enough for now - lets' get back to work !!! Cheers - Ben


Hey Ben, thanks for the comments and advice! I am planning on using soda on the parts that are in good shape that just need to be stripped, glass beads on the rougher areas. Definitely doing test areas to ensure I'm not warping anything. I got several sheets of various sandpaper from 80-1200 grit ready to go.

Luckily, with an acre of land and just woods surrounding me, I have absolutely no neighbor worries. The only things are lack of power and insulation. As you see in the background of my pics, I've only got a quarter of my shop insulated, and all the heat escapes as soon as it comes out of the heater. Funding is the main reason for this set back, especially this time of year and with three kids.

The power issue I have is poor planning on the power to the shop, there wasn't any when I bought my place. I buried heavy duty 110v wiring, expensive enough, I should have spent the extra to run 220v, just didn't think I might ever need it. That was a few years ago. When the compressor runs, the breaker trips when I'm running lights and heater. Can't wait to see what happens when a welder is added to the equation. I'm going to change out the breakers for more amps without tripping for a start.

Money doesn't buy happiness, but it would build a bigger, better, and warmer shop! That and more car parts! :p

Thanks again Ben for all the advice!


Glad to see that the cold hasn't stopped your progress:chug:


I'm a bit obsessive with saving money with cheap tools and accessories from places like harbor freight. The quality is not always up to par, but for the money and amount of times I may use a particular tool, it saves me money. Many of my hand tools I prefer to use are Snap-On, Mac, Matco, etc. but they are 10-20 times as expensive. You will feel the difference in the quality immediately, but if you are not a professional builder/mechanic, cheaper tools can still get the job done.


Buddy - You are right , in that considering the cost vs. usage , many Harbor Freight items will work just fine. I'd be willing to bet that there are more guys have Harbor Freight things in their shops that they are willing to admit !!

As I'm writing this , about the only thing I can think of that I was disappointed with was the sand paper. That was because the quality control on the grit seemed to be off. Now , probably down in the 80 to 120 grit range , it doesn't matter much. But when I am wet sanding the finished color with #1500 paper , I need to count on the same grit on each sheet of paper.

I've had things like my 12 ton press , and hydraulic jacks for years , with no problems. Big pluses are the 4" angle grinder disks they sell - can't be beat anywhere I have found.

Best of luck with your power issue - been there also ! But you are doing a great job , and keep up in the loop with photos ! Take care - Ben


Join the Elite Explorers for $20 each year.
Elite Explorer members see no advertisements, no banner ads, no double underlined links,.
Add an avatar, upload photo attachments, and more!
.


Get a steel drum with the lid and a stove kit , ace hardware has one for $50 , and maybe $30 bucks of pipe, its cheap heat that will actually keep you warm and take some slack off your electric bill and breakers


Back
Top